Sunday, September 25, 2011

Interchangable Magnetic Necklace

Pin It

I've had some fun making magnets or necklaces using Diamond Glaze and scrapbook paper (or photos)--so why not combine the two? A co-worker had some earrings that had the same premise (although fancier than a bottle cap) that I used as inspiration. Now I can switch out my necklace depending on my mood or outfit :)

You'll need:

Bottlecap necklace blank (Hobby Lobby)
Round magnets
Diamond Glaze
Patterned paper or photo


This was a super fast, super easy project (and very inexpensive--the magnets were 1.99 for 6, but I had a 40% off coupon and the bottlecap necklace was on sale for 4/$1). I looked at some other necklace blanks that were flat, but I was concerned that the magnet could get knocked off.


First, find the scrapbook paper that you like and roughly cut out a circle a bit larger than the magnet. Flip the piece of scrapbook paper upside down and spread a thin layer of the Diamond Glaze (you could use any glue here, but to keep things simple, I just use the glaze). Press the magnet into the glue. Let it set for about a minute, then use scissors to trim around the edges.


Make sure you don't have any excess glue dripping down and flip the magnet over so that the paper side is now up. Puddle some Diamond Glaze on top of the patterned paper and smooth out (I use a bit of cardstock, or in this case packaging from the bottle caps) as a spreader. Go slow and make sure that you don't have any air bubbles. Careful, if you are doing more than one pendant at a time, keep them apart--if two magnets with wet Diamond Glaze get close together...not so good (not that I learned that the hard way or anything). Let dry for a couple hours (or overnight).


Thread a chain through the bottlecap and decide which magnet to pop in! That's it :) Try it out for different holidays (or make an advent necklace!) or to switch up between favorite sports teams or your school mascot.

Washstand Repaint

Pin It
I ran across this sturdy table at a thrift store and decided I could probably put it to use. After scrubbing, I debated whether or not to leave it stained or painted. It was pretty rough, so I tried some wood restorer that did wonders on another project...but it didn't look right on this project. So, paint it is. That $3.00 sampler of Martha Stewart teal paint sure has gone a long way (this is project #3).

Before:


A couple coats of paint. Then some sanding (all the paint covered up some of its "character"). Then I used some chocolate brown glaze to tone down the color and emphasize some of the dings and dents. Really, it turned out great.


I haven't found a permanent place for it yet. I've got some ideas, like as a storage station for a basket of socks, or as a stand for drinks at a party, but right now its a charging station for my iPad.

Friday, September 2, 2011

Metal cabinet repaint

Pin It


I work in a cubicle. A gray cubicle. I do have a window, which is great, but my view is of the wall of the other building. Oh well. So, in my gray cubicle is a metal cabinet that I thought could use some sprucing up! So, I hauled it home and went to work on it.


First, I used my sander to scuff up the surface then I washed it really well and dried it. I took the doors off and the hardware and used painter's tape to cover the brand name label (Steelcage) on the bottom. I used Krylon Fusion paint in Hot Pepper. It took about 1 1/2 cans. I did not paint the inside, so I used some newspaper to cover up the door track and block overspray from getting inside.

After I let it dry (had to go grab it out in the yard in the middle of the night when the thunder storms were threatening-ha ha, me in my PJ's dragging it back into the garage) for a couple days I got to getting the vinyl ready. I had a hard time deciding what to do on the doors. I thought about quatrefoil, or intersecting circles or maybe some typography or even scientific formulas (since I am a science nerd for work)--but things are always a bit crazy around my office with huge projects, tight deadlines and low funding, so this one seemed most appropriate. I measured the space on the door (decided that I'd just do one door, 2 seemed like overkill) and left space at the top, bottom and sides for the tracks. I planned it out in my Silhouette software and let it cut while I waited for the cable man to show up (yup, 15 minutes before his 2 hour window was up, he came. Typical). I used a yardstick and chalk to mark my lines.


So it adds a nice pop of color to my office (I should probably work on getting the piles of papers taken care of, but oh well). I love the transformative power of spray paint!


Tuesday, August 23, 2011

Mailbox Re-do

Pin It
I'm lucky enough to live in a neighborhood where our mailboxes are up on the house. Mine drops right into the garage, which is very convenient and secure--but the brass mail slot cover has never been pretty. I can't believe how long I lived with it! Many times I've eyeballed new boxes, new covers. I guess either I couldn't find what I wanted or didn't want to pay for what they cost. So, I removed the 4 screws holding it in place, sprayed it with gray primer then a spray of Rustoleum black satin. I made up the vinyl decal on my Silhouette (its only about 2 inches). Even the junk mail will look better with this mailbox.


Really, this project took all of about 10 minutes of work time (maybe 15 if you count the time the Silhouette was running)--plus overnight drying time. I had to find something to do last night because my internet was down!


Monday, August 15, 2011

Transfer books on CD to iPod

Pin It


I thought I'd do another technology post! This time its about transferring your collection of Books on CD to your iPod (It is legal to do this for discs you already own). It seems like it should be just as easy as importing a music CD, but you don't want iTunes treating a book the same as a music CD. A book on CD generally has several CDs, each broken into multiple tracks. To make listening to the book easier, you want to be able to group the tracks together, make it so that your iPod will remember where you last stopped the book and save it as an AudioBook so that it shows up in the book library and not the music library.

1. You need to change some iTunes settings before you begin (remember to switch them back when you are done). (iTunes-Preferences-General-Import Settings-AAC and Spoken Podcast, OK)


2. Pop in the first disc. When iTunes asks if you want to import the disc say NO--you have some stuff to do first.

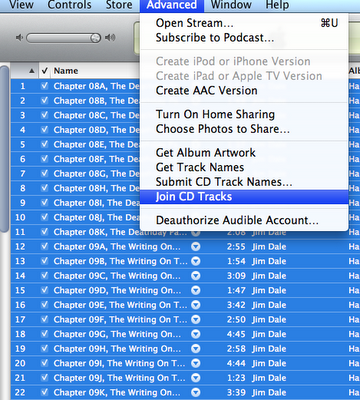
3. You need to group all the tracks on the CD into one big track. Highlight the first track, then hold down the Shift button while you highlight the last track. This will highlight all the tracks. Click the Advanced menu and choose Join Tracks. Now instead of a disc with 15-20 tracks, you have just one...much easier to work with-you'll know it worked because there will be a bracket along the left side of the track titles (and everything shifts a bit to the right).

4. Now you can click on the Import CD button in the bottom right corner. It will probably take about 10 minutes per disc.

5. Next you should change the album info and the easiest way is to go to the Recently Added section and right click on your recently added disc and choose Get Info. On the Info Tab, I like Artist=Author and Composer=Narrator. I also put the disc number in the title (so that when I see the list of 8-12 discs, I know which one is which). You can ignore the track info. Make sure that Spoken & Audio is the type.

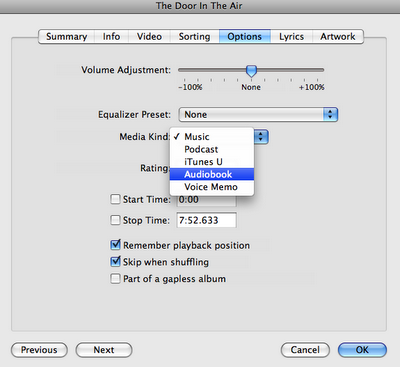
6. On the Options tab make sure the Media type is audiobook and that the boxes for Remember playback and Skip when Shuffle are checked (that way the iPod can start right where you left off, and it won't ever dump your book into your random music shuffle). I also like to add album art on that tab, but you can skip it.


7. Now you repeat the process for each of the discs in the book.

8. Don't forget to set your iTunes back to the Music CD settings!

So, it took about an hour or so for an 8 disc book, but now I can listen to it while I'm on the treadmill. Yay, I'm always looking for ways to make the treadmill more fun.


Sunday, August 7, 2011

Hallway Gallery and Repaint

Pin It
Why does even the smallest painting project seem to take over the house and take so LONG? I've been in my house for almost 9 years and the hallway is the only spot left that I have never painted (mostly because I didn't have the right kind of ladder to get up to the top of the stairwell). Well, I've had the right ladder for at least 3 years, so I can't use that as an excuse anymore.

Before:


The prep for painting takes so long! I re-textured the ceiling first and painted the ceiling. Then I got the walls painted in Sugar Wafer by Kilz (sadly, Walmart no longer carries this brand of paint, so I had it color matched at Lowe's). Of course, I had to repaint all the trim and door casings (I resisted the "while you're at it...." temptation to replace the casings to match the ones I did last year in my living and family rooms...but its on the list now). The hinges on the cupboard doors had been painted too many times to really work right, so I used a spray on paint stripper and cleaned them up. I then sprayed them with primer and some black spray paint and they look brand new and cost me nothing.


Most folks probably wouldn't notice much difference in the before/after, but I sure do! And, after a couple weeks I started working on my photo gallery wall that I've been wanting to do forever!


For the photo gallery I didn't want to put nail holes in my newly painted walls, so I used the Command Picture Hanging Strips--and that was slick! The strips say one will handle up to .5, so I used just one on the smaller pictures and 2 on the larger ones.


I uploaded some of my favorite vacation photos to Costco and printed them in black and white. I also spent WAY too much time weeding and placing vinyl on my knock off of a Ballard Design sign. Check out Infarrantly Creative's laundry version at http://www.infarrantlycreative.net/2010/09/ballard-inspired-laundry-sign.html . I think I spent about $7 in photos and the frames were .95-3.95 each, so less than $15. The canvas was a DI find that I repainted. The good news is that there is still space for more photos, so I guess I better get traveling.


Thursday, August 4, 2011

Quatrefoil Jewelry Box

Pin It


I have been itching to do a fun painting project and I found the perfect inspiration in this photo of storage boxes. Don't you just love these boxes. I am a HUGE fan of that color of green, if I were to spot them at my Home Goods store, no doubt they would come home with me.


http://tracizeller.com/blog/2010/fabulous-and-frugal-a-visit-to-homesense/

I had picked up this jewelry box at a thrift store and hoped to do something fun with it! Ta-da--Quatrefoil jewelry box in Tiffany blue and silver :)


Before: First, sanded it up and washed it.

The jewerly box top veneer was in pretty bad shape, so I used some 1/8" hardiboard to cut a new top (its thin enough that a straight edge and utility knife were enough to get the cutting job done). Glued it up with wood glue and placed a heavy box on it overnight to dry.


Next, I used Kilz gray primer (used a foam brush), 3 coats and then 3 coats of some leftover turquoise paint, mixed 1/2 and 1/2 with white semi gloss (the Turquoise is a Martha Stewart called Aruncana Teal). I used my Silhouette to create a stencil of the quatrefoil pattern.

I took my time and stenciled the top and sides with silver paint.


So what do you think? The drawer has lots of curve and so I skipped stenciling it...and I'm still thinking about doing a bit of distressing/glazing.