Pin It
I love dinner out on the grill! It keeps your kitchen from getting hot, especially when it was already 95 degrees outside. This is a pretty fast dinner, especially if you take shortcuts like me and use store bought dough and sauce.
Lucky me, my basil is growing really well, so I picked it right out of the container.
Ingredients
1 pkg pizza dough (I got mine at Winco)
1 bottle sauce
fresh mozzarella, sliced
fresh basil
Hot pepper flakes, opt
Olive oil
First, divide the dough into 4 equal pieces. Use some flour on the counter and shape each piece of dough into a pizza round. Place each crust between floured pieces of plastic wrap and let rest/rise while you get the ingredients ready (I put mine out by the grill while the grill was preheating--about 10-15 minutes).
Preheat the grill with the lid closed on high.
Slice the mozzarella and clean and dry the basil ( I julienned mine since the leaves were large).
Use a folded paper towel dipped in oil and a pair of tongs to grease the grates on the grill. Brush one side of the crust in oil and place oil side down on the grill (I turned the grill down to medium at this point). Keep an eye on the bread, it will take 3-4 minutes on one side. When you are ready to turn it over, brush oil over the top and then flip.
Immediately start spooning on the the sauce on the crust, then top with the cheese. Close the lid on the grill for a minute or two to let the cheese get all melty and delicious. Sprinkle with basil and pepper flakes. Use the tongs to pull the cooked pizza onto a waiting plate.
Friday, July 29, 2011
Monday, July 25, 2011
Chalkboard Coasters
Pin It
I was out at Market Square here in SLC a couple months ago (if you haven't been there, its an experience for sure, 1600 Empire Road) and saw these packages of 100 coasters for .99 --I didn't know what I was going to do with them, but I brought them home anyway.
I'm still thinking about other uses for them, but for now, I just made them cuter :)
I used gray spray primer on one side, then a couple coats of chalkboard paint.
On the other side I used spray adhesive to attach some leftover scrapbook paper.
So, not a particularly revolutionary use, they'll come in handy for a summer BBQ, but I suppose they could be mini-chalkboards to keep kids entertained.
Friday, July 22, 2011
Dad's Homemade Salsa
Pin It
My family loves salsa. I can remember coming home from church on Sundays and immediately digging into a bag of chips with salsa, if you were slow getting home, you were out of luck! My dad now makes this salsa (he won't even eat bottled salsa anymore) and you can whip it up in about 5 minutes, so try it out!
Ingredients
1 can of diced tomatoes with green chiles
1 can diced tomatoes
1-2 jalepenos, seeded and roughly chopped
1 small onion, roughly chopped
1 sm bunch of cilantro
1 lime
I'm lucky enough to have cilantro growing in my garden this year, so I used it. I didn't have a lime in the fridge, so I used lime juice (about 1 T). Open the cans of tomatoes and dump them into the food processor. Chop the onion into big chunks (just so that the food processor can get the job done faster). If you like spicy salsa, use more jalepeno, but it tends to get hotter the second day, so I go easy. Wash the cilantro and put in the processor.
Once everything is in the bowl of the processor, put the lid on and pulse it until you get to your desired "chunkiness." Make sure you have some chips on hand, this stuff is tasty :)
Wednesday, July 20, 2011
Step Stool Rehab
Pin It
First, I cannot find my "before" picture. I know I took one, and I know I've seen it, but I don't know where I filed it, so this one is as close as I could find (mine was in about the same sad shape, but the supports were white rather than red). When I track it down, I'll replace the picture.
I picked up 2 Cosco step stools at a yard sale for $1 each, one was more modern and in great shape, the other one, it had been well-used and but not well cared for--but it reminded me of one from my grandma's house (although hers had a seat that flipped up). So, I brought them home.
First some washing with water and dish soap to get rid of the grime and spider webs.
Next, some steel wool and WD-40 on the rust spots on the chrome.
Next, some more steel wool on the painted sections to get rid of the rust.
I took off the old vinyl and kept it as a pattern for the new vinyl (the wool batting seemed just fine, so I kept that).
I took out all the screws/bolts so that I could prime and spray paint all the white pieces without having to worry about getting paint on the chrome or seat. I used a couple coats of gray primer, then 2 coats of Rustoleum white enamel spray paint.
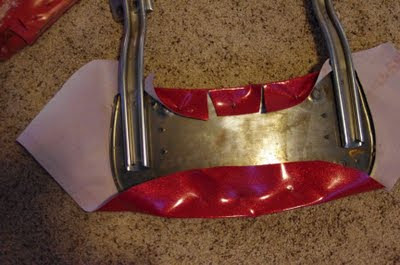
Replacing the vinyl on the chair back turned out to be very easy (I found the sparkly red vinyl at JoAnne's in the Red Tag area on sale for $5 a yard, and I only bought 1/2 yard and didn't use all of it). I laid the old seat back on the new vinyl and cut out a football/oval shape with plenty of extra around the edge. The seat back had sharp hooks on the back to grab the vinyl, so just pull it tight (do opposite sides, then move to another set of sides, etc...until you've done the whole thing).
The vinyl on the seat was tricker. It didn't have the hooks, so I ended up using hot glue to get the vinyl to stay in place until I could connect it back to the seat support. Worked great.
Putting it all back together probably would have gone better with an extra set of hands, but I managed by using my head and shoulders and a fair amount of balance to get it done. Ta-da!
Sunday, July 17, 2011
Rhubarb Crisp and Homemade Strawberry Ice Cream
Pin It
Ingredients
Opt: 1/4 C. strawberry puree plus some sliced berries for texture (I used some fresh freezer jam and some berries instead).
Happy National Ice Cream Day! To celebrate, I used more of those tasty garden strawberries in some home made ice cream. I'm a fan of Cook's Illustrated magazine (and their TV show, America's Test Kitchen) because they tell me WHY I need to prepare a recipe a certain way. The scientist in me just wants to know why. This ice cream recipe is a custard style and it substituted some of the sugar with corn syrup to help reduce the ice crystals that usually form in home made ice cream. I have to say, it works, but it isn't a fast recipe (I mixed it up in about 15 minutes, but then you need to chill it and strain it before you freeze it). Haagen Daaz, watch out!
I know most people love the combo of strawberry rhubarb crisp/cobbler, but I don't like my strawberries all cooked and soggy, so I decided to try out this Taste of Home magazine recipe and used the version that had rhubarb and apples (and saved the strawberries for the ice cream). Tasty stuff. Mix the ice cream and the crisp together and YUMMY!
Both recipes and instructions are below.
Rhubarb Crisp
Quaker Oats Recipe
- 3/4 cup sugar
- 3 tablespoons cornstarch
- 3 cups sliced fresh rhubarb or frozen rhubarb, thawed
- 2 cups sliced peeled apples or sliced strawberries
- 1 cup quick-cooking or old-fashioned oats
- 1/2 cup packed brown sugar
- 1/2 cup butter, melted (next time, I'd use 1/4 C.)
- 1/3 cup all-purpose flour
Directions
- In a large bowl, combine sugar and cornstarch. Add rhubarb and apples or strawberries; toss to coat. Spoon into an 8-in. square baking dish. (I doubled the recipe and used my 5 qt casserole)
- In a small bowl, combine the oats, brown sugar, butter, flour and cinnamon until the mixture resembles coarse crumbs. Sprinkle over fruit. Bake at 350° for 45 minutes or until bubbly and fruit is tender. (my doubled recipe baked for 65 min). Serve warm with ice cream if desired. Yield: 8 servings.
Premium Vanilla Ice Cream
Cook’s Illustrated, July./Aug 2011, Pg 23
1 vanilla bean (or 1 tsp vanilla or vanilla bean paste)
1 ¾ C. heavy cream
1 ¼ C. whole milk
½ C. plus 2 T sugar
1/3 C. light corn syrup
¼ t. salt
6 large egg yolks
1. Place an 8 or 9 inch square baking pan in the freezer to chill. Cut vanilla bean in half lengthwise and scrap out the seeds. Combine vanilla bean, seeds, cream, milk ¼ C. plus 2 T sugar, corn syrup and salt in a medium saucepan. Heat over medium heat, stirring occasionally until steaming steadily and thermometer reaches 175. Remove from heat.
2. While milk is heating, whisk yolks and remaining sugar in a bowl until smooth, about 30 seconds. Slowly whisk 1 cup of the heated milk mixture into eggs, then pour all of egg/cream mixture back into the saucepan. Cook over medium heat until thermometer registers 180 and mixture has thickened slightly. Immediately pour mixture into a large bowl and allow to cool 10-20 minutes. Transfer 1 cup of mixture into a small bowl and cover both bowls with plastic wrap. Place large bowl in fridge and small bowl in freezer. Cool at least 4 hours or overnight (small bowl will freeze completely).
3. Remove custards from fridge and freezer. Scrape frozen custard into the bowl of refrigerated custard and stir until smooth. Strain custard through fine mesh sieve (Note: If using regular vanilla instead of vanilla bean, add it now). Transfer the mix to the ice cream freezer immediately. Churn until it resembles soft serve and is about 21 degrees (add the strawberry puree in the last 30-60 seconds). Transfer to the chilled baking dish, press plastic wrap onto the surface of the ice cream and freeze for about 1 hour.
4. After about an hour, transfer ice cream to an air tight container, pressing firmly to remove air pockets. Freeze until firm, about 2 hours. Keeps about 5 days.
Wednesday, July 13, 2011
Green Chile Turkey Burgers
Pin It
Tired of the usual grilled hamburgers? Try these very tasty (and pretty nutritious) turkey burgers!
Ingredients (for 4 burgers)
1 lb ground turkey
1 can chopped green chiles, drained
1 tsp. salt and pepper
wheat hamburger buns
toppings: pepper jack cheese, avocado, lettuce, red onion, whole grain mustard
Mix the turkey and green chiles, salt and pepper. Form into 4 patties. The mixture is very soft, so form it on pieces of wax paper (if you have time, either freeze or refrigerate before cooking just to make it easier to handle). If you don't freeze first, then take the burgers out to the grill on the wax paper and just flip upside down onto the grill and pull off the wax paper.
Cook burgers on the grill just like you would regular burgers (make sure you oil the grill grates first. Since the turkey is lower fat, it may stick if you don't).
I top mine with pepper jack cheese, avocado, red onion and lettuce along with whole grain deli mustard and sometimes mayo. I've even been known to grill some pineapple rings and add those and some pickled jalepenos. Very tasty served with sweet potato fries on the side.
Fancied Up Notebooks
Pin It
Back to School will be here in just a few weeks (I know this very well since I go back to work before the teachers do...boo!) and the school supplies are showing up in all stores sales ads. Here is a fun way to jazz up a boring notebook. You could title the front "Journal" or put a fun quote on it. I used leftover scrapbook paper (turns out I much prefer scrapbooking via Snapfish), .25 cent notebooks and some ribbon from my fabric box. This would be fun on the mini size composition notebooks too. Great for students, or keep one for you to keep track of projects you want to make, or put it with your church stuff!
Supplies
1 composition notebook
2 pieces of paper for the front and back
1 piece of contrasting paper for the spine (optional)
1-1.5 yards of ribbon
Spray adhesive
I don't know how uniform the sizing of composition notebooks are, so you should probably measure yours before using my sizing.
Place a piece of paper inside the front cover with the top edge lined up and the left edge lined up along the black tape binding. Trace around the edges lightly with a pencil and cut out. Repeat for the back cover (it SHOULD be the same, but sometimes they are off just slightly). This will give you just the right size to cover the front of the notebook, leaving the black binding exposed.
If you want to cover up the binding you'll need to cut a rectangle about 3 1/4 in x 9 5/8 in. I tried covering the binding with the exact same size as the black tape, but it kept coming unglued, so I tried covering the binding first, about 1 inch wider on each side than I needed. This worked much better. You could just leave the black binding if it goes with your color scheme.
Print up and labels or quotes you want to put on the cover.
I used spray adhesive to first attach the binding cover (do a dry run first). Spray both the back of the paper as well as the notebook binding. Place the paper on the spine, then roll the spine to get the paper to adhere (that way you won't get any creases).
Now attach the front piece, lining up with the top of the book as well as the original black tape, again spraying with adhesive and repeat for the back (I recommend that during the dry run you mark the paper so you know which edge is the top).
Glue on any labels.
To add the ribbon, use a hole punch to make a hole at both the top and bottom of the back cover. I liked mine about 2 inches from the right edge and as far down from the top that my punch would let me go. Thread ribbon through and tie off. I used 1 yard of ribbon, but I wish I had had just a bit more.
Monday, July 11, 2011
Fresh Strawberry Pie
Pin It
Need a fast dessert that won't heat up your kitchen on a hot summer day? Try making a fresh strawberry pie! You can make your own regular pie crust (which I have given up trying), you could use a box pie crust mix (like Krustez or Betty Crocker) or you can use a pre-made graham cracker crust. I took these ingredients with me up to the cabin for the 4th of July for a yummy summertime dessert.
Ingredients
1 9-inch pie crust
1 pkg Danish Dessert, Strawberry (Junket brand...found on the Jello aisle, usually on top shelf)
1 3/4 C. cold water
4 C. sliced fresh strawberries
If you are lucky like me and have a strawberry patch that is doing amazing things, go get some berries, wash, hull and slice them (or at least cut them in half so that they are nice bite size slices).
In a small saucepan combine the cold water and Danish Dessert mix and cook over medium heat, stirring constantly. Bring to a boil and boil for 1 minute.
Pour the sauce over the berries and gently mix. Pour into the prepared pie crust. Refrigerate for at least 2 hours (I prefer to not leave overnight because the berries start to get soft).
Top with whip cream if you like! Super tasty and inexpensive (strawberries...free, Danish Dessert $1.34 and crust, $1.19 at Walmart).
Thursday, July 7, 2011
Strawberry Freezer Jam
Pin It
I love fresh strawberries. I've tried several locations and types of plants and not succeeded in growing them until I finally planted them in my front yard! I have too much shade everywhere else, so I created a patch along my driveway. This is year 3 with my plants (year 1 was bare-root, June-bearing plants from Gurney's), year 2 gave me just enough berries to eat with my cereal, but this year, ah, I've had enough to make pie, to snack on, to serve with shortcake and today, freezer jam! I'm still getting more berries, so maybe strawberry ice cream is next! I may even make more jam and put it away for Christmas gifts for friends!
1. Wash the berries, cut off the stems and any icky parts and slice up the berries.
2. Use a potato masher or fork to crush the berries (use a wide bottom bowl or pan and only mash up 1 cup of berries at a time). You will need 2 cups of crushed berries when you are done.
I love fresh strawberries. I've tried several locations and types of plants and not succeeded in growing them until I finally planted them in my front yard! I have too much shade everywhere else, so I created a patch along my driveway. This is year 3 with my plants (year 1 was bare-root, June-bearing plants from Gurney's), year 2 gave me just enough berries to eat with my cereal, but this year, ah, I've had enough to make pie, to snack on, to serve with shortcake and today, freezer jam! I'm still getting more berries, so maybe strawberry ice cream is next! I may even make more jam and put it away for Christmas gifts for friends!
When making freezer jam, it is so much faster and easier than cooked jam (and as a bonus it doesn't heat up the kitchen) and I prefer the fresh berry taste of freezer jam. You can use whatever brand of pectin that you prefer, but just be sure to follow the package instructions EXACTLY. I usually treat recipes as general guidelines, but not with jam. I measure, I level, I time...everything.
Ingredients
1 pkg Sure Jell pectin
1 quart fresh strawberries
4 cups sugar
1. Wash the berries, cut off the stems and any icky parts and slice up the berries.
2. Use a potato masher or fork to crush the berries (use a wide bottom bowl or pan and only mash up 1 cup of berries at a time). You will need 2 cups of crushed berries when you are done.
3. Pour the berries into a large mixing bowl.
4. Carefully measure 4 cups of granulated sugar into a separate bowl (use a knife to level off the sugar exactly).
5. Pour the measured sugar into the berries and mix it up. Set the timer and let the berry mix sit for 10 minutes. Stir occasionally.
6. Now mix the Sure Jell with 3/4 C. of water in a small saucepan. Bring to a boil and boil for 1 minute. Stir constantly.
7. Pour the hot pectin into the berries while stirring. Stir for 3 minutes to make sure all the sugar gets dissolved.
8. Pour the jam into five 1 C. containers suitable for the freezer (I used 1/2 C. mini-plastic containers since I only need a small jar of jam at any given time).
9. Leave the containers of jam on the counter for 24 hours to set, then refrigerate or freeze.
*These directions are based on using the Sure Jell brand pectin, your directions may vary if you use a different brand.
Subscribe to:
Posts (Atom)