Showing posts with label Canning. Show all posts

Wednesday, January 7, 2015

Bottling Grapefruit

Pin It

I ran across a Pin one day while looking at "Popular" pins and found a fun blog that had lots of canning and preserving instructions.  The post that interested me most (at the moment) was the bottled grapefruit.  I like grapefruit.  Even as a kid I liked it--provided it had a lot of sugar on the top.

I really enjoy the fancy grapefruit in the glass jars from the grocery store that have all the membrane removed--but its usually over $3 a jar, so I don't buy it too often.  Today, looking at the grocery ads, a small store had grapefruits on sale 5 for $1.  I stopped by and picked up 20 fruits (each were about a pound) for just $4 and tried out home canning of grapefruit.

When you peel and de-membrane the fruit, you lose a lot of volume.  I did 10 fruits and got 4 pints of finished product.  It took me about 40 minutes to peel and prepare the fruit.  I thought about doing the other 10 fruit on the counter, but I think I'll just eat them fresh--but it was a fun project for an evening.

Supplies
Grapefruit
Sugar
Water
Canning jars with new lids and bands
Sharp knife!
Water bath canner
Funnel

Prepare the fruit
I used my sharp santoku knife to slice away the peel and pith.  Then I sliced as close along a segment's membrane on both sides and popped it out of the fruit.  Do this over a bowl since it will be juicy and slurpy.  Put the prepared fruit in a bowl and try to keep out the seeds.


Sugar syrup
You can make it more or less sweet.  I used 5 cups of water and 1 3/4 cups of sugar (which was about twice the syrup I needed for my fruit).  Mix the water and sugar in a pot and bring it to a boil.


Add the fruit to the jars and then pour the hot sugar syrup over the top, leaving about 1/2 inch of space at the top of the jar.  Use a knife to slide around the edges of the jar to get rid of any air bubbles).  Wash the rim of the jar off and put on the lid and band.


Process the fruit
Put the hot fruit-filled jars into the water bath canner and bring up to a boil.  Once its boiling, process for 15 minutes (I live above 4,500 feet).  Pull the jars out and set on the counter.  The lid should have "sucked down" and not make any noise when you push on it--otherwise the seal didn't work and you'll need to keep the jar in the fridge and use it first.


Since I already had jars and sugar, I got 4 pints of grapefruit for $2, so much better than the $3 at the store-and I enjoyed a couple episodes of Big Bang Theory while I was at it!

Monday, July 28, 2014

Apricot Habanero Jam

Pin It
Saturday I was headed to the Big Orange Box store for the 3rd time for a yard project when I drove past a house at the end of the street with a sign that said "Free apricots" with a ladder all ready to go in the yard-sweet!  I stopped by and knocked on the door and the gentleman who lived there was happy to have the fruit go to a good home.   It was great to chat with him while I picked about 2 grocery bags of apricots.

I knew I was going to make some jam, but I wanted something more interesting than usual.  Some searching around the internet and I saw that adding in peppers was popular.  That sounded great.  I've done jalapeno jelly before and it was tasty.  I pulled out my Ball Canning book (the blue one) and saw that the recipe for regular apricot jam didn't call for pectin. Hmmm, I haven't done that before, so I hedged my bets and used 1 package of liquid pectin during the last 1 minute of cooking. Just in case.

Ingredients
8 cups apricot puree (about 12 cups of whole fruit...maybe 5 pounds?)
6 cups sugar
3 habanero peppers
1 teaspoon butter
1 pouch liquid pectin (optional...the recipe didn't call for it)

I washed the apricots in the sink and then used my fingers to split them in 1/2 and pull out the pits.  I then pureed (chunky) the fruit in my food processor.
 

I removed the seeds from the peppers and tossed them in the processor along with about 1 cup of the fruit puree.


Mix the fruit and sugar in  a large pot (I used my 8 quart dutch oven) and bring to a boil on medium heat.  Stir occasionally and cook until reduced about half (took about 25 minutes for me).  The color goes from the light, bright color to a dark caramel-ly color.  I also used a  thermometer to check when it got to about 220 degrees.  For the last minute of cooking, I added 1 pouch of liquid pectin and boiled for one minute, then filled my sterilized jars (makes about 5 pints) and processed in a water bath for 15 minutes.

Tastes great.  It does have a kick, but the cooking tones it down from when I tasted the raw puree.  Serve with cream cheese on crackers or as a side for pork or chicken.  Could be a tasty replacement for cranberry sauce on a sandwich. My mom suggested it as a dipping sauce for fried cream cheese wontons.  Hmmm, a trip to the store for won ton wrappers may be in order tonight.

Saturday, October 12, 2013

Applesauce

Pin It  

As a kid, I remember August and September being busy helping my mom and grandma put up fruit.  Our basement was filled with jars of peaches, cherries and pears.  I will admit to just being too lazy to do lots of canning, but I make an exception for homemade applesauce.

As with just about anything homemade (and made with homegrown items)--its going to taste better than anything at the grocery store.  The grocery store varieties are just too sweet or too much like baby food for my taste.  Applesauce is very easy, and pretty fool-proof.  Its even easier if you have a food mill, so that you don't have to peel the apples.

You will need:

Apples (I had 1/2 bushel of Ginger Gold-a sweet and spicy soft apple, terrible for eating, wonderful for sauce--I get them from my favorite vendor at the farmer's market)
Food mill
Jars with lids and bands


Since I use a food mill, I won't be peeling my apples, so I wash them in the sink.  Next, I cut the apples up using one of those apple cutters.  I put all the pieces, including the core into a large stockpot with about 1/2 cup of water.  Cover with a lid and simmer until the apples are soft (about 20 minutes)--you will need a big spoon to try and rotate the apples from the top to the bottom at least once.

Dump the soft apples into the top of the food mill and crank it out.  I use a large cake pan to collect the sauce.  Don't worry if the first bit looks a bit runny, once you have all the pulp through you can stir it up.  I run the "garbage" peels etc...3 or 4 more times to get all the goodness out that I can. I do not add anything to my applesauce--but some folks like sugar or cinnamon.


In my sterilized jars, I add the warm applesauce and leave about 3/4" of space.  Put on the lid and screw on the band.  I used my steam canner, bringing the batch up to full steam then timing it for 25 minutes.

I'm told you can freeze applesauce instead of processing it, but my freezer was kinda full...and I do like seeing the pretty jars in my storage room.  Even if you don't want to make a giant batch, make a small batch and serve it warm in a bowl like you would oatmeal (pour on some half and half, brown sugar, cinnamon and pecans)--yeah, good stuff.


Friday, July 22, 2011

Dad's Homemade Salsa

Pin It


My family loves salsa. I can remember coming home from church on Sundays and immediately digging into a bag of chips with salsa, if you were slow getting home, you were out of luck! My dad now makes this salsa (he won't even eat bottled salsa anymore) and you can whip it up in about 5 minutes, so try it out!


Ingredients
1 can of diced tomatoes with green chiles
1 can diced tomatoes
1-2 jalepenos, seeded and roughly chopped
1 small onion, roughly chopped
1 sm bunch of cilantro
1 lime


I'm lucky enough to have cilantro growing in my garden this year, so I used it. I didn't have a lime in the fridge, so I used lime juice (about 1 T). Open the cans of tomatoes and dump them into the food processor. Chop the onion into big chunks (just so that the food processor can get the job done faster). If you like spicy salsa, use more jalepeno, but it tends to get hotter the second day, so I go easy. Wash the cilantro and put in the processor.

Once everything is in the bowl of the processor, put the lid on and pulse it until you get to your desired "chunkiness." Make sure you have some chips on hand, this stuff is tasty :)


Thursday, July 7, 2011

Strawberry Freezer Jam

Pin It
I love fresh strawberries. I've tried several locations and types of plants and not succeeded in growing them until I finally planted them in my front yard! I have too much shade everywhere else, so I created a patch along my driveway. This is year 3 with my plants (year 1 was bare-root, June-bearing plants from Gurney's), year 2 gave me just enough berries to eat with my cereal, but this year, ah, I've had enough to make pie, to snack on, to serve with shortcake and today, freezer jam! I'm still getting more berries, so maybe strawberry ice cream is next! I may even make more jam and put it away for Christmas gifts for friends!

When making freezer jam, it is so much faster and easier than cooked jam (and as a bonus it doesn't heat up the kitchen) and I prefer the fresh berry taste of freezer jam. You can use whatever brand of pectin that you prefer, but just be sure to follow the package instructions EXACTLY. I usually treat recipes as general guidelines, but not with jam. I measure, I level, I time...everything.

Ingredients
1 pkg Sure Jell pectin
1 quart fresh strawberries
4 cups sugar

1. Wash the berries, cut off the stems and any icky parts and slice up the berries.

2. Use a potato masher or fork to crush the berries (use a wide bottom bowl or pan and only mash up 1 cup of berries at a time). You will need 2 cups of crushed berries when you are done.


3. Pour the berries into a large mixing bowl.
4. Carefully measure 4 cups of granulated sugar into a separate bowl (use a knife to level off the sugar exactly).
5. Pour the measured sugar into the berries and mix it up. Set the timer and let the berry mix sit for 10 minutes. Stir occasionally.


6. Now mix the Sure Jell with 3/4 C. of water in a small saucepan. Bring to a boil and boil for 1 minute. Stir constantly.
7. Pour the hot pectin into the berries while stirring. Stir for 3 minutes to make sure all the sugar gets dissolved.
8. Pour the jam into five 1 C. containers suitable for the freezer (I used 1/2 C. mini-plastic containers since I only need a small jar of jam at any given time).
9. Leave the containers of jam on the counter for 24 hours to set, then refrigerate or freeze.


*These directions are based on using the Sure Jell brand pectin, your directions may vary if you use a different brand.


Monday, May 16, 2011

Dried Mango & Pineapple

Pin It

This post combines two experiences, Costco...the place where I can't get out the door without spending $100, and Trader Joe's, a fun new experience for me (wish they had one here). I had been enjoying the dried mangoes from Trader Joe's...they are so tasty and soft and chewy and thought maybe I should dig out my dehydrator from the basement and try doing some myself. I had gone to Costco and they had cases of mangoes for only $5.99! (I picked up a pineapple too, another fruit that I really love).

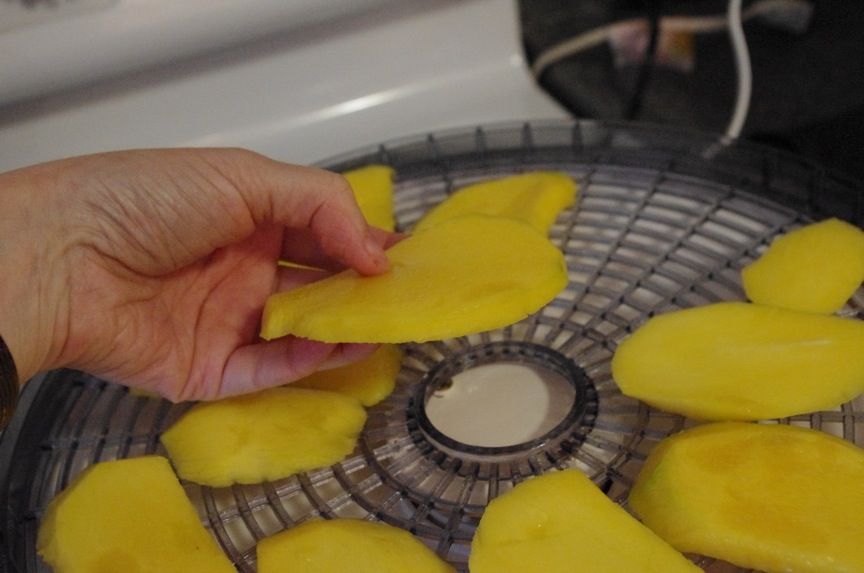
Turns out, mangoes dry up pretty nice, but it took me 3 tries to find the right amount of time to get fruit that was dry, but not crispy (started with 10 hours, but they turned out like mango chips, tried 8 hours overnight, but even though they seemed pliable, when they cooled off, again, crispy, 5-6 hours was about right). I didn't add anything to the fruit...just sliced it and put it in the dehydrator.

Use ripe mangoes (if they aren't soft and sweet now, they won't be tasty dried either). I peeled them and then sliced them about 1/4 inch thick (maybe a bit thinner-the pineapple about the same, but you don't want to slice it too thin, otherwise, you get mango chips instead of chewy mango). The fruit will shrink considerably. Its important to try and have all the slices the same thickness so that they dry at the same rate. I sliced off the long side, then turned the mango a 1/4 turn and sliced off the next side and just kept turning it until I had sliced everything away from the pit.

Spray the trays of the dehydrator with non-stick cooking spray and lay the slices on the tray. Leave plenty of space around the fruit-the air has to be able to circulate, so don't crowd it. (I think I got my dehydrator at Walmart).

In my dehydrator I found that 5-6 hours was about the right amount of time and that the bottom tray was best left empty (it got too hot). You want the fruit to look dry to the touch (as opposed to wet or juicy looking), but still be very soft and pliable. I'd suggest that your first try be when you are going to be home the whole time so you can check on it. Once you figure out the right timing, you can plan for letting it run without your constant supervision.

Yup, they turned out very tasty. Not quite as soft as the TJ ones, but pretty irresistible (the pineapple is also super yummy).

Wednesday, December 1, 2010

Jalapeno Jelly

Pin It


I was at the library and saw a gorgeous book on display that I just had to bring home-its called You Can Can by Better Homes and Gardens.


Its full of beautiful pictures of jams, jellies and other preserves--very inspirational. I was looking through it and found the perfect gift for my friends/neighbors this year. Jalapeno Jelly! I like to do homemade items, but I wasn't too excited to do repeats of projects from past years (cherry syrup, applesauce, chocolate popcorn etc...) and I thought how unique a gift this would be. Its really quite tasty with crackers and cream cheese (or goat cheese!) Its also tasty on a cornbread muffin or on a turkey sandwich. It was really simple to make--total hands on time was about 30 minutes from start to finish.


Ingredients
1 1/2 C. cranberry juice (not low sugar)
1 C. cider vinegar
2-4 jalapeno peppers cut in half (seeded or not...depends on how spicy you like it. I used 2 peppers and cut off the stem end and left the rest of the seeds)
5 C. sugar
1 3oz pkg of liquid pectin (Certo)

1. In a small saucepan bring the juice, vinegar and peppers to a boil, reduce heat and simmer for 10 minutes.
2. Pour the mix through a strainer to remove the pepper pieces (if you have less than 2 cups of liquid left, top off with juice to make 2 cups exactly).
3. In a 6-qt saucepan mix the sugar and hot juice mixture and bring to a rolling boil while stirring.
4. Add the liquid pectin and return to a boil and keep stirring for 1 minute.
5. Remove from heat, skim off the foam.
6. Pour into sterilized 1/2 pint jars
7. Process for 5 minutes (or just give it out right away and tell folks to refrigerate)

The recipe made enough for 12 of those 4 oz jelly jars. I was able to use a coupon for the juice and the peppers were less than $1! Great inexpensive gift.

I will warn you that the boiling of jalapenos and vinegar is strong...so don't stand directly over the pot in that first step.

Saturday, November 20, 2010

Homemade Cranberry Sauce

Pin It


Most people either love or hate cranberry sauce on their Thanksgiving plate. I fall into the category of "love it"--providing that the cranberries are homemade! I suppose I grew up spoiled with a mom who is a great cook and does all of the Thanksgiving meal from scratch. For me the difference between that can of cranberry jelly and the homemade is about the same as the difference between fresh peas and canned peas--so different that one is edible and the other is not really food at all. So...if you haven't been a fan in the past, give homemade cranberries a chance!


Ingredients:

1 bag cranberries
1 c. sugar
1 c. water (not quite full)

In a pot put the water and sugar (I tend to use just a bit less water, like a Tablespoon or 2 less) and bring to a boil. Dump in the cranberries. Bring the mix to a boil and then turn the heat down to medium. The concoction will get bubbly and foamy--let boil for 10 minutes (set the timer). Stir it up every couple of minutes so it doesn't scortch.


If you like the chunky cranberry sauce (and I don't) you can be done now. If you want the clear jelly you need to dump the mix into a fine strainer over a bowl and push the mix through the strainer with a wooden spoon or rubber spatula. If you are going to make the clear jelly, be ready to strain as soon as you take it off the stove--cranberries have a lot of pectin and it will set up rather quickly. Once its all strained put it in a jar or container and refrigerate it.

That's it! Now you have delicious cranberry sauce for your turkey!