Showing posts with label asian food. Show all posts

Wednesday, December 23, 2020

Fast Ramen Noodle Upgrade

Pin It


I'll admit to still eating ramen noodles from time to time--you know the kind you ate in college because they cost .10?  Yeah, those ramen.  I have an upgrade for you today, and it won't take much more time than just tearing open the spice packet. I buy the carrot shreds at the store all the time to add to salads, but you could use the cheese grater to grate your own.  I prefer napa cabbage in this recipe, but I didn't have any on hand, so I sliced regular green cabbage super thin and it worked out great. I am super lazy when it comes to garlic and ginger--I buy it already chopped up in the squeeze bottles you find in the produce section.  Makes it easy to always have ingredients on a hand for a quick stir fry.


Serves 1 as a meal, but if you added some potstickers on the side (hello, Costco frozen ones are awesome), you could stretch this to two servings.  Easy to double.

Ingredients

1 package of ramen noodles (do not use spice packet)

2 cloves garlic, minced

1/4 tsp. ginger, minced (I use the squeeze bottle from the produce section)

1/4 C. shredded carrot

1/2 C. thinly sliced cabbage (napa or green)

1 head baby bok choy, sliced crosswise (about 1 cup)

Sauce

1/2 Tbs each of dark soy sauce  and low sodium soy sauce (or just 1 total Tbs of whatever soy sauce you have)

1 Tbs sweet chili sauce

1/4 tsp sesame oil

Sriacha to taste (opt)-I like about 1/4 tsp

Garnish

Green onion

cilantro

sesame seeds


Start cooking your ramen noodles in boiling water.  Heat up a medium non-stick skillet with 1 Tbs vegetable oil over medium heat.  Add the garlic and ginger to hot oil and stir for about 10 seconds until fragrant and then add the vegetables.  Saute for 3-5 minutes until veggies are soft but not soggy.  Add the cooked noodles (make sure to drain them first)) and add the sauce.  Heat for about 1 minute and garnish with chopped green onion, cilantro and sesame seeds if you like. 


Friday, November 8, 2019

Moo Goo Gai Pan

Pin It
This is my usual order at my favorite Chinese take-out place.  I had never tried the technique of "velveting chicken"-but it was a win, so I'll keep that one in my pocket to use again on other stir fry recipes.

This recipe is from a fun family food blog called Dinner at the Zoo-check it out, lots of good stuff there. Like most things I see online, I tweak the recipe to fit my style or the ingredients I have at home.

I use boneless, skinless chicken thighs since I often use the instant pot (but not this time) and dark meat cooks better under pressure.  You must have thin sliced meat for the velveting technique to work, so partially thawed meat is easiest to slice.

Velvet the Chicken
1 lb boneless skinless chicken, thinly sliced
1 large egg white, whisked until foamy
1 Tbsp cornstarch
 Mix the egg white and cornstarch in a bowl and add the sliced chicken.  Refrigerate for 30 minutes, then strain off liquid before cooking.

Make the Sauce
1 1/2 C. chicken broth
1 Tbsp corn starch
1 Tbsp sugar
1.5 Tbsp soy sauce
1 tsp sesame oil
Mix sauce ingredients in a bowl and set aside.

Veggies to chop
2 tsp minced garlic (I use the bottled kind, about 2 cloves)
1 tsp ginger, chopped (also from the bottle)
16 oz pkg of sliced mushrooms
1 C. snow pea pods
1/2 C. sliced carrots (I buy them presliced)
1 head, baby bok choy chopped across the stalk
1 can sliced water chestnuts
1 can bamboo shoots

Heat 1 Tbsp of vegetable oil in a large fry pan over medium heat and add the carrots and about 1 T of water.  Stir and cook for a couple minutes, then add the mushrooms.  Keep cooking (and add a bit of water if you need it) until the mushrooms are soft.  Toss in the pea pods and cook for about a minute. Scoop all the cooked veggies out of the pan and into a bowl, wipe out the pan and put in a bit more oil and cook the chicken for about 4 minutes or until done.  Add in the garlic and ginger and stir for about a minute.  Add back the cooked veggies, the bok choy, water chestnuts and bamboo shoots.  Pour the sauce liquid over everything and cook until bubbling.

Tasty.  Serve it over rice and pick up a box of fortune cookies! 


Wednesday, November 6, 2019

Orange Chicken in the Instant Pot

Pin It
I've been using my Instant Pot plenty this year.  It helps me get dinner done in under 30 minutes, which is important when you work all day and are hungry once you get home.

The recipe I found on SweetandSavoryMeals was a good start...but I took a look at the ingredient list and knew there was way more garlic and ginger than I would like and I wanted to make sure I had plenty of orange flavor, and a trick I learned from America's Test Kitchen is to use frozen orange juice concentrate.  No breading on this chicken; but with orange juice concentrate, no one can say this is "healthy" but it has less carbs and calories than a fried and sauced version. Chicken thighs cook up really nicely in the Instant Pot (more fat, less likely to dry out and get rubbery than chicken breasts).


Meat
2 lbs  boneless, skinless chicken thighs cut into small pieces
2 tablespoons  vegetable oil
1 tsp ginger, minced (I used the kind in a jar/bottle)
2 tsp garlic, minced (again from the jar)


Sauce:
3/4 C. water
4 oz of frozen orange juice concentrate
1 Tbsp rice vinegar
1 Tbsp. brown sugar
1/4 C. soy sauce
1-3 tsp sriracha sauce (I use 1)
zest from one orange

Cornstarch slurry 
1Tbsp cornstarch
2 Tbsp water

In a bowl, mix up all the sauce ingredients and set aside. Turn the Instant Pot to saute and cook the chicken with the oil for about 3-4 minutes until the outside is lightly browned.   Add the ginger and garlic and stir for about a minute.  Pour the sauce ingredients in and scrape up the bottom of the pot of any brown bits (flavor!) Set the pot for 3 minutes--yup just 3 minutes.  (If you've cut your chicken into small bites and browned the outside, it will be close to being fully cooked before you set the Instant Pot).  After it has cooked at pressure for 3 minutes, let the chicken natural release for 3-5 minutes.  Open it up and stir in the cornstarch slurry and turn pot back to saute and cook until bubbly and slightly thicker.  Serve over rice or with veggies. 

Sweet and Sour version:  Try pineapple juice instead of water/oj concentrate.  Increase the vinegar to 2 tablespoons.  After you've cooked it and are adding in the cornstarch slurry, toss in a can of pineapple chunks. 


Monday, November 4, 2019

Korean Beef Tacos or Bowls in the Instant Pot

Pin It
I made this as a rice bowl and served it to my brother, who claimed it was the best thing I'd ever made for him. It is very tasty. Its a great combination of sweet, spicy, savory, crunchy and creamy. I made it as a taco bar for a family holiday party (with the small street taco corn tortillas) and even the picky kids ate it up! The recipe comes from one of my favorite blogs, Your Home Based Mom, which always has recipes that use "regular" ingredients and taste good!

I make up a batch of meat and then freeze half to use for another night (I am usually planning for 4 servings, so if you want to freeze half, you might need to double the recipe first).


Ingredients for the meat
2 lbs sirloin steak sliced thin, 1/4" thick (easy to do if meat is still partially frozen)
1/2 c soy sauce
3/4 c brown sugar
1/4 c water
2-4 tsp minced garlic (I use the bottled kind, and usually go for about 2 tsp, but you can use more)
2 Tbsp rice wine vinegar
1 tsp ginger minced (again, the bottled kind is super convenient)
1 tsp sesame oil (I think a little goes a LONG way)
1-2 tsp sriracha sauce (I'm probably closer to 2 than the 1)
1/2 tsp pepper
1 Tbsp cornstarch
1 Tbsp water

Measure everything (except the meat, cornstarch and 1 Tbs of water) and put it in the Instant Pot and bring to a boil. Make a slurry of the cornstarch and 1 Tbs of water and add to boiling liquid. Add the raw meat. Put the lid on the pot and set for 15 minutes. Natural release for about 10 minutes.

Make the Yum Yum sauce. I never have tomato paste on hand (or don't want to open a can...maybe I should buy that tube that looks like a toothpaste tube). I digress. I just use ketchup. Seems great to me. I also leave out the butter. Still tastes great to me.
2 tsp ketchup
1 Tbsp melted butter
1 tsp garlic powder
1 Tbsp rice vinegar
1 cup mayonnaise
2 tsp white sugar
1/2 tsp paprika
1/8 tsp cayenne
1/8 tsp sriracha
1/2 tsp salt
2 Tbsp water

 Rice Bowl Version: Make some rice while the meat cooks, top with the meat and veggies. I like Nappa cabbage, red cabbage, green onions, shredded carrots, cilantro, jalapeno, sesame seeds, fresh lime. Top with the Yum Yum sauce.

Taco Version: Fry/heat corn tortillas and fill with meat and veggies along with Yum Yum sauce and fresh lime.

Vegan/Vegetarian version:  Make the sauce on the stove and then add your favorite substitute meat product.   For the Yum Yum sauce, leave out the butter and use Vegan mayo.

Sunday, January 22, 2017

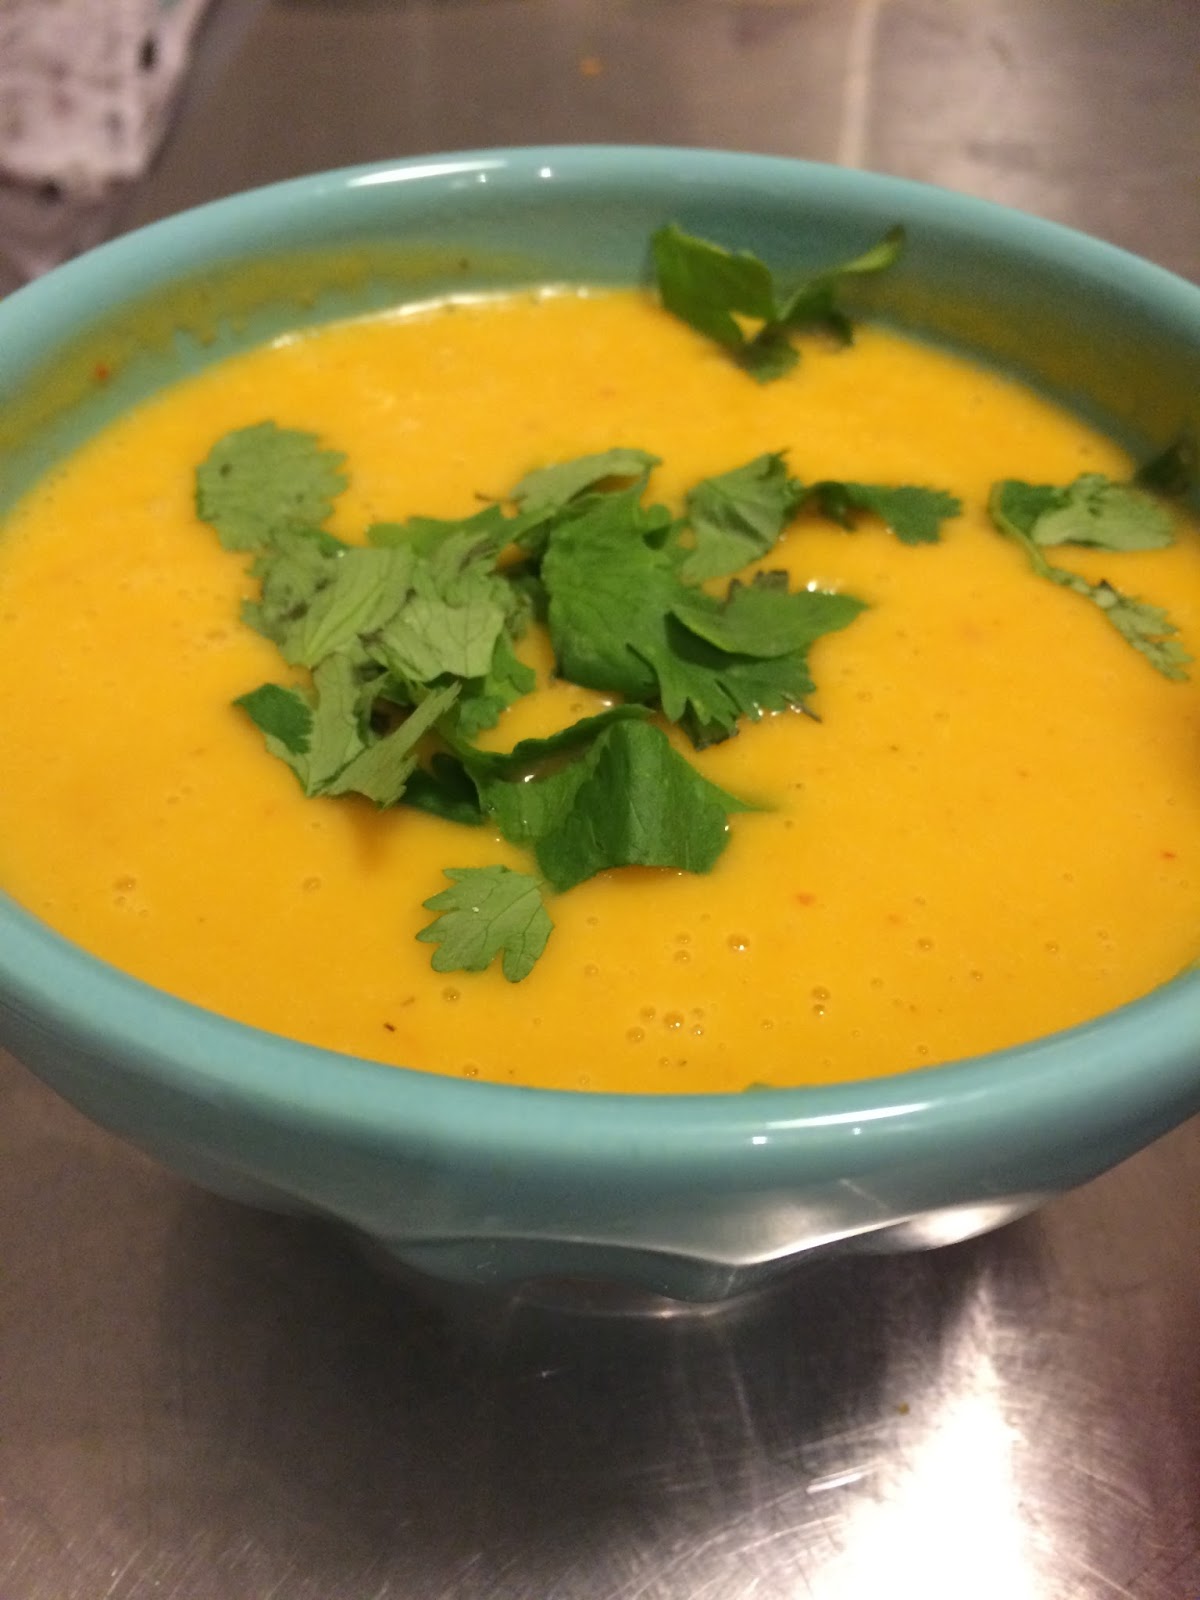
Butternut Squash Soup--Thai Style

Pin It


I love butternut squash.  But I can almost never purchase pre-made or restaurant items with butternut squash because invariably, they have pumpkin pie spices in them--that does not work for me.  I like it savory-no pie flavors.

I've made butternut squash soup before, I used cumin as my seasoning and cream and it was good.  This recipe is a take on a dish my mom ordered at a Thai place in Mesa, AZ.  Instead of white potatoes in the curry, it had diced pumpkin.  This soup has most of the ingredients of a curry, but then it gets all pureed into a smooth and non-dairy soup.  This soup is a one-pot dish and can be done in about 30 minutes if you have a pressure cooker.


Ingredients

4 cups diced butternut squash
1 Tbs vegetable oil
1 medium onion, rough dice
1 Tbs ginger, diced
2 cloves garlic, chopped
1-2 Tbs Curry paste (red is spicy, massaman is mild)
14 oz can coconut milk
14 oz can chicken broth
Cilantro, lime for garnish

In my electric pressure cooker, I turned it to the meat/saute feature and sauteed the diced onions in oil for about 5 minutes, then added the garlic, ginger and red curry paste and sauteed another minute.  Add in the chicken broth, coconut milk and diced raw butternut squash.  I put the lid on, pressed the stew button and adjusted the time to 20 minutes.  It took my cooker about 10 minutes to come to pressure and then it cooked for the 20 minutes.  I used the quick release method to reduce the pressure and open the pot.  If you have an immersion blender, you could puree the soup right in the pot--if not, scoop it into a blender and puree in batches (use a towel as a lid to avoid the blender lid popping off and soup flying everywhere).


You can doctor up each bowl of soup with diced cilantro, squeeze of lime, sriacha or even add some veggies (mushrooms, bok choy, gnocchis...hmmm all of those sound good at the moment).

This freezes well too.  

Wednesday, December 28, 2016

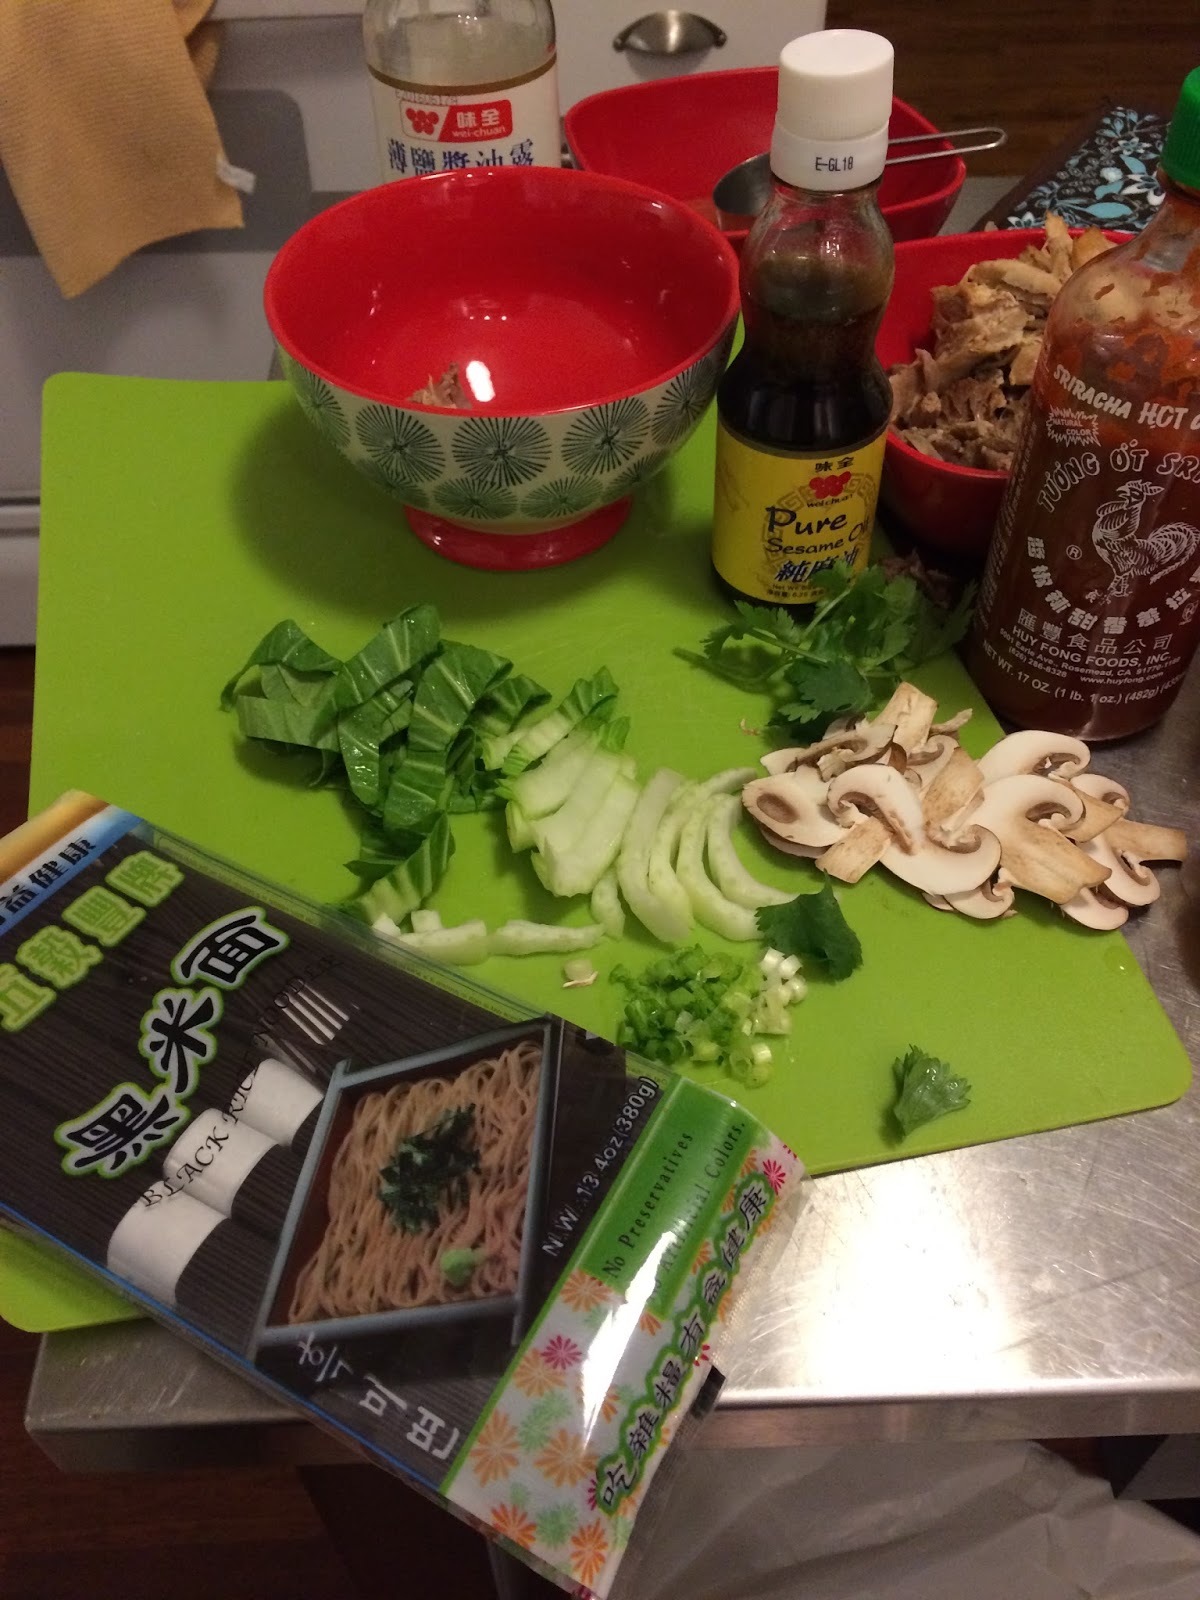
Asian Noodle Soup

Pin It

Its winter.  It snowed so much on Christmas Day that they cancelled church--that never happens.  So its soup weather.  Maybe this is faux pho, or some version of ramen...whatever, its a tasty soup.  If your New Year's goals include trying new things, how about this one?

I made a whole pot of broth that I plan on tweaking for both this Asian soup as well as a tortilla soup.

Broth

1 lb chicken thighs with bones
1 lb pork with bone (I bought neck bones from the Latino market.  You could use spareribs cut up)
1 medium onion, rough chop
1Tbs fresh ginger, chopped
2 cloves garlic, chopped
8-10 cups water

I used my electric pressure cooker to make the broth.  I set it to saute and sauteed the onions in vegetable oil until soft, then added the ginger and garlic for about 30 seconds until fragrant. Toss in the meat and add water to the max line of pressure cooker.  Set for 80 minutes. When done, strain through a fine strainer and set the solids aside.  I let my broth cool and scooped off the fat that floated to the top.

When the solids are cooled, you can pull off any chicken or pork meat and save to use in the soup.  Discard the rest.


Soup (1 serving)
1/4 c. Noodles, cooked (I used black rice noodles, but any kind you like are fine)
1/4 c. Meat
2-3 drops Sesame oil
1/2 Tbs. Soy sauce
Sriracha  to taste

Toppings:
Green onion, sliced
Mushrooms, thinly sliced
Bok Choy, sliced crosswise
Cilantro

Since I had broth in bulk, I measured out enough for my dinner (about 1 1/4 c.) and put in a small saucepan on med-high.  Doctor up the broth with the sesame oil, soy and sriracha.  Toss in the bok choy and mushrooms for about 1 minutes to soften them up.

Assemble

Put the noodles and meat in the bowl along with the toppings of your choice.  Pour the hot broth in and top with cilantro.  I have zero skill with chopsticks, so I used a spoon and a fork. 

Friday, October 14, 2016

Spicy Thai Noodles

Pin It
 
Do you love take out, but don't want to leave the house (or pay for the high cost of restaurant food?)  You gotta try these Thai-style spicy noodles.  I made this in about 35 minutes on a Monday after work.  I doubled the batch because I was taking dinner to a neighbor and her family.  A single batch was enough for 6 servings for me (but if you are feeding hungry teenagers, maybe only 4).  For the double batch ingredients (and the frozen potstickers) I spent around $20--not bad for about 12 servings of better-than-restaurant-quality food.

Ingredients
1 pound of linguine noodles (or any long noodles)
2 T. olive oil
1/4 tsp. red pepper flakes
2 cups zucchini, chopped
1 package mushrooms, sliced
2 cloves garlic, minced (I buy the pre-minced kind)
2 eggs, beaten

Sauce
1/2 c. soy sauce
1/4 tsp. sesame oil
1/2 T. sriacha sauce
3 T. brown sugar
2 1/2  T. fresh ginger, minced
Garnish
4 green onions, chopped
1/2 C. cilantro leaves, rough chop
1/4 C. peanuts, chopped 


In a large pot, boil the water and get the noodles cooking.  In a large non-stick skillet, heat the pan and fry the eggs.  Scramble them and dump them out onto a plate and wipe out the pan.  Heat the olive oil and toss in the red pepper flakes, zucchini and mushrooms.  Saute  on medium until veggies are tender but not mushy (probably around 5 minutes).  While the veggies are cooking, in a bowl or glass measuring cup mix the soy sauce, sesame oil, sriacha, brown sugar and ginger.  


When the noodles are done, drain and put back in the hot pot.  Dump in the cooked veggies along with the sauce.  Stir it all up.  Serve and garnish with the green onions, cilantro and peanuts.  

This dish is vegetarian, but you could easily add in chicken or shrimp (or leftover steak).  You could also squeeze some fresh lime on top.  I cooked up some frozen potstickers to go along with the noodles.  I also recommend  mango sticky rice for dessert!


Sunday, April 24, 2016

Thai Mango Sticky Rice

Pin It


If you like Thai food as I do, then for sure you've ordered the sweet mango sticky rice as a tasty dessert. Never tried mango sticky rice?  Do you like rice pudding? Then you will like this. It isn't terribly difficult, but it does take some time to prep. If you have an Asian grocery, head there to pick up the rice and the coconut milk (it will cost less and be more authentic).


To serve 2-4 people

1 c. Thai sweet sticky rice (glutinous rice)
1 c. water to cook rice
2/3 c. Coconut milk (full fat variety)
1/2 c. Sugar
1/2 tsp. salt
2-3 ripe mangoes


1. Start by rinsing the dry rice. Place the rice in a bowl and cover with water, swish with your hand til water is cloudy with starch, then drain and repeat 4-5 times until water stays pretty clear. This rice just smells so delicious--a nutty, sweet smell.  I bought mine at the Asian market because my grocery store didn't have it.  Its really different than regular long grain rice (or minute rice)--so look for the real deal. 

2. Soak the rice in water for at least 4 hours, but overnight is better. 

3. Drain the soaked rice and cook it. You can do it on the stovetop like regular rice, use a rice cooker, or go authentic by steaming the rice. I used my pressure cooker and put the rice in a flour dish towel on top of the steam tray. I steamed it for 17 minutes, but wish I had gone a bit longer since my rice was still a bit al dente. I saw some online suggestions on using your frying spatter screen as the steam tray and put the rice directly on it (and then cover with an inverted bowl). I don't have a splatter screen, but it looked like a less messy option than the dishtowel method.

4. Make the sweet coconut sauce. While the rice is steaming, mix the coconut milk, sugar and salt in a saucepan and bring to a low simmer. You just want it to dissolve all the sugar--you don't want to reduce or thicken the sauce.  Turn off heat and wait for rice to finish.

5. As soon as the rice is cooked, quickly transfer the hot rice to a bowl and pour the warm coconut sauce over it and stir. It will look really runny, but the hot rice will absorb the sauce.

6. After about 35 minutes, the rice will be thick and ready to be topped with fresh, sliced mangoes.  You can take a bit of extra coconut milk and sweeten it and drizzle it over the top.


I prefer the ataulfo (honey) mango, but the red mango tastes great too!


Saturday, December 28, 2013

Ginger Cilantro Chicken Salad-my version of Thai Larb

Pin It

I like Thai food. Funny, but until about 5 years ago, I hadn't really tried it.  I grew up in a smaller town and I don't think there was anything outside of the usual Mexican, Italian an Chinese places.  Now I eat Thai quite often..although whenever they ask how spicy, I say "not spicy at all"--which is usually PLENTY spicy for me (and I like spicy Mexican food, but wow, Thai spicy is another scale).  Anyway, aside from Pad Thai, Green Curry and Massaman Curry, one of my favorites is Larb, a type of salad--which I think is pronounced without the "r".  I had some last night at Thai Siam, one of my favorite places, where they serve it lettuce wrap style.  I decided to try it out at home and used this recipe as my guide.

I ended up just making a big salad, rather than as wraps, and I didn't cook the sticky rice that would accompany it, but I sure did enjoy it!

Marinade and salad dressing base:
You'll mix this up and then reserve part of it to use for the marinade and the other part for the dressing.

1/4 c. low sodium soy sauce
1/4 c. canola oil
2 Tbs finely diced fresh ginger (this is the secret ingredient, its about 2 inches of ginger root)
2 Tbs Hoisin sauce
2 tsp sesame oil
1 tsp sriracha sauce-want more spice? add 1 Tbs instead

--Mix all the above together.  Take 4 Tbs out and save it for the marinade--

Now add the last three ingredients and you've got the salad dressing made.
1/4 c. red wine vinegar
3 green onions, chopped including most of the green parts
1 Tbs sugar (optional, or use a packet of artificial sweetener)

Marinate 1 large chicken breast with the 4 Tbs of reserved sauce in a zipper bag.  I pounded the chicken flat so it would cook nice and fast.

Get the salad ready:
1/2 of a large head of Nappa cabbage, thinly sliced (about 4-5 cups)
1-2 carrots, shredded
2-3 radishes, sliced
1/2-2/3 cups of cilantro (remove stems, roughly chop)
toasted sliced almonds
toasted sesame seeds
fresh mint leaves (optional...larb has it, but I just used extra cilantro instead)

Once you've marinaded the chicken for about 30 minutes, place it in a heated skillet with a bit of oil.  Cook each side for about 4 minutes on med-low or until the thermometer reads 180.  Remove from pan and let rest while you mix up the salad.

In a bowl put the cabbage, carrot, radishes, cilantro.  Toss with the dressing.  Slice up the chicken and place on top and sprinkle with the almonds and sesame seeds.

If you are serving this as a main dish salad, it serves two.  If you are doing it as larb or a side dish you can probably get 4-6 servings.  If you are going to do it like larb, then chop up everything much smaller and serve with some pieces of romaine lettuce and sticky rice to make wraps.