Showing posts with label cake. Show all posts

Friday, April 10, 2020

Strawberry Strawberry Cupcakes

Pin It


Raise your hand if you've ever planned a trip around a cupcake shop visit?  Silos Bakery? Check.  Georgetown Cupcake? Check.  Magnolia? Sprinkles?  Check, Check.  I like cupcakes.  I've searched for lots of copy-cat recipes to all those famous shops and none have met my expectations (too lightweight, too dry, too heavy...just not right).  So I went with a default trick of doctoring up a cake mix for my cupcakes.  The real star of this show is the strawberry flavor--and it comes from freeze-dried strawberries.  Since I'm home like everyone else in the world trying to avoid the coronavirus, I went wandering through my food storage and brought up the can of freeze dried berries.   They are PERFECT for cupcakes.  You get tons of strawberry flavor and you don't need any artificial flavoring!  You can buy them in smaller packages at Trader Joes--maybe even regular grocery stores.

Cupcakes
1 Duncan Hines white cake mix
1 C. milk
3 large egg whites
1/3 C. vegetable oil
1/4 C. crushed/powdered freeze dried strawberries (not fresh berries)
1/2 C sour cream

Preheat the oven to 350 degrees and get 24 cupcake liners ready.  Pulverize  about 1 cup of the freeze dried strawberries in a zipper bag  with a rolling pin (you'll get enough for cake and frosting).  Mix up the batter by following the directions on the box, but sub out the water with whole milk.  Add the sour cream and the strawberry powder.  Mix just enough to get it all mixed together with no streaks of white remaining.  Divide the batter into 24 cupcakes (I think I got 22).  The box said to bake for 18-22 minutes BUT I went with 16 and it was just right.

Strawberry Cream Cheese Frosting

1/2 C butter, room temp
1/2 C cream cheese, room temp (4 oz, which is half a brick)
1 tsp vanilla
1/8 tsp coconut extract
1/8 tsp almond extract
1 1/2 Tbs freeze dried strawberry powder
3 C. Powdered sugar
1-2 Tbs milk

Use paddle attachment on the stand mixer and cream the butter and cream cheese together.  Add the extracts and strawberry powder.  Alternate adding the powdered sugar and milk (on low) and mix on low until all combined.  Switch to the whisk attachment and whip on medium-high for 3-4 minutes to get all fluffy and light pink.

When cupcakes are completely cool, pipe frosting onto your cupcakes (I found that I actually preferred the ratio of frosting when I used the smaller tip than my jumbo star tip).  You can freeze these completely frosted if you want (I tested that out for you...an entire cupcake, with its pretty frosting will defrost in about 15 minutes and taste delicious). 


Freeze dried strawberries are the trick.  You can't use fresh strawberries because everything will be too wet and diluted.  The freeze drying concentrates the flavor.  Game changer!  

Sunday, May 3, 2015

Star Wars Day--May the 4th Be With You!

Pin It

I love the original Star Wars movies, but Return of the Jedi holds a special place in my heart.  Daring rescues, cool light saber fights and adorable Ewoks!  I clearly remember going to see it in the summer of 1983.  I had gone on a trip to California with a singing group I was in--and came home to hear about lots of flooding in Salt Lake City.  So much flooding that they created a "river" right through downtown.  Our family went to see the river and then headed to the Century Movie theaters--these awesome theaters that were in dome shaped buildings (at least I thought they were awesome).  I even got to buy treats with my leftover trip money. It was a pretty great day.


Tomorrow is May the 4th and to celebrate I decided to do some baking.  I went looking for inspiration on Pinterest and found a deliciously delightful blog called Yummy Crumble and knew this was the cake to make!  It didn't require a bunch of cake decorating skills like fondant or piping--but it is a multi-step messy process.  I made a few changes from the original because I couldn't find some of ingredients (and I didn't have a madeline cookie pan and neither did any of my neighbors).


Vanilla Bundt Cake
I liked the recipe on Yummy Crumble, so I'll send you over to her blog to get the recipe. Be sure to REALLY grease that bundt pan-mine was non-stick and I drowned it in non-stick spray and I still had one spot that didn't come out clean.  My cake took 43 minutes (I check it at 35 min and it was still really wet in the middle).  I did the cake first so that it could be cooling while I got the decoration stuff prepped.

"Sand" topping
Oatmeal cookies (the crunchy un-frosted kind from the cookie aisle)
Caramel topping (bottled from the ice cream section)


I used 12 cookies and pulverized them in the Vitamix.  Glaze the cake with a thin layer of caramel topping.  I spread it around with a rubber spatula and then pressed the cookie crumbs all over.  I did this while the cake was still on the cooling rack and on top of a cookie sheet to catch all the excess (and re-use the crumbs).


Sarlacc monster
Butterscotch chip jaws and tentacles
Almond slivers

I melted the chips in the microwave (heat in 30 second cycles and stir until all melty).   Put it in a zipper bag and clip the corner and pipe into 4 different fat squiggles for the tentacles.   For the mouth, I squeezed a rounded triangle shape onto a wax paper square and let it set for about 5 minutes and then draped it over a water bottle and popped it in the fridge (with a container on each side so it didn't roll around on me) to harden up. About 1 minute after it was in the fridge I used a butter knife to make some ridge marks on the back of the "monster." Honestly, this was the trickiest part--the water bottle really wanted to escape on me.  I used some white frosting to make teeth.


You stick the almond slivers around the inside, and then make a pile of frosting in the hole and set up the monster pieces.


I'll be serving this fine cake with some Yoda Soda (ginger ale) and some ice cubes from my fancy Darth Vader and Han Solo in Carbonite molds.  Should be a fun celebration.


Friday, December 19, 2014

Triple Chocolate Mousse Cake

Pin It
 
If you have a holiday party that you want to "WOW" everyone at, I suggest this tasty dessert from America's Test Kitchen (I've never been disappointed with one of their recipes).  Warning, while the dessert is not super challenging, it does take all morning to get it prepped and then it will need to refrigerate the rest of the day (or overnight).

Ingredients


Bottom Layer
  • 6 tablespoons (3/4 stick) unsalted butter , cut into 6 pieces, plus extra for greasing pan
  • 7 ounces bittersweet chocolate , chopped fine
  • 3/4 teaspoon instant espresso powder (I didn't use this)
  • 1 1/2 teaspoons vanilla extract
  • 4 large eggs , separated
  • Pinch table salt
  • 1/3 cup packed (about 2 1/2 ounces) light brown sugar , crumbled with fingers to remove lumps 


  • Middle Layer


  • 2 tablespoons cocoa powder , preferably Dutch-processed
  • 5 tablespoons hot water
  • 7 ounces bittersweet chocolate , chopped fine
  • 1 1/2 cups cold heavy cream
  • 1 tablespoon granulated sugar
  • 1/8 teaspoon table salt


  • Top Layer


  • 3/4 teaspoon powdered gelatin
  • 1 tablespoon water
  • 6 ounces white chocolate chips
  • 1 1/2 cups cold heavy cream
  • Shaved chocolate or cocoa powder for serving, optional

  • Directions

    1. FOR THE BOTTOM LAYER: Adjust oven rack to middle position and heat oven to 325 degrees. Butter bottom and sides of 9 1/2-inch springform pan. Melt butter, chocolate, and espresso powder in large heatproof bowl set over saucepan filled with 1 inch of barely simmering water, stirring occasionally until smooth. Remove from heat and cool mixture slightly, about 5 minutes. Whisk in vanilla and egg yolks; set aside.


    2. In stand mixer fitted with whisk attachment, beat egg whites and salt at medium speed until frothy, about 30 seconds. Add half of brown sugar and beat until combined, about 15 seconds. Add remaining brown sugar and beat at high speed until soft peaks form when whisk is lifted, about 1 minute longer, scraping down sides halfway through. Using whisk, fold one-third of beaten egg whites into chocolate mixture to lighten. Using rubber spatula, fold in remaining egg whites until no white streaks remain. Carefully transfer batter to prepared springform pan, gently smoothing top with offset spatula


    3. Bake until cake has risen, is firm around edges, and center has just set but is still soft (center of cake will spring back after pressing gently with finger), 13 to 18 minutes. Transfer cake to wire rack to cool completely, about 1 hour. (Cake will collapse as it cools.) Do not remove cake from pan.


    4. FOR THE MIDDLE LAYER: Combine cocoa powder and hot water in small bowl; set aside. Melt chocolate in large heatproof bowl set over saucepan filled with 1 inch of barely simmering water, stirring occasionally until smooth. Remove from heat and cool slightly, 2 to 5 minutes.


    5. In clean bowl of stand mixer fitted with whisk attachment, whip cream, granulated sugar, and salt at medium speed until mixture begins to thicken, about 30 seconds. Increase speed to high and whip until soft peaks form when whisk is lifted, 15 to 60 seconds.
    6. Whisk cocoa powder mixture into melted chocolate until smooth. Using whisk, fold one-third of whipped cream into chocolate mixture to lighten. Using rubber spatula, fold in remaining whipped cream until no white streaks remain. Spoon mousse into springform pan over cooled cake and gently tap pan on counter 3 times to remove any large air bubbles; gently smooth top with offset spatula. Wipe inside edge of pan with damp cloth to remove any drips. Refrigerate cake at least 15 minutes while preparing top layer.
    7. FOR THE TOP LAYER: In small bowl, sprinkle gelatin over water; let stand at least 5 minutes. Place white chocolate in medium bowl. Bring 1/2 cup cream to simmer in small saucepan over medium-high heat. Remove from heat; add gelatin mixture and stir until fully dissolved. Pour cream mixture over white chocolate and whisk until chocolate is melted and mixture is smooth, about 30 seconds. Cool to room temperature, stirring occasionally, 5 to 8 minutes (mixture will thicken slightly).
    8. In clean bowl of stand mixer fitted with whisk attachment, whip remaining cup cream at medium speed until it begins to thicken, about 30 seconds. Increase speed to high and whip until soft peaks form when whisk is lifted, 15 to 60 seconds. Using whisk, fold one-third of whipped cream into white chocolate mixture to lighten. Using rubber spatula, fold remaining whipped cream into white chocolate mixture until no white streaks remain. Spoon white chocolate mousse into pan over middle layer. Smooth top with offset spatula. Return cake to refrigerator and chill until set, at least 2 1/2 hours.


    9. TO SERVE: If using, garnish top of cake with chocolate curls or dust with cocoa. Run thin knife between cake and side of springform pan; remove side of pan. Run cleaned knife along outside of cake to smooth sides. Cut into slices and serve.


    Thursday, December 8, 2011

    Cake Pops

    Pin It
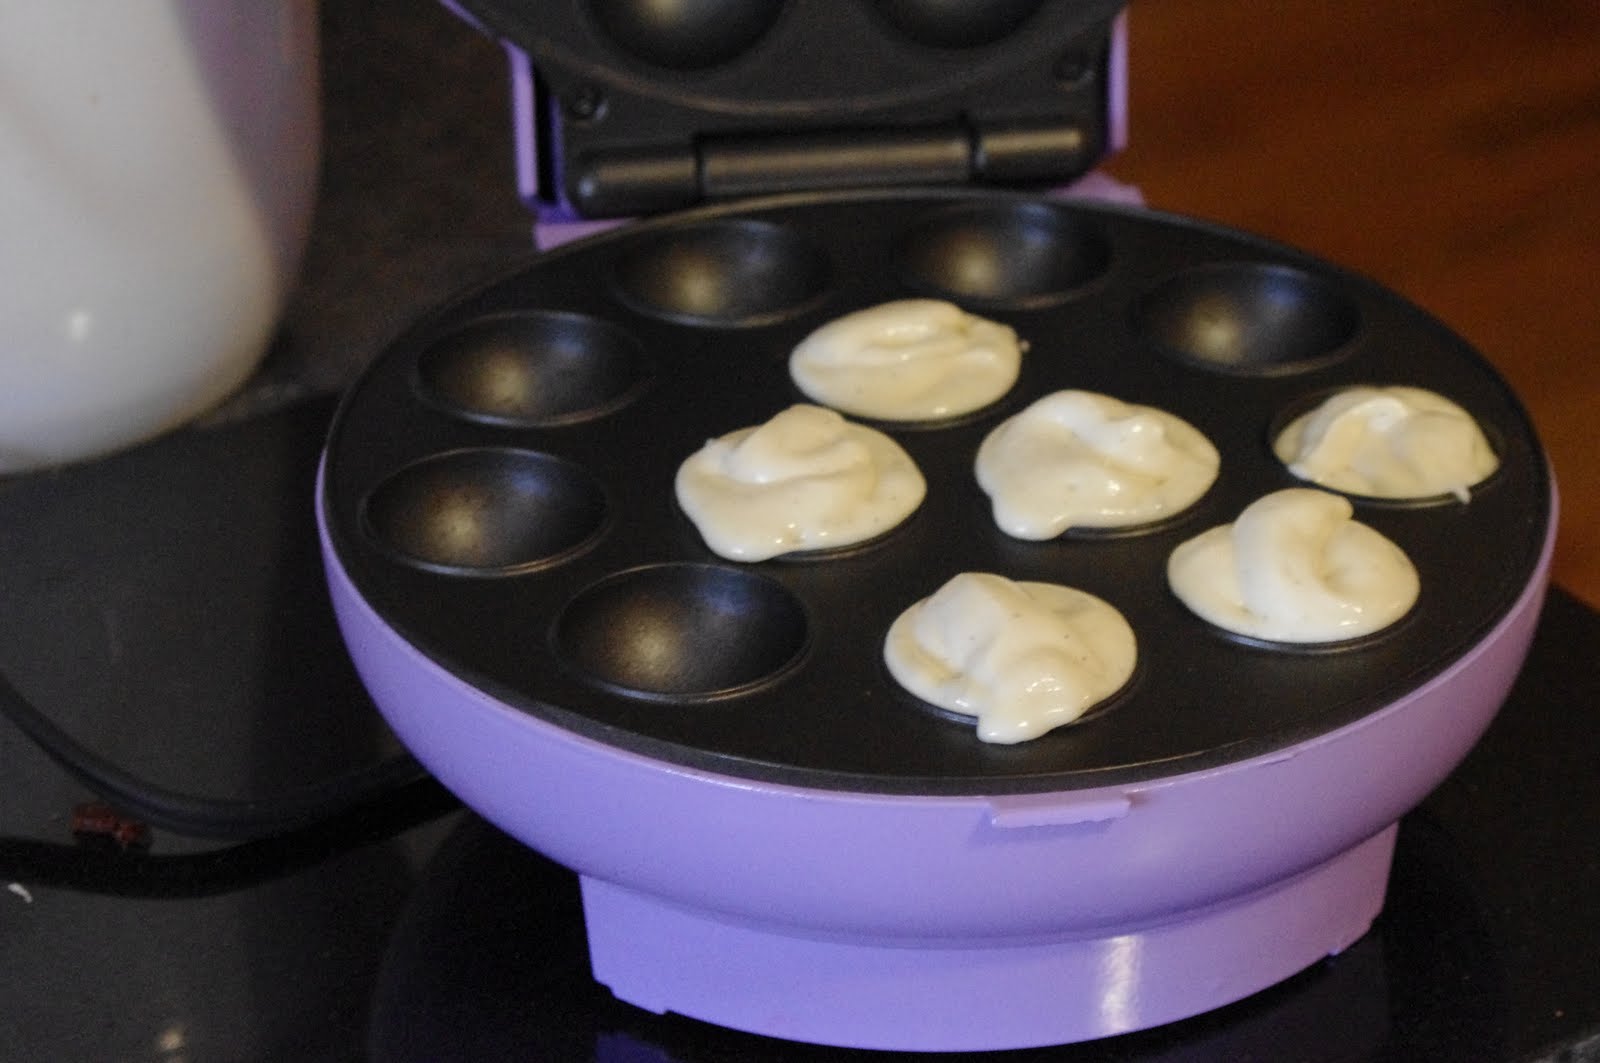
    Do you remember the Christmas that you got your Easy Bake Oven? I do. I'm pretty sure its the same year that I got a foot-pedal powered blender that I used to make red Kool-Aid in my bedroom with brand new sunshine yellow carpet (sorry Mom). I loved making cute little cakes. Turns out my demographic are suckers for spending money on things that remind us of our childhood, hence the Babycakes Cake Pop Maker. I got one on Black Friday at Kohl's and I had some fun trying it out!

    I made the vanilla cake recipe in the Babycakes recipe book that came with the machine. The batter is a thick one, and with the many other reviews I've seen, apparently that is an important factor. I tested several methods of putting the batter into the wells, and I decided I liked the cookie-dough scoop the best.


    I found that filling each well right to the top worked best. My first batch turned out absolutely perfectly...every cake was a perfect sphere...and yet I manged to not take a single picture of them. Sigh. As I continued making batches (cooking for about 5 minutes) they got less and less perfect. I suspect that the device was getting too hot. So next time, I'll unplug the device between batches and plug it back in once I've got the batter in and lid closed.


    I put the cake balls in the freezer before decorating. To decorate, I melted the candy chips in the microwave in a small bowl and then sat the bowl in my mini-crock pot. This kept the candy nice and smooth and allowed for easy clean up. I dipped the stick into the melted candy then pushed it into the frozen cake ball. Then I put them back in the freezer to harden the stick. I then dipped and swirled each of the cake pops. You have to tap off the excess and twirl the stick a bit to get it all smooth.


    Decorate with sprinkles or drizzling with melted chocolate. Turned out pretty darn good for a first try. I did find this great Youtube video today, AFTER I had already done mine. I think I'll try some of her suggestion too.

    I had great fun--I'm thinking cake pops are going to show up at the family Christmas party :)

    Sunday, May 22, 2011

    Coconut Lime Layer Cake-Toppled but Tasty

    Pin It This is Paula's cake...and mine looked a lot like it, until I drove with it across town, grrr!


    I was at the library and I spotted Paula Deen's magazine with this cake on the cover, and it just called to me! First, the cake was very tasty...although I did have a transportation disaster--mine didn't look quite magazine cover ready once I got it to the dinner party I was taking it to--I should have taken a picture BEFORE, oh well. (I give the recipe a bonus since extra coconut and frosting disguised most of the damage). I did make a few cupcakes with the leftover batter and I think I might do a whole batch next time!

    Timeline:
    Get out 5 sticks of butter to be softening for both the cake and the frosting.
    You could make the cakes the day before and freeze them, or make them the morning of.
    Make the frosting and frost the cooled cakes.
    Refrigerate for an hour before trying to transport the assembled cake to a new location (if you are serving it at your house, then no worries!)
    So this recipe used my KitchenAid stand mixer bowl, plus 2 bowls for separating the eggs and another bowl for the dry ingredients...whew, lots of dishes!

    Cream the butter and sugar until fluffy then add the egg yolks.

    The final batter is very thick, even after folding in the egg whites.

    There is enough batter for 3 layers and then some--but I only had 2 cake pans, so I had to do the first two, then the last one. The leftover batter I used in my mini cupcake pan and got 5 bite size cakes.

    Even though I only filled each pan only about 1/2 full, it still rose really high in the middle, but as it cooled, it dropped (when I inverted the cake onto the cooling rack, it flattened even more). By the time I was ready to frost, I had 3 perfectly flat rounds. The recipe said 18-20 minutes, but the batter in the middle wasn't even close to done at that point, so I ended up going about 29 minutes.


    This is my cake at the party AFTER the top layer completely slid off the top, the middle layer broke into 3 pieces and the bottom layer just fell apart! So, learn from my mistake--first, refrigerate the cake for about an hour before moving it...if the frosting isn't soft, it can't slide. Next, use skewers to keep everything in place. The good thing is that once I put it all back together and re-spread some frosting and smooshed more coconut on the sides, it looked pretty good. If you do refrigerate the cake, be sure to let it come to room temperature before serving...with all the butter and coconut milk, the cake gets very firm when cold.


    From the March/April Paula Deen Magazine, pg 46

    Coconut-Lime Cake
    Makes 1 (9-inch, 3 layer) cake

    1 1/2 cups butter, softened
    2 cups Domino Granulated Sugar
    5 Large Eggland's Best Eggs, separated
    1 teaspoon coconut extract
    1 teaspoon vanilla extract ( I used vanilla paste with bean seeds)
    3 1/2 cups all-purpose flour
    1 teaspoon baking powder
    1/2 t baking soda
    1/2 teaspoon salt
    1 1/4 cups coconut milk
    1 cup buttermilk
    Luscious Lime Frosting (recipe follows)
    Coconut flakes for decorating (I used Nutty Guys, which I found at Dan's Foods)

    1. Preheat oven to 350 degrees. Spray (9-inch) cake pans with nonstick baking spray with flour.
    2. In a large bowl, beat butter and sugar at medium speed with a mixer until fluffy. Add egg yolks and extracts,beating until combined.
    3. In a medium bowl, combine flour, baking powder, baking soda, and salt.
    4. In a small bowl, combine coconut milk and buttermilk. Gradually add flour mixture to butter mixture alternately with coconut milk mixture, beginning and ending with flour mixture, beating just until combined after each addition.
    5. In a medium bowl, beat egg whites until stiff peaks form. Gently fold into batter. Spoon batter into prepared pans, and bake for 18 to 20 minutes. (Note: I needed almost 30 minutes for my cakes) or until a wooden pick inserted in center comes out clean. Let cool in pans for
    10 minutes. Remove from pans, and cool completely on wire racks.
    6. Spread Luscious Lime Frosting between layers and on top and sides
    of cake. Press coconut flakes around edge of cake. Garnish with fresh berries and lime slices; if desired. Chill until ready to serve.

    Luscious Lime Frosting
    Makes about 5 Cups

    1 cup butter, softened
    1 teaspoon lime zest (pretty much all the zest on one lime)
    1/4 cup fresh lime juice (I got this out of 2 limes)
    5 cups Domino Confectioners' Sugar
    1 (8 ounce) container frozen whipped topping, thawed

    1. In a large bowl, beat butter, lime
    zest, and lime juice at medium speed
    with a mixer until combined. Gradually
    add confectioners' sugar, beating until
    smooth. Add whipped topping, beating
    until combined. Lick fingers :)

    Wednesday, April 27, 2011

    Royal Wedding Celebrations

    Pin It


    Do you remember the 1981 royal wedding (have a scrapbook perhaps?) So, its 30 years later, gulp, how did that happen? Friday is a National Holiday in England so that folks can celebrate the wedding of Wills & Kate--so at the very least, I had to do some crafting. Last week, for spring break, I was in Arizona and stopped in a cute little shop in Carefree, AZ (home of the World's 2nd Largest Sundial!) that had decked itself with all things royal or British. Check out this cute pillow. This cue'd my crafting mode. OK, I'm finally done, the wedding is in the morning and we're doing "crowns and cupcakes" tomorrow!

    Inspiration pillow that started my royal crafting frenzy!

    Printable
    I started with the easy project...a quick sign for my frame that usually has my subway word art. Super easy and just cheesy enough right? (If you're going to print, remember to click on the thumbnail to bring up the full size image).


    Princess Pillows and Freezer Paper

    Next, an excuse to really make myself learn how to use my Silhouette SD...which I think I'll probably love, eventually, but the learning curve is STEEP (and it isn't the software that is the hard part...its getting the vinyl or paper to thread through, cut correctly and not get all jammed up). Argh. But after a few fits and starts I did manage to get a design of my own choosing loaded, cut on freezer paper and ready for use. Tip: set the thickness to 1 and the speed to 2 or 3 and place the paper on the carrier shiny side UP.


    The freezer-paper-as-silk-screen-template is brilliant! You cut your shape out so that the shiny side of the paper will be face down. Place your cut out over your fabric and iron it in place. There is just enough wax on the paper to hold it in place. Since this project won't be going through the wash, I just used acrylic craft paint. Go super light on the paint and just go over the spots multiple times (this will help prevent paint from seeping under the edges of the template). I put some newsprint between layers of fabric to avoid bleed-through. I pulled the paper off when the paint was dry enough not to smear. I had so much fun I did it again (but I used an old skirt for the fabric and blinged it out with some rhinestones!).


    Go slowly with the paint, especially around the edges.

    I sewed up around the edges, leaving a gap for stuffing, then used a needle and thread to stitch the hole closed.

    Burlap remnant from JoAnne's $1.43 (enough for 4 pillows), stuffing I already had.
    Ivory/green printed linen skirt a $4 thrift store find, pillow form I already had.


    London Bobby Pins


    Next-I love hair accessories, so when I spotted some blank bobby pins with a bezel (shallow pad that you can add decorations to) at the Hobby Lobby (on sale! $1.19 pkg) I knew I needed some--and I'll be wearing mine tomorrow for sure. I printed some royal graphics with my laser jet. I used Microsoft Word to insert the images and re-sized them. The square is 5/8", so re-size the image on your computer to .625 for both the width and height. The round one is 1/2", BUT I had to re-size the circle to .55 inches. Cut out the images, brush a thin layer of glue on the back of the image (not in the box on the pin) and press it into place--I needed to use a small rectangle of plastic to get the corners in firmly. Let dry, then fill the wells up with Judy's Diamond Glaze and let dry (I used some playdough as a base to keep the pin level and unmoving). Ta-da! Office appropriate wedding celebration accessories :)


    Above: Before I added the Diamond Glaze


    Above: After I puddled the Diamond Glaze (fill it up so that it nearly spills out of the top)


    Here are some graphics that you can print and use:


    Royal Cupcakes


    OK, this was my first experience with marshmallow fondant, and it was pretty nice to work with but I wish I had come up with the ring cupcake first--so, so much easier and faster than the Union Jack. Oh well...they taste yummy too! If you want to do some of your own tasty treats, you really should make the fondant the day before, so here's the link to the recipe


    Little Princesses

    Wait, we're not done yet! I got a link from my Disney Rewards account with a couple of super cute printables for the younger princesses at your house. Check out the Princess Kate paper doll and tiara