Saturday, December 28, 2013

Ginger Cilantro Chicken Salad-my version of Thai Larb

Pin It

I like Thai food. Funny, but until about 5 years ago, I hadn't really tried it.  I grew up in a smaller town and I don't think there was anything outside of the usual Mexican, Italian an Chinese places.  Now I eat Thai quite often..although whenever they ask how spicy, I say "not spicy at all"--which is usually PLENTY spicy for me (and I like spicy Mexican food, but wow, Thai spicy is another scale).  Anyway, aside from Pad Thai, Green Curry and Massaman Curry, one of my favorites is Larb, a type of salad--which I think is pronounced without the "r".  I had some last night at Thai Siam, one of my favorite places, where they serve it lettuce wrap style.  I decided to try it out at home and used this recipe as my guide.

I ended up just making a big salad, rather than as wraps, and I didn't cook the sticky rice that would accompany it, but I sure did enjoy it!

Marinade and salad dressing base:
You'll mix this up and then reserve part of it to use for the marinade and the other part for the dressing.

1/4 c. low sodium soy sauce
1/4 c. canola oil
2 Tbs finely diced fresh ginger (this is the secret ingredient, its about 2 inches of ginger root)
2 Tbs Hoisin sauce
2 tsp sesame oil
1 tsp sriracha sauce-want more spice? add 1 Tbs instead

--Mix all the above together.  Take 4 Tbs out and save it for the marinade--

Now add the last three ingredients and you've got the salad dressing made.
1/4 c. red wine vinegar
3 green onions, chopped including most of the green parts
1 Tbs sugar (optional, or use a packet of artificial sweetener)

Marinate 1 large chicken breast with the 4 Tbs of reserved sauce in a zipper bag.  I pounded the chicken flat so it would cook nice and fast.

Get the salad ready:
1/2 of a large head of Nappa cabbage, thinly sliced (about 4-5 cups)
1-2 carrots, shredded
2-3 radishes, sliced
1/2-2/3 cups of cilantro (remove stems, roughly chop)
toasted sliced almonds
toasted sesame seeds
fresh mint leaves (optional...larb has it, but I just used extra cilantro instead)

Once you've marinaded the chicken for about 30 minutes, place it in a heated skillet with a bit of oil.  Cook each side for about 4 minutes on med-low or until the thermometer reads 180.  Remove from pan and let rest while you mix up the salad.

In a bowl put the cabbage, carrot, radishes, cilantro.  Toss with the dressing.  Slice up the chicken and place on top and sprinkle with the almonds and sesame seeds.

If you are serving this as a main dish salad, it serves two.  If you are doing it as larb or a side dish you can probably get 4-6 servings.  If you are going to do it like larb, then chop up everything much smaller and serve with some pieces of romaine lettuce and sticky rice to make wraps. 


Sunday, December 22, 2013

Nostalgic Cookies Part 2: Rosettes

Pin It  
My last post was about cookies that my dad's mom made.  This post is about my other grandma-a great cook--who was always certain that she hadn't made enough cookies (maybe its because we  filched cookies while she wasn't looking).  I thought I'd give Rosette cookies a try--its been many, many years since I've had them, and for a first try, these seem pretty good (not Grandma perfect, but a worthy effort).

Batter
1 egg
1/8 tsp salt
1/2 Tbs sugar
1/2 cup flour
1/2 cup milk
1/2 tsp vanilla


Beat the egg, salt and sugar then add the remaining ingredients and mix until smooth (I used my hand mixer for about 1 minute).  Refrigerate batter for about 30 minutes.

Heat the oil to about 350 degrees.  Place your rosette iron in the hot oil for about 30 seconds.  Since I had 2 irons I kept one in the oil while I used the other one. 

To make the rosettes:
Take the iron out of the hot oil and tap off excess oil on nearby paper towel.
Dip the iron into the batter, leaving at least the top 1/4 of the iron out of the batter. Hold the iron in the batter for about 3 seconds.
Dip the battered iron into the hot oil for about 12-18 seconds.
Tap off the excess oil and use tongs to gently pull the rosette off the mold.
Flip the cookie so that the oil drips out of the indentations.
When ready to serve, sprinkle with powdered sugar (or a mix of granulated sugar/cinnamon)

I struggled to keep the oil the right temperature, but for the most part, the rosettes worked out fine.  They taste good, and that is the important part!  Merry Christmas.


Friday, December 20, 2013

Nostalgic Cookies Part 1-Raisin Filled Cookies

Pin It  
This Christmas season I have been trying to stay very focused on the true meaning of Christmas--which has meant less shopping, less decorating and more reflections on the birth of the Savior. I also have been reflecting on what a great family I have. As a kid, I have fond memories of celebrations with my grandparents. Today's post is in honor of my Grandma--an Idaho farm wife who was great at making jams, jellies...and raisin filled cookies. I am sad to say that I couldn't find my grandmother's recipe (although I'm still working on it), so I did some searching online and found this one from Brown Eyed Baker, which I tweaked a bit.


The recipe turned out great.  I can imagine sitting in Grandma's kitchen eating cookies, so I think that is a success.  Stay tuned for Nostalgic Cookies Part 2-Rosettes

Dough
1 cup sugar
1/2 cup margarine (don't substitute, look for Gold n Soft)
1 tsp salt
1 egg
3 cups flour
1/2 cup milk
1 Tbs sour cream
2 tsp baking powder
1 tsp baking soda
1 tsp vanilla

In a stand mixer, cream the sugar and butter.  Add the salt, egg, milk, sour cream, baking powder, baking soda and vanilla-mix until combined. Turn off the mixer and add all 3 cups of flour.  Turn mixer on low to avoid a cloud of flour, and mix until a soft, sticky dough ball is formed.  The dough reminds me of a very soft sugar cookie dough.  Wrap the dough in plastic wrap and refrigerate for at least 30 minutes while you make the raisin filling.
 
Filling
1/2 cup sugar
1 1/2 Tbs cornstarch
3/4 cup water
1/2 Tbs lemon juice
8 oz of raisins (that is about 1 1/2 cups, but I use a kitchen scale)

In a small saucepan, mix the sugar, cornstarch and water and whisk until smooth.  Add the lemon juice and raisins and bring to a boil on medium heat.  Simmer while stirring for about 5 minutes (the raisins need to get super soft and plump).
 
Dust your counter top with flour and roll out about 1/3 of the dough to 1/8 inch thick.  Use a round cookie cutter (mine was about 2" circle) to cut the cookies.  I used a well floured spatula to get them off the counter and placed them on a parchment lined baking sheet.  Use a couple of spoons to get the filling out of the pan and smoothed onto the cookie (as the filling cools, its a bit sticky and hard to get off the spoon and I didn't want to use my finger).  Top the cookie and filling with another cookie.  I lightly pressed the edges of the cookies together, but I wasn't careful about it--the dough is soft and it just bakes together.


I baked mine at 375 for about 12 minutes (I rotated the sheet about half way through the process)--its important to only let the bottoms get a bit golden because you want the cookie to be soft, not crunchy.
This recipe made about 2 1/2 dozen cookies.  I've already eaten 3.  I had to put them in the freezer so there will be some left for the family Christmas celebration. 


Monday, November 4, 2013

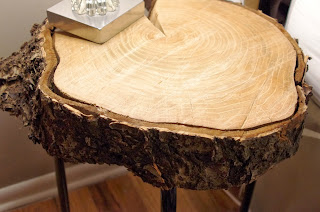
Rustic wood nightstand

Pin It


I've been a fan of a blog called Liz Marie...and she has a great way of blending traditional, modern and rustic styles all together, and it all looks great mixed up!  Taking some inspiration from her designs and another blog  I decided to give this project a try.  A co-worker was kind enough to bring me some slices of a tree that he was taking out.  They were beautiful rounds of wood back in June...and when I came home from a trip, both slices had split as they dried (I think a possible solution would be to use older wood...a log that had dried for a year before being sliced into rounds).

My tree slice is cherry, and may I say cherry is HARD wood.  I started by using my nail gun to make sure the bark was firmly attached (not that it seemed like it was coming off, but just to be safe).  I also used a stiff brush to clean up any stuff on the bark--I wasn't gentle with the bark at all--I figured if it was going to come off, now would be the time to address that.  Next, I started the sanding with 36 grit sandpaper and my palm sander.  You know its super hard wood when hardly any sawdust is created.  I eventually got to 80 grit, but I didn't think it was going to get any smoother (took about 1 1/2 hours of sanding).  I had hoped to sand out the lines from the chain saw, but seriously, cherry is hard.  I guess that bodes well as a table top though.  It is very smooth to the touch and has no slivers.


Using the IKEA marius stool ($5.99) as my base, I flipped the legs of the stool upside down and attached the wood to the legs.  I replaced the screws that came with the stool with 3" wood screws.  I did pre-drill the holes since the wood was SO hard there was no way I was going to be able to muscle in the screws without the pre-drilling.  Did I mention cherry is hard?  Maybe next time I'd use pine :) As my one mistake in the project, I was using a 5" bit and drilled all the way through the log in one of the holes, so I had to fill that in.  Darn it.

I coated the top of the log with Minwax paste wax and buffed it the next day.  I decided that the split just adds rustic character (which I could also cover with a lamp).  This table is super stable and could be used as a stool if you wanted, but its pretty heavy. 

Really, it wasn't a difficult project, just lots of sanding.  I like it-how about you?

Monday, October 14, 2013

Pumpkin Cinnamon Rolls with Ah-Mazing Cream Cheese Frosting

Pin It
 

Scrolling through blogs one night, I ran across a very pretty post about pumpkin cinnamon rolls.  To be perfectly honest, I don't usually gush over pumpkin recipes this time of year (now apple recipes, that is a whole 'nother ball game for me)--but this one looked pretty darn tasty.


I tweaked the recipe a bit, hoping to use the 1-hour bread recipe that my sister-in-law gave me.  It did take me more than an hour, but  the finished rolls were coming out of the oven in under 2 hours.  The rolls are very good, but its the frosting that turned out surprisingly wonderful.  The original recipe called for maple extract, but I didn't have any, so I substituted Vanilla Butter and Nut (from my Smith's grocery)--and WOW, best frosting ever.  Even if you don't make the rolls, try the frosting!


In the KitchenAid bowl:
1/3 c. melted butter
1/2 c. warm water
1/2 c. scalded milk (heat milk on medium until bubbles start to form around the edges, but not boiled)
1 c. pumpkin puree
1 egg
1 tsp. salt
1 tsp. pumpkin pie spice
2 1/2 tsp. instant yeast (the instant type is important, because you do NOT proof this type of yeast in water and you only have to rise the dough once)
1 T. dough enhancer or lecithin (I buy powdered dough enhancer at my WalMart)
4-5 cups of flour (I used 4).

Filling:
1/4 c. brown sugar
1-2 tsp. cinnamon
4 Tbs. butter, softened


Mix all the wet ingredients in the bowl.  In a separate bowl mix all the dry ingredients.  Add the dry ingredients 1 cup at a time until you get a ball of dough that pulls away from the sides of the bowl cleanly.  Let it mix for 5 minutes.


Spray your counter with non-stick cooking spray and dump out your dough.  Because I used instant yeast, you only have to do one rise, instead of the usual two.  So you can immediately roll dough out to a 9x15 rectangle.  Spread the dough with butter, sprinkle with brown sugar and cinnamon.


Roll the dough up along the long edge.  I use dental floss to cut the dough, but a serrated knife would work too.  Place the rolls into a greased baking dish (I wish I'd cut mine 1" instead of 1 1/2" and gotten 15 instead of 12 rolls). Let rise for 30-45 minutes or until double in size.


Bake for about 30 minutes at 350.  Frost with the Ah-Mazing cream cheese frosting.


Ah-MAZING Frosting
4 oz cream cheese
1/4 C. butter
1 1/2 C. Powdered sugar
1 T. milk
1 1/2 tsp. Vanilla butter nut extract-this is the secret ingredient
1/4 tsp. salt


Whip it all together in the KitchenAid for about 3 minutes on high.


Saturday, October 12, 2013

Applesauce

Pin It  

As a kid, I remember August and September being busy helping my mom and grandma put up fruit.  Our basement was filled with jars of peaches, cherries and pears.  I will admit to just being too lazy to do lots of canning, but I make an exception for homemade applesauce.

As with just about anything homemade (and made with homegrown items)--its going to taste better than anything at the grocery store.  The grocery store varieties are just too sweet or too much like baby food for my taste.  Applesauce is very easy, and pretty fool-proof.  Its even easier if you have a food mill, so that you don't have to peel the apples.

You will need:

Apples (I had 1/2 bushel of Ginger Gold-a sweet and spicy soft apple, terrible for eating, wonderful for sauce--I get them from my favorite vendor at the farmer's market)
Food mill
Jars with lids and bands


Since I use a food mill, I won't be peeling my apples, so I wash them in the sink.  Next, I cut the apples up using one of those apple cutters.  I put all the pieces, including the core into a large stockpot with about 1/2 cup of water.  Cover with a lid and simmer until the apples are soft (about 20 minutes)--you will need a big spoon to try and rotate the apples from the top to the bottom at least once.

Dump the soft apples into the top of the food mill and crank it out.  I use a large cake pan to collect the sauce.  Don't worry if the first bit looks a bit runny, once you have all the pulp through you can stir it up.  I run the "garbage" peels etc...3 or 4 more times to get all the goodness out that I can. I do not add anything to my applesauce--but some folks like sugar or cinnamon.


In my sterilized jars, I add the warm applesauce and leave about 3/4" of space.  Put on the lid and screw on the band.  I used my steam canner, bringing the batch up to full steam then timing it for 25 minutes.

I'm told you can freeze applesauce instead of processing it, but my freezer was kinda full...and I do like seeing the pretty jars in my storage room.  Even if you don't want to make a giant batch, make a small batch and serve it warm in a bowl like you would oatmeal (pour on some half and half, brown sugar, cinnamon and pecans)--yeah, good stuff.


Wednesday, July 31, 2013

Coffee Table Re-do

Pin It  
The industrial rustic decorating style has been holding some appeal for me lately.  I had been looking for the right project to tackle and finally found it!

This was one of the easiest and fastest furniture makeovers ever.  Really. It started with this clearance Target table (11.00).  The faux wicker and glass had to go, it was the metal base that I was interested in.
 

Next, the new top.  I headed to Home Depot and the "cull" bin at the back of the store.  I scored two pieces of lumber for only 1.01 each.  I measured the length of the old top and cut the boards to be about the same, 41 inches.  The old top was 20 inches wide, but with my lumber it was 22...close enough.


Some sanding and then I clamped the two boards together.  I cut 3 wood pieces (scraps from my shed) to connect the two pieces together.  I used the nail gun to tack them in place, then used screws to make the connection more secure.
 

More sanding with the palm sander.  I applied the stain (a mix of golden oak and kona black-it was what I had in the garage) and let it dry.  I finished it with some Minwax Finishing Paste, let it dry overnight and buffed it out.

I attached the table top to the base frame using some screws from underneath.

Total investment: $13 and 1 day of working time and a day of drying time.


Monday, July 1, 2013

Mango Coconut Vanilla Artisan Popsicles

Pin It


I recently returned from a trip that included a stop in Indianapolis, IN.  As luck would have it, I was there on a Statehouse Market day and I discovered that artisan popsicles are apparently all the rage.

Where have I been to have not known about this?  Obviously I haven't been searching Pinterest nearly enough.  Well, I am happy to step up to the plate on this one (especially since it will be over 100 degrees pretty much every day this week).

The hardest part for me was deciding what flavor to make. Like many of you, I started thinking I wanted to do this project late at night...on a Sunday...so I had to use what was in the house.  Luckily, I had a few options (ruled out, but saved for a future day are Key Lime Coconut, Strawberry, Chocolate Pudding and Pineapple/Greek yogurt).  I reviewed several recipes online for inspiration, but I really just went with what sounded good.  If you wanted to make these completely dairy free, skip the condensed milk and use sugar or honey as your sweetener instead. Don't have coconut milk?  Use half and half instead.

Here's what you need:
Popsicle molds
2 ripe mangoes
1 can coconut milk (13 oz)
1/4 tsp. vanilla bean paste (or 1 vanilla bean, seeds scraped out)
1/2 can of sweetened condensed milk


Peel and dice up the mangoes and then puree them in the blender--you may need to add a splash of water to make it easier on the blender.


Pour the mango puree through a strainer into a bowl with a pour spout (you'll strain out a bunch of stringy fibers that would otherwise make your popsicle less enjoyable to eat).  Add the coconut milk, vanilla and sweetened condensed milk.  Stir it up.

Pour into your molds and put in the freezer.  I set the timer for 1 hour and then I put the sticks in.  In my mold, if I put the sticks in right away, they sink and leave me with no handle.  If the mixture was a bit thicker to begin with, you could probably put sticks in from the get-go. 


I indulged in a popsicle and some time in the inflatable pool in the backyard with one of these babies today!


Wednesday, June 5, 2013

Knit Skirt, Yoga Waistband

Pin It


I wear skirts a lot..for work, for church, for travel...they're comfy, especially when they are knit and have a fold-over waistband. I have a few in my closet that I've purchased, but who doesn't need more?  I have made about 5 of these so far, using mostly fabric I got online at Girl Charlee.  Love 'em.


Get your fabric laid out (right sides together...and if the front and the back look a lot alike, put some tape on the wrong side so you don't get mixed up later when you are working in a dim basement :) For the pattern, either use a skirt you already have as a guide, or just do some math.


For the math version:
Skirt front and back
Measure the spot around your hip/waist where you want the skirt's waistband to sit.  Let's use the number 40" since its a nice round number. 
Now divide that measurement by 4.  40/4 =10 inches
On the fold of the fabric, measure a line 10" arcross at the top of the skirt
Note:  Its stretchy fabric, so I don't leave much of a seam allowance, but you can if you want.

Now find out how many inches long you want the skirt to be, then add an inch for some hemming allowance.  (Lets say about 36 inches).
Next, you need to make the measurement for the bottom of the skirt.  You can make this as wide as you want.  I'd suggest that you make the bottom  at least 4" more than the top (our top was 10", so the bottom would need to be at least 14")--but it doesn't matter.  If you want a fuller skirt, make it 6 or 8 inches more than the top. 
For the back skirt piece.  If you have enough fabric length, just do an identical piece to the front along the fold (it depends on how long you need your skirt to be--if you are taller than my 5'7", you might need more than 2 yards of fabric--OR--don't cut it on the fold.  Instead, cut it on the leftover space from the front skirt piece.  You'll end up with two pieces that need a back seam sewed, but it works.

Now that you have a front piece and a back piece (note, if you had to cut the back in two pieces, please sew the center seam, right sides together)--you need to sew the side seams.  If you have a patterned fabric, you can try lining up the pattern, or not.  It is a pretty casual skirt.


Once you have the skirt body done, try it on--if its too big, you can always re-sew the side seams a bit closer. 

Waistband
Its time to make the fold-over (yoga style) waistband.  Let's take that waist measurement again, 40"-we'll need a rectangle of fabric that is 40"x 15" (the 15 is a flexible number.  I like my fold over waistband pretty wide, but you can make it narrower if you like).  The 40" need to be the stretchy direction (so theoretically you could stretch that 40" to more than that...if it doesn't stretch, then you're going the wrong direction on the fabric).  Note.  I like to actually measure the distance between the side seams on the skirt body and use that as my official waistband measurement.  It means that for sure the waistband will fit the skirt body precisely.

Fold the rectangle in half (right sides together) so that you end up with a 20x15 piece and sew the side seam, making a tube (You'll note that I didn't have a single piece big enough, so I did 2 20x15 pieces and sewed both edges).


Now fold the tube down so that you have a tube that is 7.5 inches tall and 20 inches (or so) across.  The right side of the fabric should be all you see on the tube. (Hmmm, I also used a quick basting stitch on the raw edges on this example, but I quit doing that because it took more time and didn't really  make a difference...I'm lazy apparently).


Last, you have to attached the waistband to the skirt.  Leave the skirt inside out.  Lay the skirt flat on the ground/table with the waist opening pointing away from you.  Leave the tube right side out. The folded edge of the tube should be pointing toward you.  

Slide the tube over the skirt so that the folded edge of the tube is pointing toward you and all the raw edges of the tube and the skirt body line up.   (sorry, no pic).  I like to line up my tube's side seam with the left seam of the skirt body.  You'll need to pin the waistband all around.  Now use a serger, or a zig-zag stitch on a regular machine to sew the waistband onto the skirt.

You may think you did the waistband backwards, except remember you will be folding the waistband down, hiding that seam :) 

Hemming.  Knit doesn't fray or ravel...so you could just leave it with no hem. Or just serge it.  Or fold it over a couple times and sew a straight stitch around.  Up to you.