Saturday, July 2, 2011

T-shirt recycling, Summer Skirts

Pin It


So, I've come up with a new use for old t-shirts...summer skirts! I tend to wear skirts all summer since they are cool and breezy. You all know by now that I like cutting up old shirts and putting them back together, so here is a great way to recycle some of those big, boxy t-shirts in your closet.

I did two different versions, the first one, which I didn't take good pictures of, is the 15 minute version. The second, probably took me about 45 minutes (although part of that time was me trying to decide how I wanted to go about things, so the next time I do it, I'm guessing it would only be about 30 minutes). You will need a Large or XL shirt (I usually wear a size medium skirt or medium t-shirt, but a men's Large shirt had the length I needed to make a modest skirt).


Version 1: Drawstring skirt.
1. Lay shirt flat on your quilting cutting board. Line up your cutting ruler along the side of the shirt and cut off whatever part of the sleeve sits outside the "perfect rectangle". Next, use the ruler to cut off the neck hole (as high up as you can so that you have plenty of fabric at the top to turn into the waistband). So you should have a perfect rectangle shape left.

2. Flip shirt inside out and sew up the sides where you cut off the sleeve. So now you have a perfect rectangle tube.


3. Fold down about 1 inch of fabric from the top of the shirt and sew a casing to hold a drawstring.

4. I used leftover knit from the sleeves and collar (sewed together) to make the drawstring.


Version 2: Shaped waistband.


Lay the t-shirt out and use your ruler and rotary cutter to cut off the top of the shirt. I left about 1 inch above the graphic for some seam allowance. You want as much fabric on the collar piece left as possible since you will use that to cut out the waistband.

I used a pair of yoga pants with the type of waistband I wanted as my pattern. I laid the yoga pants on the leftover collar fabric and traced the shape. I then cut out the waistband and sewed the ends together (right sides together) to make the circle for the waistband.
With the wrong side out, fold down the top of the waistband to make a finished edge (if you have enough space, you could possibly add a drawstring, but I didn't). Sew around the top of the waistband.

Next, you will need to lay your waistband piece on top of the skirt and trim the body of the skirt so that it is more A-line rather than rectangle. The waistband is your guide on how much to trim off the top of the t-shirt. Once you trimmed the shirt, sew up the sides of the skirt (right sides together).

Last, you need to attach the waistband to the body of the skirt. Make sure that right sides are together (before you start sewing, pin it on and flip it to make sure it isn't backwards). Sew around and then trim off excess fabric from the seams.

If your t-shirt isn't long enough, you could use a second shirt, in a contrasting color and cut off the hem and sew it on to the bottom of the skirt to add some length. I got my shirts at Thriftown for $1 each, but it is yard sale season and you can probably get them for even less (or raid your guy's closet :)

Close up of the waistband:


Back of the skirt had a player's number, which I think just adds to the character:


Great with a pair of flip flops and shades!

Thursday, June 30, 2011

Patio Furniture Slipcovers

Pin It


Every year I think I'm going to turn my backyard into an amazing oasis, but somehow it never happens (I'm still on the lookout for Ahmed Hassan from Yard Crashers, it could happen right?)

I have a patio table and chairs that are great, but not particularly fashionable. I looked at new cushions, but most of them start at over $30 each. So, I thought perhaps a slipcover would be a good solution. I started at Home Fabrics and found several good choices of fabrics that I liked. I love green and brown, so this harlequin pattern was perfect (and at less than $2 a yard, it made the decision easy). I toyed with making the slipcovers more fancy, adding ties etc..., but in the end went with simple instead.

I laid out the cushion and measured around giving myself a 2" allowance around each side. I used the fold to help make things go faster. Turns out I needed 1 yard per cushion since I had 54" wide fabric.


I used the iron to fold and press along the open edge, then pinned the slipcover inside out. I sewed along the top and bottom as well as part of the long side (but I left a very long opening to slide the cushion in). Be sure to really back-stitch the edges of the cushion opening really well so that the seam doesn't tear out while you are stuffing the cushion in.


Sew the opening shut (or use some stick-on velcro or snaps).


Sunday, June 19, 2011

Baby Back Ribs

Pin It


To celebrate Father's Day, I did one of my dad's favorites, ribs. My brother Brian taught me how to do this never-fail method of getting tasty, tender ribs. I like them so well, that I don't even add bbq sauce.

I used half a package of ribs from Costco, which was about 3.5 pounds of meat and it was enough for 4 adults. We served it with corn on the cob and potato casserole (aka: funeral potatoes). I could have made these today, but I did it last night and just put the pot back in the oven to warm them up this afternoon.

Dry Rub

3-4 T. cajun spice mix
1 T. cumin
2 tsp. salt
1 tsp. black pepper


Mix up the spices and set aside. (I'll be honest, I don't really measure any of these ingredients, I just mix until it seems right, the cajun mix makes it a bit spicy, which I like...or you could use a rub that you just buy at the store)

Take the meat out of the package and pat it dry with a paper towel. If your ribs still have the silver membrane on the back (my Costco ones did not), you'll need to pull that off.

Sprinkle the spice mix all over the top and press into the meat (both the top and the bottom). I was in a bit of a rush, so I let it "marinate" on the counter while I let the meat come to room temperature and while I waited for the oven to pre-heat. You could do this overnight or a few hours in advance and just put in the fridge.


Cut the meat into 4-rib pieces and place in a dutch oven (or other heavy covered baking dish). I like to put about 1 tablespoon of oil in the bottom of the dutch oven first. Be sure to arrange the pieces of meat so that some of them curve up and others curve down, giving air lots of room to circulate around the pieces. (According to the cooking shows, meat should be room temp before you throw it into a super hot oven, so I let mine come to room temp first..which was about 20 minutes).


Preheat oven to 500 degrees. With the lid OFF, put the meat into the oven for 30 minutes. Don't open the oven and check on it during these 30 minutes. When the buzzer goes off, open the oven, put the lid on and turn the oven temperature down to 200 degrees-and then don't open the oven again until you are done. Continue cooking at 200 degrees for 20 minutes per pound (so I ended up cooking my 3.5 pounds of meat for another 1 hour 10 minutes, for a grand total of 1 hour 40 minutes).


I cannot believe that I forgot to take a picture of the done ribs...guess we were hungry :) The high temp cook at the beginning helps sear the meat and develop a nice crust. The low temp cooking renders the fat and make the meat nice and tender. I have on other occasions (when it isn't pouring rain outside) fired up the grill and put the already-baked ribs on a hot grill for a minute or two on each side to crispy up the edges or add bbq sauce.


I figure that for 4 servings of ribs, corn, potatoes and huckleberry ice cream (bought that at the store, Tillamook brand, my dad's favorite) I spent less than $4 per person. Take that pricey rib joints!


Tuesday, June 14, 2011

iPad, Handbrake and DVDs

Pin It

I realize I've been very un-projecty lately. I've been really swamped trying to wrap up the school year at work and getting ready for a choir trip next week. Speaking of my trip, I finally got my iPad (I had ordered one from a store here in town who said it would be a couple weeks...which turned into 8...which led me to the actual Apple store where I bought one 10 minutes after walking in the door). Ha. So, for my trip, I of course want to have my new iPad loaded up with lots of movies. I have several already in my iTunes, but I've seen all of those LOTS of times since I use my iPod while on the treadmill.

I thought I'd share some of the tricks I've learned about taking discs I already own and converting them into digital files for my iPad. First, I have a Mac laptop, but I think the software works on PCs too. I downloaded the program Handbrake (here) first.

Put in a dvd (not a blu ray) and let the Mac's DVD player get started and get into the actual movie (not just the previews or the menu, but the actual movie).

Right click on the movie screen and look for the Title menu, look to see which title has a check mark next to it.

You see, it is important to know which title on the disc has the actual movie and not the title that has the extra features or the fake-out movie version (Ah-ha, perhaps you've tried Handbrake before and ended up with a movie that skips the chapters all out of order? That is because Handbrake will default to the longest title, and sometimes the DVD maker puts fake long titles on the disc that are all scrambled).

OK, now you know exactly what Title you need, stop the movie and open up Handbrake.

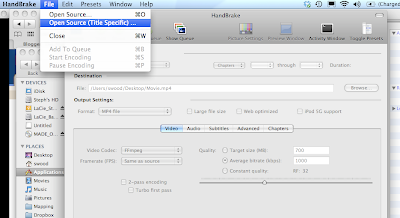
Click on the File menu and choose "Open Source (Title Specific). Do not use the movie-clapper icon that says "source"--otherwise it will scan all the titles on the disc (which takes a LONG time, sometimes stalls and sometimes chooses the wrong title).


Click on the DVD icon and then on the video file


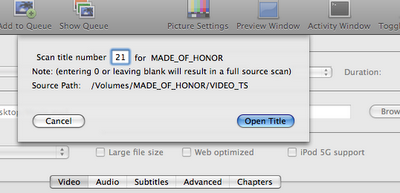
A window will pop up asking which title, so type it in (in my case, title 21...this can vary from dvd to dvd)


Now the program will scan just the correct title (instead of all 98 extra fake ones).

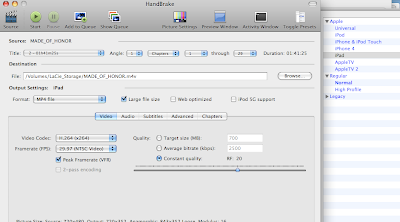
Be sure to click the type of output device (iPhone, iPad, etc...) over on the right side.


There is also a line to tell the computer where you want the finished file to be saved. I change it to my external hard drive so that I don't slow down my computer with lots of large movie files (each about 1 gig), but you can put it wherever you want.

Click the green start icon near the top of the window. Should take between 30-45 minutes.

When its done, I open up iTunes, click Add to Library and browse to where I saved the movie file. I then right click on the movie in iTunes and choose Get Info so that I can add in the cover artwork--which I have previously found online and saved in the album art file of iTunes (note: if you are buying stuff directly from iTunes, or a have a free digital code that came with your movie, the artwork will show up automatically).

So, now you can start moving your giant collection of DVDs to your computer. Hours of entertainment await :)

Tuesday, May 31, 2011

Great Link to More Subway Art

Pin It Wow, I found the motherlode for ideas (and many free printables) for subway art for just about any season or occasion! Not sure which one I want to hang up in my house next (a couple I already have :)

Pinterest Subway Art

Friday, May 27, 2011

New Outdoor Lights

Pin It


I've had really ugly brass (corroded brass at that) light fixtures outside on my garage. I've finally gotten around to replacing them. Eventually I'll do the ones over the front door too, but not today.

The first fixture took about 40 minutes, the second one about 5 minutes! Swapping sconces is pretty simple.

Turn the power off at the breaker box.

Unscrew the old fixture from the wall.

Undo the wire nuts and pull the fixture off.


I had to add a new mounting bracket since I didn't have one with the old fixture, but if you've already got a bracket, just skip to the next step.

Match the black wire from the new fixture to the black wire in the wall and screw together with the wire nut.

Match the white wire from the new fixture to the white wire in the wall and screw together with the wire nut.

Wrap the plain copper wire (sometimes coated in green plastic) around the green "ground" screw.

Cover it all up with the new fixture and screw it in place (depends on the fixture on how that is going to go).


Ta-da! So much better don't you think? I got these cuties from Lowe's for less than $20 each!

Sunday, May 22, 2011

Coconut Lime Layer Cake-Toppled but Tasty

Pin It This is Paula's cake...and mine looked a lot like it, until I drove with it across town, grrr!


I was at the library and I spotted Paula Deen's magazine with this cake on the cover, and it just called to me! First, the cake was very tasty...although I did have a transportation disaster--mine didn't look quite magazine cover ready once I got it to the dinner party I was taking it to--I should have taken a picture BEFORE, oh well. (I give the recipe a bonus since extra coconut and frosting disguised most of the damage). I did make a few cupcakes with the leftover batter and I think I might do a whole batch next time!

Timeline:
Get out 5 sticks of butter to be softening for both the cake and the frosting.
You could make the cakes the day before and freeze them, or make them the morning of.
Make the frosting and frost the cooled cakes.
Refrigerate for an hour before trying to transport the assembled cake to a new location (if you are serving it at your house, then no worries!)
So this recipe used my KitchenAid stand mixer bowl, plus 2 bowls for separating the eggs and another bowl for the dry ingredients...whew, lots of dishes!

Cream the butter and sugar until fluffy then add the egg yolks.

The final batter is very thick, even after folding in the egg whites.

There is enough batter for 3 layers and then some--but I only had 2 cake pans, so I had to do the first two, then the last one. The leftover batter I used in my mini cupcake pan and got 5 bite size cakes.

Even though I only filled each pan only about 1/2 full, it still rose really high in the middle, but as it cooled, it dropped (when I inverted the cake onto the cooling rack, it flattened even more). By the time I was ready to frost, I had 3 perfectly flat rounds. The recipe said 18-20 minutes, but the batter in the middle wasn't even close to done at that point, so I ended up going about 29 minutes.


This is my cake at the party AFTER the top layer completely slid off the top, the middle layer broke into 3 pieces and the bottom layer just fell apart! So, learn from my mistake--first, refrigerate the cake for about an hour before moving it...if the frosting isn't soft, it can't slide. Next, use skewers to keep everything in place. The good thing is that once I put it all back together and re-spread some frosting and smooshed more coconut on the sides, it looked pretty good. If you do refrigerate the cake, be sure to let it come to room temperature before serving...with all the butter and coconut milk, the cake gets very firm when cold.


From the March/April Paula Deen Magazine, pg 46

Coconut-Lime Cake
Makes 1 (9-inch, 3 layer) cake

1 1/2 cups butter, softened
2 cups Domino Granulated Sugar
5 Large Eggland's Best Eggs, separated
1 teaspoon coconut extract
1 teaspoon vanilla extract ( I used vanilla paste with bean seeds)
3 1/2 cups all-purpose flour
1 teaspoon baking powder
1/2 t baking soda
1/2 teaspoon salt
1 1/4 cups coconut milk
1 cup buttermilk
Luscious Lime Frosting (recipe follows)
Coconut flakes for decorating (I used Nutty Guys, which I found at Dan's Foods)

1. Preheat oven to 350 degrees. Spray (9-inch) cake pans with nonstick baking spray with flour.
2. In a large bowl, beat butter and sugar at medium speed with a mixer until fluffy. Add egg yolks and extracts,beating until combined.
3. In a medium bowl, combine flour, baking powder, baking soda, and salt.
4. In a small bowl, combine coconut milk and buttermilk. Gradually add flour mixture to butter mixture alternately with coconut milk mixture, beginning and ending with flour mixture, beating just until combined after each addition.
5. In a medium bowl, beat egg whites until stiff peaks form. Gently fold into batter. Spoon batter into prepared pans, and bake for 18 to 20 minutes. (Note: I needed almost 30 minutes for my cakes) or until a wooden pick inserted in center comes out clean. Let cool in pans for
10 minutes. Remove from pans, and cool completely on wire racks.
6. Spread Luscious Lime Frosting between layers and on top and sides
of cake. Press coconut flakes around edge of cake. Garnish with fresh berries and lime slices; if desired. Chill until ready to serve.

Luscious Lime Frosting
Makes about 5 Cups

1 cup butter, softened
1 teaspoon lime zest (pretty much all the zest on one lime)
1/4 cup fresh lime juice (I got this out of 2 limes)
5 cups Domino Confectioners' Sugar
1 (8 ounce) container frozen whipped topping, thawed

1. In a large bowl, beat butter, lime
zest, and lime juice at medium speed
with a mixer until combined. Gradually
add confectioners' sugar, beating until
smooth. Add whipped topping, beating
until combined. Lick fingers :)