Friday, February 18, 2011

Pedestal Bowl

Pin It


I have a really beautiful red pedestal bowl in my kitchen that mostly sits as display, with the occasional use for a party (but it sure looks pretty in the open shelving). Since I like the look, when I ran across the DIY Pedestal Bowl from the blog, The Speckled Dog I thought I had to try it.

First, I don't think I'd use gorilla glue again, instead, I'd screw through the bowl and countersink the screw and fill the hole with wood putty--BUT, since this bowl is for decoration, it will be fine.

I sanded the original finish a bit to help the paint stick, but I don't think I'd do that again next time either (hmmm, this is turning into a "what not to do" post)--since I wanted to create an antique-y worn look, it probably would have been better to leave the slick finish and paint right over it, it would have sanded off better.


I painted it some left over green paint from the TV cabinet (Dutch Boy Bullfrog Green), let it dry then did a light coat of Oatmeal (Ralph Lauren) paint. Some sanding to make it look old and a coat of poly.

I picked up a few possible bowls at the DI for future projects too (although big chunky candle sticks were in short supply, so I'll have to keep an eye out for the right base).

Monday, February 14, 2011

Ruffle T-Shirt Re-do

Pin It

I love ruffle-y tops. I bought one last year that was expensive, but it was my birthday and I really wanted it. But anyone who knows me, knows I do love clothes, so one top was not enough. A couple months ago at a craft night where we were all learning about recycling the things we have into new things, one neighbor showed how she took 2 matching t-shirts and cannabalized one to add embellishments to the other. Nice. I've been thinking about that for a while and finally decided to do something about it.

I started out with a long sleeve, 100% cotton t-shirt. This shirt had cuffs at the sleeves, rather than just a hemmed edge.


Next, I cut off the sleeves (no going back now).


I cut off the cuff about 1/4" above the seam.


I pinned the cuff back on to what was left of the sleeve (remember, right sides together) and then sewed it back on right along the cuff's original seam.


Next, I used the leftover fabric from the sleeve to cut 2" wide strips. I created the ruffles by running each strip through the sewing machine on a basting stitch, right down the center of each strip. (Use a backstitch on one end of the strip but NOT the other). To make the ruffles, pull one of the threads from the non-backstitched end to gather it up (pull more thread to make a tighter ruffle).


Now, one strip at a time pin the ruffle along the edge of the neckline (I played around a lot with how I wanted to do this first. I thought about going around the whole neckline, making flowers instead of ruffles, etc...).


Once you've pinned on a row of ruffles, sew it on with the sewing machine by sewing right over the top of the center seam. Then repeat the pinning and sewing process for each row. I spaced each row of ruffles about 1/2" apart. I ended up using 4 rows of ruffles.


Ta-Da! New shirt from old shirt :)

Saturday, February 12, 2011

Faux Canvas Pictures

Pin It


Picture from Raymond Designs


Have you been to Costco here in Utah and seen the big displays of temple and landscape pictures? I like them, but even at Costco prices they are a bit pricey. I visited my aunt in Idaho and she had one on her wall, but they had done them at a craft night, where someone from Utah came with all the supplies, but wouldn't tell them what the liquid was that they used on the project. Hmmm, I did some searching and it appears that the secret is....Mod Podge.

I found a really great tutorial here at Shot by Megs--and if you are going big or really custom, it is the way to go! If you are a bit more lazy (busy), here's a few short cuts that I came up with.

Get a picture that you want to texturize (I spent some time playing in Photoshop elements with one that I had to give it that "antique" look, but I think any type of pic would be fun...black and white, cute pics of kids, whatever). I had it printed at Coscto in 8x10 since this was an experiment (in Luster finish)--now that I've tried it, I'll be looking for the right frame at the DI for a larger picture.

Find a frame (I had a thrift store one that I sprayed black).

You will need a backer-board for the photo. You could use hardboard that you get cut at Home Depot, but if your frame had that "pressboard" insert, you could use that OR do what I did, use the glass from the frame! Brilliant huh? You don't need the glass to go over the top of the finished picture, so why not use it?

Use spray adhesive on the insert or glass, then smooth the picture on (I happen to have a J-roller for installing countertop or floor, but it worked great for this too).

Pour some Mod Podge on top of the picture and roll it out with a paint roller. Careful not to leave "edges" or lines as you roll. Let it dry and put on another coat. This gives the subtle pebbled texture that makes the picture look like more than just a photo (the texture is REALLY hard to photograph).
Now you can pop it back into the frame! I guess I need to scuff up the frame a bit to help it match the "antique-y" photo.


Wednesday, February 2, 2011

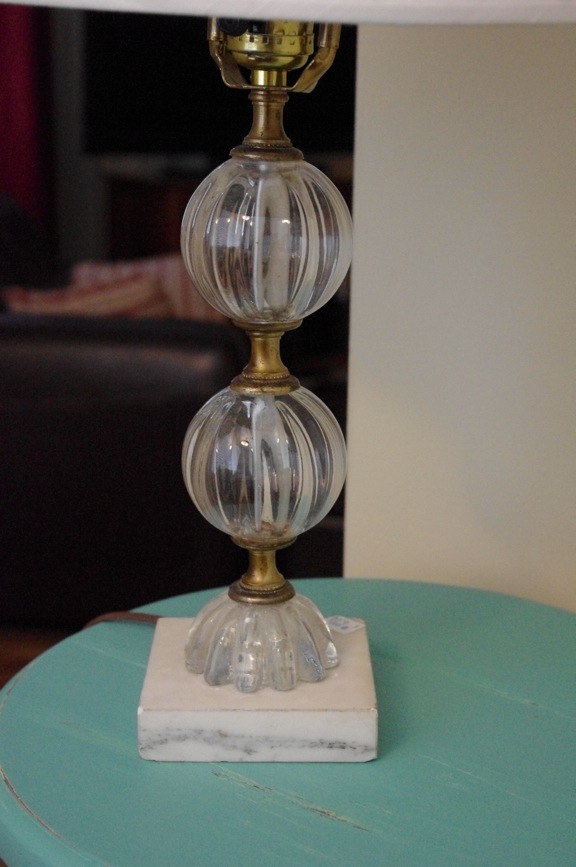
Lamp Refurb

Pin It


I really love the funky acrylic lamps that have become quite popular. I've checked them out at Target, Home Goods, even Walmart and they are pricey (and of course, the ones I like best are the most expensive!) I was at the DI (looking for some pots and pans for my brother who had borrowed one of mine that I for sure didn't want to lose forever) when a lamp with potential caught my eye!

Yup, this lamp could help me get the look of the expensive acrylic one.


It had a slightly bent frame and the lightbulb socket was completely skiwampus, but I just knew it needed a bit of love.

Materials you need:

Small flat head screwdriver
Spray-on primer
Metallic spray paint (I used Krylon)
Forlorn lamp looking for a new lease on life

First thing I did was take a picture so that I would remember the order of all the parts (yup, I'm a thinker...sometimes). Then I disassembled it--pretty easy, there's a tiny set screw on the lightbulb socket, then just unscrew the socket, then all the parts just slid right off the interior pole.


I took the glass balls and washed them up and then used spray primer and silver spray paint on all the metal parts. The base of the lamp was a white/green marble and it also got painted (I thought about leaving it, but it just looked a bit dingy compared to all the new shiny silver parts).

There is a small electrical component that you have to take out (don't spray paint it), but it was really easy to disconnect and then reconnect when I was all done. Just take a picture and use a Sharpie to mark which wire connects to which screw.


Now, put back together it adds a fun bit of sparkle to the bedroom for way less than $10 :) I am going to keep an eye out for a more cylindrical shade and maybe pick up small ball to glue on the finial, but for now, I'm pretty happy!


Monday, January 31, 2011

Upholstered Headboard

Pin It


I always get antsy in January...all the bad air, cold weather etc... keeps me indoors and I start creating projects inside to keep things interesting. The headboard in my bedroom is great--I used a door that I salvaged from an old junior high that was being torn down. I've always liked it, but after 6 years, I wanted to change it up. I thought about painting it black (I've already got the paint leftover from another project)--but then I saw THIS in Good Housekeeping Magazine:


I decided that this was a look I was interested in. I figured I'd just use the headboard I already had and if I ever decide to go back, I can.

Headboard Before:


Supplies you will need:
Piece of particle board (or MDF) cut to size (1/2 inch particle board is cheap at Home Depot and they will cut it to size for you)
1/2 in foam padding (trust me, thicker is not better...just more difficult to work with)
quilt batting
Spray adhesive
staple gun
Nail tack strips (or individual tacks)
Small hammer
Fabric


I found my fabric at Home Fabrics here in SLC (7800 S. State St) in the clearance bin for only $2 a yard! Needed 2 yards of 60" wide fabric.


Cut the board to the size you need.
Got the foam at Hobby Lobby (on sale)--but, I wouldn't use the 1" thick again. It was just too thick, so look for 1/2" (I think Hancock Fabrics carries it). Cut the foam to the size of your board. Use the spray adhesive to make the foam stick.
Smooth the batting (super thin, cheap kind I got for $5 at JoAnns) over the foam and staple it on the back (I only used a few staples to keep it in place).
Take your time and get your fabric spread over the batting--make sure that it is straight. I started at the center bottom with one staple and then the top center. I then worked slowly across the bottom from the center out, then the top. I did the sides the same way. You'll have to experiement with how tight to pull. If you pull too tight, you end up with a funny "dent" at the edge of the headboard foam, but if you don't pull tight enough you'll end up with wrinkles.
It looked great without the nailhead trim, but I forged onward.
Take your time with the corners.

I purchased a nailhead trim that you only have to place a tack every 5th nail to secure it (I ordered it online from Perfectfit.com, with shipping $23 and it got here in 2 days). It is made out of metal (watch out...it can be sharp on the back, I cut my finger and bled on the fabric...drat, but I did get it cleaned up). Even drawing on a straight line to follow didn't make this an easy task. The key is the right hammer (which I didn't have) and going slow. Get a small hammer (like a "lady size" or "kid size") and cover the head with some duct tape so that the metal head doesn't scratch or dent the nailhead trim. Keep the tack straight and gently tap the tack in (no whacking it, you'll just bend the tack and pull it out). I'm still thinking about adding the second row of tacks, but we'll just have to see.

I've also been refurbishing the lamp on the nightstand that I'll showcase later this week. I'm still looking for some new accessories and maybe some new bedding (although my old bedding seems more interesting now that the headboard is "new"). I spent about $50 in supplies, not bad for a new look :)


All in all, I like the headboard, but I'm only about 80% satisfied with the placement of the tacks. So we'll see if I can live with it or if I pull it out and try again.


Friday, January 28, 2011

Leather Belt Wrist Cuff

Pin It I was at a chocolate party a couple weekends ago (don't you just love it when a friend sends you an invite to a party and chocolate is the only thing being served?) Anyway, she was wearing this fun leather cuff that looked a lot like an old belt that had been up-cycled. So I thought I'd give it a try. Finding the old belt was easy (closet), getting the right snaps and embellishment a little more tricky. Turns out that Michael's crafts had the best selection (although Beck Leather goods did have lots, they are pretty far from my house). I tried using snaps and the snap pliers that I already had, but it didn't work because the leather is too thick for the types of snaps you use on fabric. Instead, the ones I got at Michael's have a longer post to accommodate the thicker leather. I learned a new vocabulary term during this process, concho, which is the name for the metal decoration that can either have a screw-on back like mine or a rivet style (you can also buy fancy rivets that have crystals or turquoise or decorative silver).

Find a fun belt (mine conveniently already had holes to put the snap through)


Get a snap setter and anvil kit plus snaps (I used size 24 for the thick leather)-got the kit at Michael's for 7.99 (use your 40% off coupon for an even better deal). I put the 2 pieces that go together in the picture for when you are ready to assemble the snaps.

Place the button (nice side) of the snap upside down on the curved anvil.


Put the leather on the button part of the snap (upside down) and put the piece with the ring on it and set with the setting tool and a hammer. You will need to keep things straight in order for the snap to set correctly.

Duh, I had meant to put the button part of the snap on the other side of the bracelet so that the finished edge of the belt ended up on top, but its ok. Just make sure that before you set the snaps you don't have them both facing the same side, otherwise they won't line up to snap.


The concho has a screw back, so I just threaded it through a hole and used a screwdriver to tighten it up.