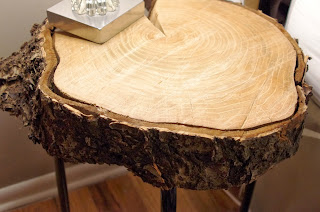
I've been a fan of a blog called Liz Marie...and she has a great way of blending traditional, modern and rustic styles all together, and it all looks great mixed up! Taking some inspiration from her designs and another blog I decided to give this project a try. A co-worker was kind enough to bring me some slices of a tree that he was taking out. They were beautiful rounds of wood back in June...and when I came home from a trip, both slices had split as they dried (I think a possible solution would be to use older wood...a log that had dried for a year before being sliced into rounds).

My tree slice is cherry, and may I say cherry is HARD wood. I started by using my nail gun to make sure the bark was firmly attached (not that it seemed like it was coming off, but just to be safe). I also used a stiff brush to clean up any stuff on the bark--I wasn't gentle with the bark at all--I figured if it was going to come off, now would be the time to address that. Next, I started the sanding with 36 grit sandpaper and my palm sander. You know its super hard wood when hardly any sawdust is created. I eventually got to 80 grit, but I didn't think it was going to get any smoother (took about 1 1/2 hours of sanding). I had hoped to sand out the lines from the chain saw, but seriously, cherry is hard. I guess that bodes well as a table top though. It is very smooth to the touch and has no slivers.

Using the IKEA marius stool ($5.99) as my base, I flipped the legs of the stool upside down and attached the wood to the legs. I replaced the screws that came with the stool with 3" wood screws. I did pre-drill the holes since the wood was SO hard there was no way I was going to be able to muscle in the screws without the pre-drilling. Did I mention cherry is hard? Maybe next time I'd use pine :) As my one mistake in the project, I was using a 5" bit and drilled all the way through the log in one of the holes, so I had to fill that in. Darn it.

I coated the top of the log with Minwax paste wax and buffed it the next day. I decided that the split just adds rustic character (which I could also cover with a lamp). This table is super stable and could be used as a stool if you wanted, but its pretty heavy.

Really, it wasn't a difficult project, just lots of sanding. I like it-how about you?


No comments:
Post a Comment
Thank you for taking time to comment!
Note: Only a member of this blog may post a comment.