Sunday, July 30, 2017

Traveling Light--Summer trip to Europe

Pin It

I just got back from 8 days in Paris and Prague with my brother.  I'm a fan of packing light, and have done posts on packing light before.  I thought I'd share what I took with me for a July trip. It was hot and we walked everywhere.

While I was only gone for 8 days, the things I had with me I could have done 2-3 weeks if I did laundry more often.  I only washed underwear on this short trip, but I was down to my last clean shirt on the last day. 

Bags

Osprey Porter 46
This is a great backpack.  Its slightly larger than my regular backpack, but it isn't in the category of "backpacking through Europe" either.  Its main draw is that it unzips and opens up like a suitcase, so its easy to get in and out of.  Its comfortable enough for wearing from the airport, on the subway etc...but you do get tired of it--it doesn't have hip belts to distribute weight.  But you don't want roller bags in Europe--too many cobble stone sidewalks and stairs.  This bag also has some cinch straps, so if you need to smash it in order to make it fit as a carry on, you can (It easily fit in the overhead on my Delta and Air France flights, but I don't know about the budget European carriers).

Keen travel purse
I love this purse.  It is heavy duty nylon with lots of zippers and pockets. 


Packing cubes

I had 2 long rectangle and 2 small rectangle cubes.  (Try eBags or Amazon Basic for some inexpensive ones).  The long rectangles were great for the backpack.  I used them for my clothes.  The small rectangles I used for socks, underwear and electronics. 


What I took

Clothes
1 Pair travel pants
1 pair leggings
2 skirts (these were reversible, found them at Costco)
1 knit dress (Banana Republic)
4 black t shirts
1 stripe short sleeve top
1 stripe long sleeve top
1 gray long sleeve thin sweater
1 pink thin cardigan
2 scarves
4 pairs of socks
4 pairs of underwear
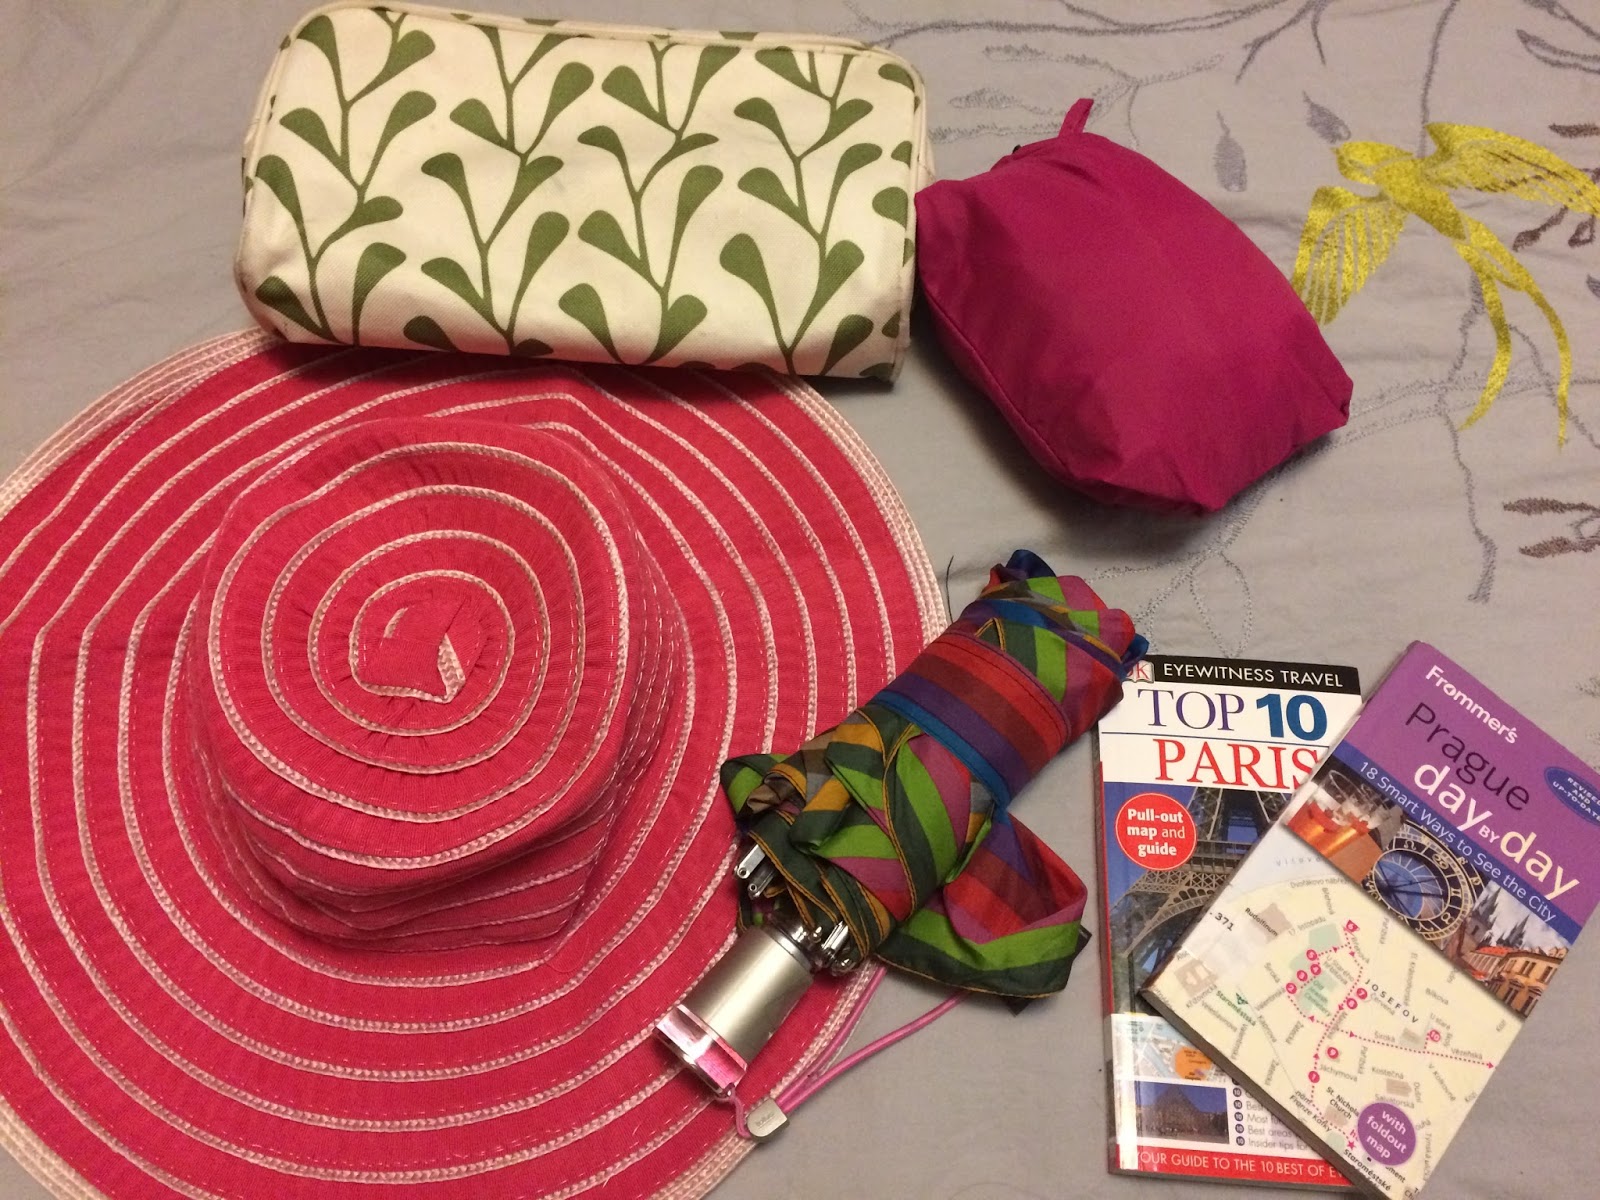
1 sun hat
1 rain jacket (that folds into its own pocket)

Shoes
black sandals
black Sketcher mary janes
running shoes

Toiletries
sunscreen
minimal make up
medicine
ear plugs
band aids
laundry soap (Tide liquid travel packs)


Other
small guidebooks
umbrella
sunglasses
back up battery
phone
mini ipad (I could have left at home...plane had plenty of in seat entertainment)
noise cancelling headphones
power converter/adapter


I could have gotten by with 1 less black shirt and I wore the dress once--but could have worn a skirt another time.  I am so glad I took the running shoes.  Everyone says that Paris needs to be dressier, that you'll stand out as an American if you wear tennis shoes.  Guess what, you'll look like an American no matter what.  Its your trip and your feet--wear the tennis shoes.  I wore my black sandals on the first day (landed at 11:15 am and powered through the day until about 8:00 and with the hot, sweaty weather, I ended up with a large blister on the bottom of my foot.  These sandals have never given me trouble any other time and I've had them for years).  Wear the tennis shoes--don't put fashion over function, not even for Paris.  I do love my Sketcher Mary Janes--and wore them all last year on my Europe trip, but I know I walked WAY more on this trip (at a minimum of 12 miles per day)--and with the blister from day one, I needed to wear socks, so the Mary Janes didn't get the wear that I thought they would.    


Blister help:  I had a big blister on the bottom of my heel by the end of day one.  It had not popped and I had 7 more days of walking to do.  Blisters happen because of friction--so you want to reduce friction and add support.  I didn't take my body glide that I use when I run (should have, for my feet but also other places that got sweaty and chafed with all the walking and sweating)--so I pulled out my stick deodorant and used my fingernail to dig out a dollop and put it on top of the blister, then covered it with a good bandage.  Then I smeared some deodorant on top of the bandage.  I then put on my socks (luckily, I took my double knit running socks, which help reduce friction).  By wearing the bandage with the deodorant, socks and my tennis shoes I was able to walk all day on day 2 without being miserable and by day three the blister had receded on its own.  My brother had a similar problem, so we did the same fix for him. 

Thursday, July 27, 2017

Travel Pant Refashion-Tapering and Waistband adjustment

Pin It

I am traveling to Europe this summer--and even though I was there last summer, I find that once again, I'm shopping for just the right clothes.  This trip is a short time frame and the weather will probably be warm, but I get cold on planes, so pants make sense.   So, I started looking for some great travel pants.  I found great ones from Athleta--they are called the Trekkie Jogger, but they are $89.  I do love Athleta, and have many of their clothes--but $89 just wasn't in the budget (car repairs last week, upcoming dental expenses...not to mention the cost of the upcoming trip).  I tried to love something already in my wardrobe, but couldn't.  I wanted something lightweight, non-wrinkly, easy to dry and ankle length--plus I wanted secure pockets with zippers to hold things.  Tall order--but the Athleta pants did all that, for a price.

So I decided I'd hit my favorite thrift store and cross my fingers that I'd find the perfect pants (I actually have a lot of Athleta from thrift stores).  No luck--no one had purchased the Trekkie Jogger and donated it for me to find.  But I did find a pair of Eddie Bauer hiking pants that had potential.  The fabric was right, the size was close, they had some zippered pockets and they were long--and they were $4.  But they were also really boxy.


I've been using my sewing machine a lot this summer.  Mostly small mending projects--but I've done lots of alterations.  T-shirts that were just a little wide--a quick seam down each side and now its a fitted shirt! A clearance find shirt that the store only had in size 1X (great length for leggings though)--or how about tacking the top of a swimsuit in about an inch (more hips than chest for me).  These are not complicated alterations--but it makes my clothes fit right, which makes me feel more confident in them and more likely to wear them.   I can't tell you how grateful I am that my mom and grandma taught me to sew.  I bet I've fixed/changed about 7 items just this summer.  I usually avoid sewing pants, but tapering the legs seemed do-able; and it was.  It took about 1 hour to complete.

What you'll need:
Pants to taper
sewing machine
pins
thread
straight edge and chalk pencil (or washable marker)
elastic

Difficulty:  Beginner (if you can sew a straight line, you can do this)

Put the pants on inside out.  If you have a friend to help with the pinning, it would be easier, but I did it on myself--just be careful!  Figure out how narrow you want the pants to be at the ankle (test pin it and put your foot in and out to make sure it fits).  Then pin from ankle to crotch in a diagonal line that makes your taper evenly go down the pant leg. 

Once I had them pinned, I removed them, laid them flat on the table and fidgeted with the pinning so that the fabric was flat and I could see the general line that I would follow for sewing.  I got out my quilting ruler and used a chalk pencil to draw the line I would sew.  Then I unpinned and repinned the pants so  that everything was flat and smooth.

I used the longest stitch on my machine and did not backstitch and sewed along the chalk line.  I created an angle seam from the crotch all the way to the ankle.  Repeat for the other pant leg.  Take out the pins, turn the pants right side out and try them on.  If they are tapered to your liking, great!  If not, redraw the line to make them wider/narrower and sew again (if you accidentally made them too narrow the first time, you will have to unpick the seam and try again.  If they were too wide the first time, no big deal--just sew another line).  Once you are satisfied with the fit you can go back over the seam, backstitch the beginning and end, or be like me and use a serger to cut off the extra fabric and make the raw edges neat and tidy.  Just don't cut off the extra fabric of the pants until you are SURE that they are just the way you want them. 


Don't they look better?  More feminine?  Yeah, I thought so too.  But I did a bit more tweaking.  The pants were 1 size too big to begin with--so the waistband gapped in the back.  No one wants to see underwear hanging out the back of someone's pants.  Here's an easy trick.  Put in a bit of elastic in the back of the waistband.  Nothing that would scream "senior citizen" pants, but just enough stretch to keep the back of the pants from gapping.  I flipped the pants inside out again, and made two small cuts into the inside of the waist.  I decided I wanted the elastic to go from the outer edge of each pocket, which was about 10 inches total.


Note:  The zig zag line on the waistband was part of the original pants, I didn't do that.


I took a piece of 1/4" elastic that was about 14 inches long and put a safety pin on one end and threaded it through the two holes I'd made. I stretched it about 1 1/2 inches past the hole and pinned it in place--and did the same on the opposite end.  It looked really gathered laying on my sewing table, but when I tried the pants on, the gathers nearly disappeared.  Once I was pleased with the amount of stretch, I sewed over the end of the elastic a few times with the machine and then trimmed off the ends.  I used a tight zig-zag stitch to cover/close up the holes I had cut.  No one will notice as long as you use matching thread.


The Athleta version have elastic around the ankles, but I decided to add a gathered detail along the outside ankle instead.   The hardest part about this was getting the fabric of the ankle out of the way so that you are only sewing through the one side of fabric + the elastic. Measure up 5 inches from the hem on the wrong side of the fabric and pin the elastic on top. Place under the needle with the fabric on the bottom and elastic on the top. Sew a couple stitches to make sure the elastic won't come flying at you, then pull the elastic so its fully stretched and continue sewing along the outside seam until just before the hem.  Backstitch to hold it in place and then trim off the elastic.


Not too bad right? These altered pants now meet my needs.  They have the soft stretchy fabric that wicks moisture and dries quickly.  They have 3 pockets with zippers (and two without), they look a bit more dressy than the boxy hiking pants that they started out as.


As a last alteration, I wanted to add a temporary hidden pocket to hold my passport/money.  I sewed a rectangle pocket with a zipper at the top and then sewed it into the inside front waistband of the pants.  I will un-attach it after the trip, but it will make me feel more secure about traveling on crowded trains/subways.


There you go, my $4 version of expensive travel pants.  I'm pretty excited.  They are fitted without being uncomfortable and the fabric has plenty of stretch to make them perfect for long airplane rides.