Showing posts with label breakfast. Show all posts

Friday, October 7, 2016

Overnight Waffles

Pin It
 
Its pretty rare for me to make waffles. I'm just not home in the mornings, but I had a day off from work and I just enjoyed being home and really wanted waffles.  I have tried lots of waffle mixes, which promise delicious waffles with zero effort, and I haven't ever been in love (they taste like pancakes in waffle shape).  I know I love the Leige waffles you can get at Belgian places (or our local food truck)--but the sugar in the Leige waffles is hard to clean and you need a nicer waffle iron than I have to get the right heat going (plus it requires a trip to IKEA for the sugar or an order from Amazon).  So more research.  King Arthur flour always has interesting recipes, and they had one for overnight yeast waffles.  This sounds like my kind of time-saver; let the waffles get ready while I sleep.  

Mixing up the waffles took about 5 minutes in my KitchenAid--then I let the batter sit on the counter while I puttered around my bedtime routine.  Then put it in the fridge until morning. 
After 1 hour on the counter
After resting overnight in the fridge

I made only one change to the recipe, I used white sugar instead of maple sugar in the batter.  I found that my waffle iron on level 7.5 (out of 10) was the right temp.  I preheated the iron for about 10 minutes.  Added 1 cup of batter and let it cook for about 6 minutes.  I made 3 waffles in the batch.  The batter is pretty thick.  Maybe I'd mix it up in a gallon zipper bag next time and then cut off the tip to just squeeze out the batter. 
Serve it with fresh picked peaches and whipped cream.  I froze the leftover and they toast up nicely the next day.  The yeast gives the waffle a really nice light texture and more interesting flavor.  I think this is my go-to recipe.  I think I could even make a mix with powdered milk and then I'd just have to add eggs, butter and water.  Hmmmm.

3/4 C. lukewarm milk
3 T. melted butter
1 1/2  T sugar
1/2 tsp. Salt
1 tsp. vanilla
1 egg
1 C. all purpose flour
3/4 tsp. instant yeast

Mix everything up and sit on counter for about an hour. You can cook them after the 1st hour if you want...or refrigerate the batter overnight and make waffles in the morning.


Thursday, July 21, 2016

Coconut Chia Pudding

Pin It
I've been wanting to try the chia pudding trend--the images on Pinterest all look so tasty, but I was worried that looks would be deceiving and I'd be sad to waste good ingredients.  As luck would have it, I was waiting for a flight and the cafe near my gate was a place called Naked Food with all kinds of whole food choices, including a chia pudding with mangoes. It was a worthy purchase--it was so tasty!  So I headed home to replicate it at home with great success.

This stuff is super simple, and while I've only tried it with the coconut milk, other recipes around the internet use all kinds of milks.


2 C. coconut milk (I used canned full fat Thai coconut milk, not the box kind)
1/2 C. chia seed
1 tsp. vanilla
1 packet of stevia

Whisk it all together and refrigerate for at least 3 hours.  The seeds swell and gel the liquid, but mine stayed a bit crunchy.  Top with fruit and enjoy.  I divided it into 6 servings. I hear that if you have a super blender, you can puree the mix before refrigerating and you'll end up with a smooth pudding.  Maybe I'll try that (and maybe I'll try the box coconut milk and some chocolate).


Monday, October 14, 2013

Pumpkin Cinnamon Rolls with Ah-Mazing Cream Cheese Frosting

Pin It
 

Scrolling through blogs one night, I ran across a very pretty post about pumpkin cinnamon rolls.  To be perfectly honest, I don't usually gush over pumpkin recipes this time of year (now apple recipes, that is a whole 'nother ball game for me)--but this one looked pretty darn tasty.


I tweaked the recipe a bit, hoping to use the 1-hour bread recipe that my sister-in-law gave me.  It did take me more than an hour, but  the finished rolls were coming out of the oven in under 2 hours.  The rolls are very good, but its the frosting that turned out surprisingly wonderful.  The original recipe called for maple extract, but I didn't have any, so I substituted Vanilla Butter and Nut (from my Smith's grocery)--and WOW, best frosting ever.  Even if you don't make the rolls, try the frosting!


In the KitchenAid bowl:
1/3 c. melted butter
1/2 c. warm water
1/2 c. scalded milk (heat milk on medium until bubbles start to form around the edges, but not boiled)
1 c. pumpkin puree
1 egg
1 tsp. salt
1 tsp. pumpkin pie spice
2 1/2 tsp. instant yeast (the instant type is important, because you do NOT proof this type of yeast in water and you only have to rise the dough once)
1 T. dough enhancer or lecithin (I buy powdered dough enhancer at my WalMart)
4-5 cups of flour (I used 4).

Filling:
1/4 c. brown sugar
1-2 tsp. cinnamon
4 Tbs. butter, softened


Mix all the wet ingredients in the bowl.  In a separate bowl mix all the dry ingredients.  Add the dry ingredients 1 cup at a time until you get a ball of dough that pulls away from the sides of the bowl cleanly.  Let it mix for 5 minutes.


Spray your counter with non-stick cooking spray and dump out your dough.  Because I used instant yeast, you only have to do one rise, instead of the usual two.  So you can immediately roll dough out to a 9x15 rectangle.  Spread the dough with butter, sprinkle with brown sugar and cinnamon.


Roll the dough up along the long edge.  I use dental floss to cut the dough, but a serrated knife would work too.  Place the rolls into a greased baking dish (I wish I'd cut mine 1" instead of 1 1/2" and gotten 15 instead of 12 rolls). Let rise for 30-45 minutes or until double in size.


Bake for about 30 minutes at 350.  Frost with the Ah-Mazing cream cheese frosting.


Ah-MAZING Frosting
4 oz cream cheese
1/4 C. butter
1 1/2 C. Powdered sugar
1 T. milk
1 1/2 tsp. Vanilla butter nut extract-this is the secret ingredient
1/4 tsp. salt


Whip it all together in the KitchenAid for about 3 minutes on high.


Monday, April 15, 2013

Quick Pecan Sticky Buns

Pin It


I do like baking, especially yeast breads since they just make your house smell divine and they taste so good.  The downside is that it can take a while.  My sister-in-law has a recipe for bread that takes one hour from start to finish, but I hadn't tried it out--so today seemed like a good day to change that.

Some quick internet searching turned up the same recipe over and over with slight variations. My sis-in-law uses the version with liquid soy lecithin, but I don't have any of that on hand--but I do have  a container of "dough enhancer" which contains lecithin, so I figured I'd just experiment and just add it (none of the recipes I saw did that, but hey, I like experiments).

Ingredients
 5 1/2 c. bread flour
2-4 Tbs sugar (I used 4 since I'm making sweet rolls)
1 1/2 Tbs. (heaping) SAF instant yeast
1 Tbs. dough enhancer (opt.)
1 1/2 tsp. salt
3 Tbs. oil
2 C. hot water
Non-stick spray

Filling
butter, softened
brown sugar
cinnamon

Topping
1/2 C. butter melted
1/2 C. brown sugar
1 C. pecans, rough chopped

Put all the dry ingredients in your mixer, yes, all of them including the dry yeast (I used my KitchenAid on this one and it was fine, but if you double the recipe, you'll need a Bosch).  Now add the water and oil and mix for a minute.  After 1 minute it should be all incorporated and look pretty sticky, if not, add a bit more water.  Now mix for 5 minutes in your mixer (or if you are doing it by hand, wow, you are stronger than me).

While its mixing up, I put everything away (including the flour! you don't need it again) and made sure the countertop was clean and dry.  Spray the counter with non-stick spray and dump the sticky dough on it (get your hands sprayed too).  Knead the dough for just a minute to get it in a nice ball.


I divided the dough in half and placed one half in a zipper bag (sprayed with non-stick spray) to save for later this week when I try scones.


The remaining dough I rolled out on the counter into about a 12x16 inch rectangle.   Spread with butter and then sprinkle with brown sugar and cinnamon.  Roll the dough into a long log.  I use dental floss or thread to slice 1 1/2 inch long rolls.

In your baking pan (I had 2 rounds, but a 9x13 would be fine-I only took pictures of just the one pan, but I ended up with about 12 rolls) mix the melted butter and brown sugar.  Sprinkle in the pecans.  Now place each of your rolls in the pan, cover with a dish towel and let rise for 25 minutes.


After 25 minutes, they were ready to bake!


Bake at 350 for about 25 minutes.  Invert on a serving tray right away and start eating :)


Since this was my first go-round, my total time from pulling out ingredients to eating a roll was about 70 minutes-not bad!  They taste very good--probably not award-winning when compared to other doughs, but very good.  Much better than the refrigerator/freezer rolls you can buy at the store.  

I'm pretty sure my sis-in-law uses this same recipe for monkey bread, dinner rolls, sandwich bread, pizza crust and more.  I'm going to keep trying it (adjusting the sugar amounts depending on my product).  Should be fun.


Tuesday, July 10, 2012

Star Wars Palooza!

Pin It Star Wars party

Each year I celebrate "Day with Aunt Steph" with my brothers' kids.  I've learned that it isn't about fancy or expensive, its just about spending time together (and ditching the parents).  Our tradition includes lunch and a chocolate fountain. This year I thought I'd combine our  mutual love of Star Wars with our special day and did a Star Wars Palooza.

I've found tons of great Star Wars party ideas on Pinterest.  I have been adding to my kitchen collection of Star Wars supplies for a while.  From Williams-Sonoma, I have the cookie cutters, pancake molds and sandwich cutters.  From Amazon, I  found some silicone trays for ice cubes/chocolates (just do a search for Star Wars silicone tray).  As for entertainment, I thought a pinata would be cool, as well as light-sabers and then an outdoor movie. 


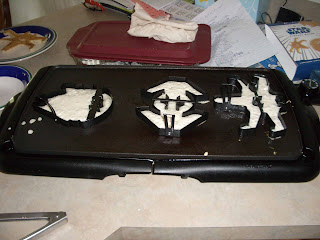
We started the day with Star Wars pancakes.  Couple of things to make this go smoothly.  First, if you have more than one person eating with you, start a bit earlier than when the kids are all sitting at the table waiting!  I used Krusteaz pancake mix and made it just a little thinner than usual (not really thin, just a bit more pourable) and put it in a large water bottle with a squeeze cap.  Preheat your griddle to around 250-300 degrees with the pancake molds sitting on the griddle (you want them to be hot too).  Spray them very generously with non-stick spray.  Squirt the batter into all the crevices.  Careful--you don't want to fill more than 1/2 full otherwise the batter puffs up over the top of the mold and then things get really messy and stuck.  Once the batter is fairly dry looking and bubbles have stopped, gently pull off the mold and then flip the pancake with a larger turner. 

This day took some advance prep, so I started with making the cookies and froze them.   Apparently I took no pictures of the process, but I modified this recipe by leaving out the espresso powder.  I also did 1/2 batch for Darth Vader and the other 1/2 batch for Yoda (so, how do you get 1/2 an egg?  you crack it open, scramble it and then divide it in half...since I was going to make two mini batches of cookie anyway, it worked out great).  Also used this blog post  and this one for help.

 
For Darth Vader, I used regular cocoa powder and black gel food coloring.  Refrigerating the dough for 30 minutes before rolling out helped.  You need to pop the tray of cookies in the freezer before you bake them for about 10 minutes (this helps keep them from getting too puffy and losing their details while baking).

For Yoda, I reduced the cocoa to 1 Tablespoon and a few drops of regular green food coloring, which made for the perfect Yoda green (one of the recipes used green tea powder, but I didn't want to)!  I also chose to use lemon extract instead of vanilla on these cookies.  Ditto on the refrigerating the dough and freezing the tray before baking. 

I did think about making sandwich cookies out of these, but I suspected the kids would probably dunk them in the chocolate fountain anyway, so I didn't (no one cared that they had no frosting...come on, they look like Yoda and Darth Vader!)

Chocolates


Next on my prep list was the Star Wars chocolates.  I bought the molds from Amazon.com  They were each about $9.  I will say that the X-wing and R2D2 molds were disappointing.  They have such fine details and small parts that they did not unmold successfully.  Han Solo in carbonite and Darth Vader worked really, really well (so did the large Millennium Falcon).

I started with a tray of melting chocolate (OK, this party was for kids under the age of 12, so I did not spring for expensive chocolate).  I melted it up in the microwave right in its tray. 

I got all the molds ready and pulled out a spoon and some skewers.

 I filled each mold with the spoon and then used the skewer to make sure that chocolate filled in all the little details.


 You can see how the X Wing fighters are all broken.  Not one got the small wing tips out. 

Light Sabers
From http://havocmayhem.blogspot.com

I made Light Sabers for each of the kids out of pool noodles.  I used this tutorial:
http://www.jedibroadsquad.net/FoamSaber.html  Which while keeping an eye on  8 kids (4 of them are 3 yrs old) I didn't get a chance to snap any clear pics of the Light Sabers, oh well).

I found the shiny silver duct tape at WalMart and used it for covering the handle (the tutorial used black).  I used electrical tape to add the decorations around each handle.  Super easy and the kids loved whacking stuff with them, including the pinata!

Pinata

A pinata  you say? Yup, a big "hit" to be sure. The easiest one I could think of was a Death Star.  I got some punch ball balloons at WalMart because they are supposed to be round...but it was pretty oval shaped. Oh well.  If I were to do it again, I'd hit the dollar store for an inflatable beach ball instead.  The pinata took a whole day to make (luckily it was a sunny and windy day, so it dried quickly).

Mix up the glue; 2 c. water, 1 c. flour.  Tear up some strips of newspaper and smooth them all around the balloon.  I did this outside on the lawn in my work clothes, because this is messy. I had a large bowl to set the balloon in while I worked.  I hung the pinata to dry from the punch balloon rubber band.  When layer one was done, I did it again.  Since most of the kids would be under 8, two layers was plenty, but if they were older, you'd probably want 4 layers.

I sprayed the dried pinata with gray primer since that is what I had in the garage.  Once the paint was dry, I poked the balloon and let the air out.  I used black electrical tape to make the equator and some shiny duct tape to add the decor and large round spot.  I also used the duct tape to cover over the hole left at the top where I stuffed the candy.

I filled the pinata with some Star Wars chocolate coins that I found at WalMart at Christmas time and some other candy.  


The Food!

There are lots and lots of great ideas for Star Wars themed party food.  My brother and his wife even gave me the Star Wars cook book for my birthday.  I used the book for some of the food titles, some titles I found on other blogs and still others I just put together.  I was loved the classic Star Wars detailing of the food labels over at Hello My Sweet so I used them as inspiration for mine. I even did water bottle labels that I printed and taped on Costco brand water.  I'll be honest, I created LOTS more labels than I would have needed, and ended up trying to keep things simple.  After the kids had been playing at the park and a stop at the grocery store for fruit for dipping, they were starved, so I had to hustle to get things set out.  So, no fancy display table, but the kids didn't care one bit!

Wanna know the funniest?  Of all the items on the table, which one do you think got eaten up first and had none left over?  The broccoli from the veggie tray.  Hilarious (and what good sisters-in-law I have for teaching their kids to enjoy vegetables!) 

On the table:
Padowan Pizza
Vader Veggies w/ Droid Dip
Light Sabers (fat pretzel sticks, plain. The kids dipped them in dip or chocolate fountain)
Yoda/Darth Vader Cookies
Hoth Chocolates
The Force Fruit
Chewbaca's Chocolate Fountain (Hershey's Syrup in a fountain I found at Ross for $15)


Monday, May 16, 2011

Dried Mango & Pineapple

Pin It

This post combines two experiences, Costco...the place where I can't get out the door without spending $100, and Trader Joe's, a fun new experience for me (wish they had one here). I had been enjoying the dried mangoes from Trader Joe's...they are so tasty and soft and chewy and thought maybe I should dig out my dehydrator from the basement and try doing some myself. I had gone to Costco and they had cases of mangoes for only $5.99! (I picked up a pineapple too, another fruit that I really love).

Turns out, mangoes dry up pretty nice, but it took me 3 tries to find the right amount of time to get fruit that was dry, but not crispy (started with 10 hours, but they turned out like mango chips, tried 8 hours overnight, but even though they seemed pliable, when they cooled off, again, crispy, 5-6 hours was about right). I didn't add anything to the fruit...just sliced it and put it in the dehydrator.

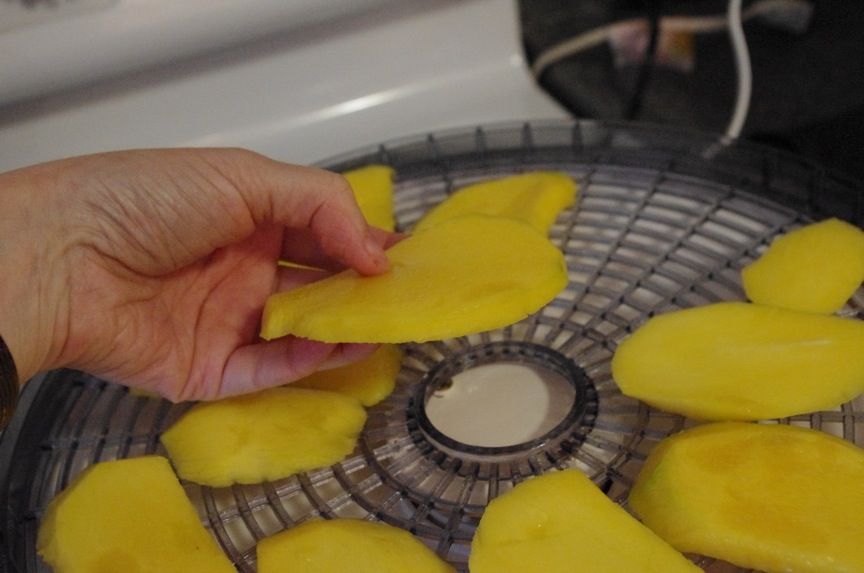
Use ripe mangoes (if they aren't soft and sweet now, they won't be tasty dried either). I peeled them and then sliced them about 1/4 inch thick (maybe a bit thinner-the pineapple about the same, but you don't want to slice it too thin, otherwise, you get mango chips instead of chewy mango). The fruit will shrink considerably. Its important to try and have all the slices the same thickness so that they dry at the same rate. I sliced off the long side, then turned the mango a 1/4 turn and sliced off the next side and just kept turning it until I had sliced everything away from the pit.

Spray the trays of the dehydrator with non-stick cooking spray and lay the slices on the tray. Leave plenty of space around the fruit-the air has to be able to circulate, so don't crowd it. (I think I got my dehydrator at Walmart).

In my dehydrator I found that 5-6 hours was about the right amount of time and that the bottom tray was best left empty (it got too hot). You want the fruit to look dry to the touch (as opposed to wet or juicy looking), but still be very soft and pliable. I'd suggest that your first try be when you are going to be home the whole time so you can check on it. Once you figure out the right timing, you can plan for letting it run without your constant supervision.

Yup, they turned out very tasty. Not quite as soft as the TJ ones, but pretty irresistible (the pineapple is also super yummy).