Monday, March 14, 2016

Happy Pi Day!

Pin It
My day job is all about science and math...so of course I'm going to celebrate Pi Day (and if you consider that 3.14159 rounds to 3.1416, then hooray! Today is 3/14/16).

My good friend introduced me to Pizza Limone and a tasty pizza pie made with prosciutto and blackberry. I already know I like ham and pineapple (and pepperoni and pineapple)-and I like this one even more!
 
 I made the dough using the 60-minute bread dough recipe this morning before work and left it in the fridge. After work, I divided it into 3 balls and made 3 "pi"s. For the first pie I used olive oil as the sauce. The second pizza I used bottled marinara sauce. The last pizza I made with some pepperoni and pineapple. My favorite was the olive oil one, with the super-thin crust.
 
 I baked it at 475 on my pre-heated pizza stone for about 8 minutes (keep an eye on it if the crust is really thin). Dust the bottom of the crust and the baking pan with cornmeal to prevent sticking. I didn't have any fresh basil, but it would be delicious to put on after you take the pizza out of the oven.

Dough
2 1/4 c. flour
3/4 T. instant yeast
3/4 T. salt
1 1/2 T. vegetable oil
1 c. hot water
Cornmeal for dusting under the crust

Mix all the dry ingredients together in the KitchenAid, then add the liquid. Mix it up still it forms a wet, sticky dough. Let it rise on the counter for about 45 minute (or like me, in the fridge for 8 hours).

Toppings 1 oz Prosciutto per pizza
Olive oil and garlic (or marinara sauce)


Mozzarella cheese Blackberries (tossed with a bit of sugar)

Monday, March 7, 2016

Magical T-Shirt Makeover

Pin It


I love Disney-especially princesses, so I'm not sure why it took me so long to see the Cinderella remake last year.  Anyway, I finally got around to seeing it and loved it (ah, that ballgown!)  It was then that I discovered that Kohl's and the LC Conrad clothing line had some Cinderella inspired clothes--but it was too late to find anything but a few clearance items at my store. I really wanted this adorable graphic t-shirt, but there were none to be had. So, I took it as an opportunity to break out the Silhouette cutter and re-learn how to use it, and try heat transfer vinyl.

Inspiration T-shirt
Inspiration T-shirt from Kohls
I chose Ballerina Script.  I bought a 100% cotton tee (the vinyl works on poly/cotton too) and shiny gold Siser EasyWeed heat transfer vinyl.

Decide on the size of the graphic, pick your font (you can use a picture too) and type it up in Silhouette software.  Get it sized the way you like and then use the Mirror feature to reverse your graphic (super important, otherwise your letters will be backwards when you go to iron it on).


Set up your vinyl in the cutter. I set the cut settings for a blue blade (because that is what I have), speed 5 and depth of 24.  I did a test cut with depth 20 and it wasn't quite right and 22 seemed ok--but 24 worked just perfectly.  I used Expressions Vinyl's info sheet to figure out settings.

The vinyl has a clear transfer sheet over the finished face of the vinyl.  On my shiny gold, the back was a less shiny silver color.  I loaded the vinyl gold side down, then let the machine do its job.

Gold side down


Silver side was the back

You'll have to pull away or weed the unwanted vinyl.  Weed slowly, especially if you choose a text or design with lots of curves or small pieces.  You'll probably want a weeding tool (looks like a dental pick) to get at the small bits inside letters.  It took me about 30 minutes to weed the design.

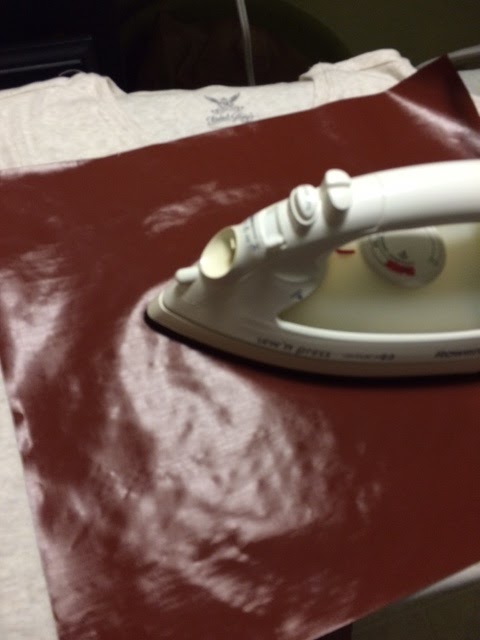
I don't have a big heat press, just my regular Rowenta iron.  The Wool setting is supposed to be around 300 degrees.  The vinyl manufacturer recommends 305-320 for proper adhesion.  I used a laser thermometer to check the temperature of the iron surface (about 315 when I pushed the dial a smidge past "wool").  I pressed down hard for 15 seconds on each section.  My ironing board does not have a padded cover, so I just used the board--but video tutorials I watched suggested using a hard table or board under the iron.  Spend plenty of time with a ruler planning the placement of your decal.  Iron out your shirt before you adhere the vinyl--also make sure there are no fuzzies, specks, hairs etc... on the shirt. 


 I used a teflon sheet between my vinyl and the iron, but I hear parchment paper works too.

Saturday, February 27, 2016

Cheater Faux Pallet Wall

Pin It
I have way too many "inspiration rooms" pinned to my boards for my bedroom.  I really like the idea of a dark accent wall behind my bed--but I've been really enamored of the rustic/modern look of weathered barn wood (I've been re-working my living room and I've built an industrial shelf with lumber and plumbing fittings, post coming eventually).  I also know I'm a commitment-phobe when it comes to decorating. Maybe its more like a short attention span for trends. My last bedroom update resulted in cute wall vinyl decoration.
 

At any rate, I was leaning toward paint since I know I can change it out really easily, as opposed to nailed-on boards.  And then I saw this bulletin board paper at JoAnn Fabric (in the "kids craft" section).

http://www.joann.com/busy-kids-learning-fadeless-designs-weathered-wood/10795243.html#q=wood+paper&start=33
JoAnn

The ideas started flowing.  The paper comes in a roll 12 feet x 4 feet and was only 7.99--if you use your 40% off coupon, it was only $5 a roll including tax.  Bargain!  I might have preferred a darker color wood, but on the plus side, this weathered color blends nicely with the rest of the paint in my room.

I measured my wall 10.5 feet across and its vaulted, so 89.5 inches on one end and 100 inches on the other.  Math was required for this project.  I calculated the rise/run of the slope of my ceiling and found that I needed to slope 4.25 inches for every 4 feet.  I needed 2 rolls of paper, so I opened them both and lined up the "boards" and used a long straight-edge to draw the angle and cut the top of the paper.


I used painters tape and clear thumbtacks to hold up the top while I used a level to make sure things weren't all skiwampus.  Once I got the first sheet up, I tacked up the 2nd sheet and carefully matched all the seams of the boards and smoothed it up on the wall.  I used more painters tape behind the paper.

I cheated behind the headboard--the paper only goes down about 8 inches behind the bed.  That left me with enough of the roll of paper to do the last bit of wall (since the wall is 10 feet and the paper combined to make 8 feet).  I overlapped the paper and once again lined up the boards and tacked it up.

So, for a couple hours total (that includes measuring, math calculations, furniture moving and pinning/taping) I've got a pretty good facsimile of a pallet wall.  I bought two rolls of paper (check that both are in the same dye lot), so I only spent $10 and I still have paper left over-enough for a "headboard" for a twin size bed maybe. 


Friday, January 1, 2016

Personalized Bath Towels

Pin It
Do you have a pile of fabric that you can't part with, but it doesn't seem like enough for a project?  How about this quick one?  My sister-in-law decorated tables with fabric from her favorite fandoms at her wedding reception, and this Dr. Who fabric had a bit left over.  I thought I might be able to do something with it for a Christmas gift, but time was getting tight and I didn't really have it in me to do a big project.  Light-bulb moment--just fancy up an already made item--in this case, bath towels.  But it would work great on flour sack towels for the kitchen too.

Supplies needed

1/3 yard of fabric (maybe less depending on the pattern of the fabric)
2 bath towels
matching thread

Since the towels and the fabric were both 100% cotton, I washed and dried them first so that uneven shrinking wouldn't cause pulled seams.   I ironed the Dr. Who fabric and started measuring. Measure the width of the towel.  Take that measurement and add an inch to the length of your decoration fabric so you'll have room to fold under the ends. 

Decide how tall you want the finished strip to be and add 1 inch (you'll fold over both edges 1/2 inch and iron--it gives you plenty of room to sew your seams). The Tardis pattern was about 3 inches tall, so I cut my fabric 4 inches.


Pin the decoration fabric to the front of your towel (make sure you pin it straight)--fold the short ends under and pin them too.  Next, just sew around all 4 edges.


Now you're done.  Total measuring/cutting/sewing time...15 minutes (for both towels).  My sister-in-law said she thought they were great.

Monday, December 7, 2015

Christmas Handel Messiah Printable

Pin It I was singing at the Christmas devotional for church and we did For Unto Us a Child is Born from Handel's Messiah--which is an awesome piece of music.  (You can check it out here)  I thought it would be a great piece to use for my Christmas art in my seasonal frame on the mantel.  Although truth be told, its been less seasonal this year and more...oh, its probably time to change up the frame, its not Easter any more.  So, if you are looking for a quick way to add some of the real meaning of Christmas to your decorations, give this one a go.  I printed it 8x10, but the file size is big enough that it should be able to print 11x14 without pixelating.  Once you click the link, find the print called Handel Chalkboard.  Merry Christmas!

Link to file, click here.

Saturday, November 21, 2015

Make and Freeze Thanksgiving

Pin It Thanksgiving is a great holiday.  I have great memories of helping prepare food with my mom and my grandmother.  In the last couple years, my mom and I have noticed that even doing dishes as you go all day long, there is still a mountain of dishes at the end of the meal.  I love to cook--but I hate dishes.  Even though I'm not hosting Turkey Day at my house, I love the once-a-year foods for this meal, so I'm cooking my favorites and I'm doing some tricks to make things easier.

Make and Freeze Dressing
Serves 4-5
1 pkg  herbed bread cubes
1/2 c. butter
1 c. onion, chopped (1 medium)
1 c. celery, chopped (2-3 stalks)
1 can low sodium chicken broth (14 oz)
1 tsp. sage (or poultry seasoning)

Chop up the onion and celery finely and saute in the butter in a skillet over medium heat for about 10-12 minutes, until translucent and soft.  In a large mixing bowl, pour the cooked onion mixture over the breadcrumbs and stir.  Slowly pour about half of the chicken broth over bread and mix.  Add more broth until the cubes have absorbed and they are soft but not soggy.  Add the sage and stir.

Here's the time saver--at this point, you have two choices.  1.  Let the mixture come to room temperature, put it in a zipper bag and freeze it.  On Thanksgiving, you can put the mix in the nice baking dish and cover with foil and bake at 350 for about an hour or in a crock pot on low for 2-3 hours (you may need to add a bit more chicken stock as you bake).  2.  You  bake the dressing immediately then freeze and just use the microwave to reheat on meal day.

P.S.  I was watching America's Test Kitchen this morning, and they put their dressing in the bottom of the roasting pan and placed a "deconstructed" turkey (the breast and the thigh/legs) on top and baked it that way for extra turkey flavor.  Looked good to me, I might have to try that. 


Make ahead fruit pie
I'm afraid that pumpkin pie is not my thing--although I can make one (and you can do it the day before).  If you want to do pie the easy way, like me.  Make the fruit pie filling in advance and freeze it in a zipper bag.  When you are ready to make the pie, just put it in the crust and bake.  No, I don't make my own crust--Pillsbury works for me.  You CAN make and freeze an entire pie, before you bake--it just takes about 2 hours to bake from frozen (and you have to shield the edges of the crust so they don't burn).  Here's how I do pie filling for the whole year all at once.  http://theprojectspot.blogspot.com/2011/11/apple-pie-filling-for-now-or-freezer.html


Cranberry Sauce

If you haven't ever made your own cranberry sauce, try it this year.  It takes about 15 minutes and its so delicious.  I did some instructions a few years ago, so give it a go and throw it in the fridge or freezer until Thursday.
http://theprojectspot.blogspot.com/2010/11/homemade-cranberry-sauce.html


Monday, October 5, 2015

Super Light Packing

Pin It

You already know by now that I enjoy traveling and I pack light.  I challenged myself last month for my lightest packing adventure yet.  I was heading to Disneyland--my flight would get me there around 10:00am and my return was the next night around dinner.  Often I stay at a hotel just across the entrance, but this time I did Hotwire and ended up about a mile from the park.  Not that far, but I didn't want to take a shuttle/cab to the hotel, check in early and leave a bag and then get myself to the park (and the reverse would be true the next day--I'd give up park time to head back to to the hotel to get my bag before the airport).  I could have rented a locker at Disneyland for $7 a day both days, but like I said--packing light challenge.  So, how much do you really need for a 32 hour trip?  Turns out, not too much.

I realize that this method probably doesn't work when traveling with small kids, but some of the tips could help cut down on a few things.  I'm a believer of "buy it there if you need it" rather than throwing in everything just in case.  You rarely end up needing it. 

So, here's what I took:
1 regular size cross-body purse
1 t shirt
1 pr underwear
Rain jacket (it folds up into its own pocket, from LL Bean)
Make up:  mascara, eyeliner, eye shadow stick, sponge, blush, moisturizer (I rarely wear more than that anyway)
Deodorant
Toothbrush
Hair pick, ribbon and elastic
iPhone/charger
 
I wore the same pants and the same shoes both days--I do that at home all the time--don't you? No?  Oh well, the jig is up for me then.

Here's how I compacted my toiletries.  You know those tiny zip bags that extra buttons come in when you buy new clothes?  I used those.  I had enough moisturizer for bedtime and getting ready.  For the deodorant, I sliced off a bit and smooshed it around in the zipper bag--then split the bag wide open when I used it and rubbed it on my skin.  Too "redneck"?  Maybe--but it worked.  My toothbrush came prepasted (it was like dehydrated paste, but you could just use a mini zipper bag).  I also did a bag with medicine.  As a bonus, the toothbrush was disposable and the mascara was at its end, so I tossed them before I came home.  Hotels come with shampoo and conditioner, so for one night--it works. 


That's it.  Two days, no luggage and a purse smaller than my everyday bag.  I brought home more than I took with a few souvenirs (it is Disney after all).  I enjoyed every moment in the park!