Pin It
Wow, I found the motherlode for ideas (and many free printables) for subway art for just about any season or occasion! Not sure which one I want to hang up in my house next (a couple I already have :)
Pinterest Subway Art

Tuesday, May 31, 2011

Friday, May 27, 2011
New Outdoor Lights
Pin It

I've had really ugly brass (corroded brass at that) light fixtures outside on my garage. I've finally gotten around to replacing them. Eventually I'll do the ones over the front door too, but not today.


The first fixture took about 40 minutes, the second one about 5 minutes! Swapping sconces is pretty simple.
Turn the power off at the breaker box.
Unscrew the old fixture from the wall.
Undo the wire nuts and pull the fixture off.

I had to add a new mounting bracket since I didn't have one with the old fixture, but if you've already got a bracket, just skip to the next step.
Match the black wire from the new fixture to the black wire in the wall and screw together with the wire nut.
Match the white wire from the new fixture to the white wire in the wall and screw together with the wire nut.
Wrap the plain copper wire (sometimes coated in green plastic) around the green "ground" screw.
Cover it all up with the new fixture and screw it in place (depends on the fixture on how that is going to go).
Ta-da! So much better don't you think? I got these cuties from Lowe's for less than $20 each!
Sunday, May 22, 2011
Coconut Lime Layer Cake-Toppled but Tasty
Pin It
 This is Paula's cake...and mine looked a lot like it, until I drove with it across town, grrr!
I was at the library and I spotted Paula Deen's magazine with this cake on the cover, and it just called to me! First, the cake was very tasty...although I did have a transportation disaster--mine didn't look quite magazine cover ready once I got it to the dinner party I was taking it to--I should have taken a picture BEFORE, oh well. (I give the recipe a bonus since extra coconut and frosting disguised most of the damage). I did make a few cupcakes with the leftover batter and I think I might do a whole batch next time!
Timeline:
Get out 5 sticks of butter to be softening for both the cake and the frosting.
You could make the cakes the day before and freeze them, or make them the morning of.
Make the frosting and frost the cooled cakes.
Refrigerate for an hour before trying to transport the assembled cake to a new location (if you are serving it at your house, then no worries!)
 So this recipe used my KitchenAid stand mixer bowl, plus 2 bowls for separating the eggs and another bowl for the dry ingredients...whew, lots of dishes!
 Cream the butter and sugar until fluffy then add the egg yolks.
 The final batter is very thick, even after folding in the egg whites.
 There is enough batter for 3 layers and then some--but I only had 2 cake pans, so I had to do the first two, then the last one. The leftover batter I used in my mini cupcake pan and got 5 bite size cakes.
 Even though I only filled each pan only about 1/2 full, it still rose really high in the middle, but as it cooled, it dropped (when I inverted the cake onto the cooling rack, it flattened even more). By the time I was ready to frost, I had 3 perfectly flat rounds. The recipe said 18-20 minutes, but the batter in the middle wasn't even close to done at that point, so I ended up going about 29 minutes.

This is my cake at the party AFTER the top layer completely slid off the top, the middle layer broke into 3 pieces and the bottom layer just fell apart! So, learn from my mistake--first, refrigerate the cake for about an hour before moving it...if the frosting isn't soft, it can't slide. Next, use skewers to keep everything in place. The good thing is that once I put it all back together and re-spread some frosting and smooshed more coconut on the sides, it looked pretty good. If you do refrigerate the cake, be sure to let it come to room temperature before serving...with all the butter and coconut milk, the cake gets very firm when cold.
From the March/April Paula Deen Magazine, pg 46
This is Paula's cake...and mine looked a lot like it, until I drove with it across town, grrr!I was at the library and I spotted Paula Deen's magazine with this cake on the cover, and it just called to me! First, the cake was very tasty...although I did have a transportation disaster--mine didn't look quite magazine cover ready once I got it to the dinner party I was taking it to--I should have taken a picture BEFORE, oh well. (I give the recipe a bonus since extra coconut and frosting disguised most of the damage). I did make a few cupcakes with the leftover batter and I think I might do a whole batch next time!
Timeline:
Get out 5 sticks of butter to be softening for both the cake and the frosting.
You could make the cakes the day before and freeze them, or make them the morning of.
Make the frosting and frost the cooled cakes.
Refrigerate for an hour before trying to transport the assembled cake to a new location (if you are serving it at your house, then no worries!)
 So this recipe used my KitchenAid stand mixer bowl, plus 2 bowls for separating the eggs and another bowl for the dry ingredients...whew, lots of dishes!
 Cream the butter and sugar until fluffy then add the egg yolks.
 The final batter is very thick, even after folding in the egg whites.
 There is enough batter for 3 layers and then some--but I only had 2 cake pans, so I had to do the first two, then the last one. The leftover batter I used in my mini cupcake pan and got 5 bite size cakes.
 Even though I only filled each pan only about 1/2 full, it still rose really high in the middle, but as it cooled, it dropped (when I inverted the cake onto the cooling rack, it flattened even more). By the time I was ready to frost, I had 3 perfectly flat rounds. The recipe said 18-20 minutes, but the batter in the middle wasn't even close to done at that point, so I ended up going about 29 minutes.
This is my cake at the party AFTER the top layer completely slid off the top, the middle layer broke into 3 pieces and the bottom layer just fell apart! So, learn from my mistake--first, refrigerate the cake for about an hour before moving it...if the frosting isn't soft, it can't slide. Next, use skewers to keep everything in place. The good thing is that once I put it all back together and re-spread some frosting and smooshed more coconut on the sides, it looked pretty good. If you do refrigerate the cake, be sure to let it come to room temperature before serving...with all the butter and coconut milk, the cake gets very firm when cold.
From the March/April Paula Deen Magazine, pg 46
Coconut-Lime Cake
Makes 1 (9-inch, 3 layer) cake
1 1/2 cups butter, softened
2 cups Domino Granulated Sugar
5 Large Eggland's Best Eggs, separated
1 teaspoon coconut extract
1 teaspoon vanilla extract ( I used vanilla paste with bean seeds)
3 1/2 cups all-purpose flour
1 teaspoon baking powder
1/2 t baking soda
1/2 teaspoon salt
1 1/4 cups coconut milk
1 cup buttermilk
Luscious Lime Frosting (recipe follows)
Coconut flakes for decorating (I used Nutty Guys, which I found at Dan's Foods)
1. Preheat oven to 350 degrees. Spray (9-inch) cake pans with nonstick baking spray with flour.
2. In a large bowl, beat butter and sugar at medium speed with a mixer until fluffy. Add egg yolks and extracts,beating until combined.
3. In a medium bowl, combine flour, baking powder, baking soda, and salt.
4. In a small bowl, combine coconut milk and buttermilk. Gradually add flour mixture to butter mixture alternately with coconut milk mixture, beginning and ending with flour mixture, beating just until combined after each addition.
5. In a medium bowl, beat egg whites until stiff peaks form. Gently fold into batter. Spoon batter into prepared pans, and bake for 18 to 20 minutes. (Note: I needed almost 30 minutes for my cakes) or until a wooden pick inserted in center comes out clean. Let cool in pans for
10 minutes. Remove from pans, and cool completely on wire racks.
6. Spread Luscious Lime Frosting between layers and on top and sides
of cake. Press coconut flakes around edge of cake. Garnish with fresh berries and lime slices; if desired. Chill until ready to serve.
Luscious Lime Frosting
Makes about 5 Cups
1 cup butter, softened
1 teaspoon lime zest (pretty much all the zest on one lime)
1/4 cup fresh lime juice (I got this out of 2 limes)
5 cups Domino Confectioners' Sugar
1 (8 ounce) container frozen whipped topping, thawed
1. In a large bowl, beat butter, lime
zest, and lime juice at medium speed
with a mixer until combined. Gradually
add confectioners' sugar, beating until
smooth. Add whipped topping, beating
until combined. Lick fingers :)
Monday, May 16, 2011
Dried Mango & Pineapple
Pin It

This post combines two experiences, Costco...the place where I can't get out the door without spending $100, and Trader Joe's, a fun new experience for me (wish they had one here). I had been enjoying the dried mangoes from Trader Joe's...they are so tasty and soft and chewy and thought maybe I should dig out my dehydrator from the basement and try doing some myself. I had gone to Costco and they had cases of mangoes for only $5.99! (I picked up a pineapple too, another fruit that I really love).
Turns out, mangoes dry up pretty nice, but it took me 3 tries to find the right amount of time to get fruit that was dry, but not crispy (started with 10 hours, but they turned out like mango chips, tried 8 hours overnight, but even though they seemed pliable, when they cooled off, again, crispy, 5-6 hours was about right). I didn't add anything to the fruit...just sliced it and put it in the dehydrator.

Use ripe mangoes (if they aren't soft and sweet now, they won't be tasty dried either). I peeled them and then sliced them about 1/4 inch thick (maybe a bit thinner-the pineapple about the same, but you don't want to slice it too thin, otherwise, you get mango chips instead of chewy mango). The fruit will shrink considerably. Its important to try and have all the slices the same thickness so that they dry at the same rate. I sliced off the long side, then turned the mango a 1/4 turn and sliced off the next side and just kept turning it until I had sliced everything away from the pit.

Spray the trays of the dehydrator with non-stick cooking spray and lay the slices on the tray. Leave plenty of space around the fruit-the air has to be able to circulate, so don't crowd it. (I think I got my dehydrator at Walmart).
In my dehydrator I found that 5-6 hours was about the right amount of time and that the bottom tray was best left empty (it got too hot). You want the fruit to look dry to the touch (as opposed to wet or juicy looking), but still be very soft and pliable. I'd suggest that your first try be when you are going to be home the whole time so you can check on it. Once you figure out the right timing, you can plan for letting it run without your constant supervision.
 Yup, they turned out very tasty. Not quite as soft as the TJ ones, but pretty irresistible (the pineapple is also super yummy).

This post combines two experiences, Costco...the place where I can't get out the door without spending $100, and Trader Joe's, a fun new experience for me (wish they had one here). I had been enjoying the dried mangoes from Trader Joe's...they are so tasty and soft and chewy and thought maybe I should dig out my dehydrator from the basement and try doing some myself. I had gone to Costco and they had cases of mangoes for only $5.99! (I picked up a pineapple too, another fruit that I really love).
Turns out, mangoes dry up pretty nice, but it took me 3 tries to find the right amount of time to get fruit that was dry, but not crispy (started with 10 hours, but they turned out like mango chips, tried 8 hours overnight, but even though they seemed pliable, when they cooled off, again, crispy, 5-6 hours was about right). I didn't add anything to the fruit...just sliced it and put it in the dehydrator.
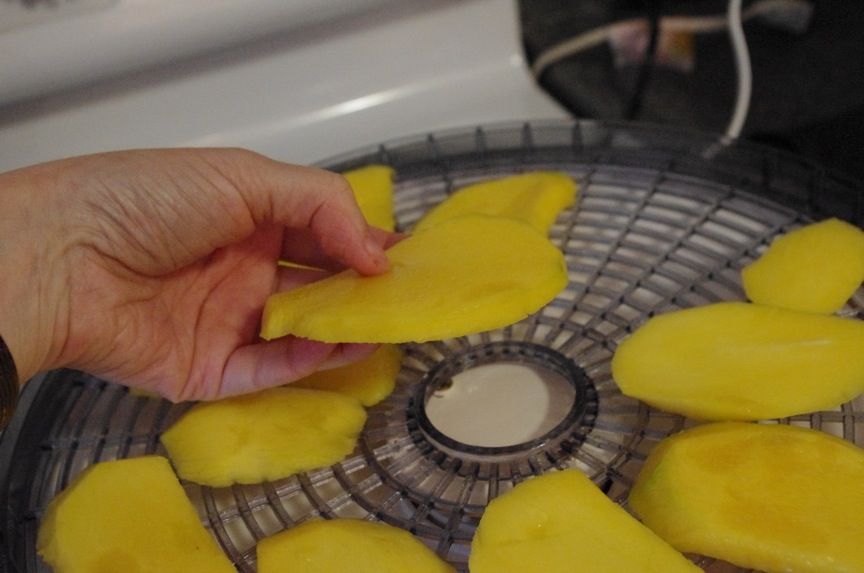
Use ripe mangoes (if they aren't soft and sweet now, they won't be tasty dried either). I peeled them and then sliced them about 1/4 inch thick (maybe a bit thinner-the pineapple about the same, but you don't want to slice it too thin, otherwise, you get mango chips instead of chewy mango). The fruit will shrink considerably. Its important to try and have all the slices the same thickness so that they dry at the same rate. I sliced off the long side, then turned the mango a 1/4 turn and sliced off the next side and just kept turning it until I had sliced everything away from the pit.

Spray the trays of the dehydrator with non-stick cooking spray and lay the slices on the tray. Leave plenty of space around the fruit-the air has to be able to circulate, so don't crowd it. (I think I got my dehydrator at Walmart).
In my dehydrator I found that 5-6 hours was about the right amount of time and that the bottom tray was best left empty (it got too hot). You want the fruit to look dry to the touch (as opposed to wet or juicy looking), but still be very soft and pliable. I'd suggest that your first try be when you are going to be home the whole time so you can check on it. Once you figure out the right timing, you can plan for letting it run without your constant supervision.
 Yup, they turned out very tasty. Not quite as soft as the TJ ones, but pretty irresistible (the pineapple is also super yummy).
Tuesday, May 10, 2011
Baby Bib Upcycle
Pin It
 I found another blog called A Little Tipsy (seriously...some nights I bounce from one to another and all of a sudden its time for bed), and I loved her projects during her "Baby Week", so I gave the t-shirt bib upcyle a shot. So clean out your t-shirt pile (or snag a bunch of cheap ones at the yard sales that are starting to pop up now that the snow has melted). For the full tutorial, head on over to A Little Tipsy
 I found another blog called A Little Tipsy (seriously...some nights I bounce from one to another and all of a sudden its time for bed), and I loved her projects during her "Baby Week", so I gave the t-shirt bib upcyle a shot. So clean out your t-shirt pile (or snag a bunch of cheap ones at the yard sales that are starting to pop up now that the snow has melted). For the full tutorial, head on over to A Little Tipsy
Cut out the pattern (which you'll only use as a general guide). I folded the shirt in half along the front so that I could just print half the pattern then line up the pattern along the fold. I used a microfiber towel from the dollar store for the backing. Pin and sew the pieces together leaving a gap so you can turn it (if you have a serger, I'd probably just sew it right sides out and call it good). I used a snap instead of velcro since that is what I had on hand. Now, who has a slobbery kid who needs a new bib?


Tuesday, May 3, 2011
Lemon Meringue Pie
Pin It

I hosted Easter dinner this year, and for dessert, I made my dad's favorite, Lemon Meringue Pie. Of course, I made it because I love him (not because this is one dessert that never fails me!) My good old Betty Crocker cookbook recipe works every time.
OK, first thing I admit is that I cannot make pie crust. Despite my grandmother's best efforts, I can't do it, so I cheat. I use a box mix...you do have to use a bowl and a rolling pin, so it almost homemade and I think it tastes great (and you can make those yummy cinnamon and sugar pie crust cookies with the leftover bits).

Meringue
3 egg whites
1/4 tsp cream of tartar
6 Tb sugar
1/2 tsp vanilla
In a 2 1/2 qt mixing bowl beat egg whites and cream of tartar until foamy. Add sugar 1 T at a time. Continue beating until stiff and glossy. Add vanilla.
Pie
9" baked pie shell
1 1/2 C. sugar
1/3 C. plus 1 T cornstarch
1 1/2 C. water
3 egg yolks, slightly beaten
3 T. butter
2 tsp lemon zest
1/2 C. lemon juice
Bake the pie shell. Make the meringue. Preheat oven to 400. Now make the lemon filling. Mix sugar and cornstarch in a saucepan ( 1 1/2 qt). Gradually add the water. Cook over medium heat, stirring constantly until mixture thickens and boils. Boil and stir for 1 minute. Slowly pour at least half of the hot mixture into the eggs (you need to be pouring a thin stream of hot mixture while quickly stirring it into the eggs). Now pour it all back into the saucepan and return to heat. Bring back to boil and boil & stir for 1 minute. Remove from heat. Add the butter, lemon juice and zest. Pour into the pie shell.
Spread the meringue over the hot filling, sealing it to the edge of the crust. Bake about 8 minutes until the meringue is golden brown. Let cool completely on the counter and then refrigerate.


Subscribe to:
Posts (Atom)