Sunday, September 25, 2011
Interchangable Magnetic Necklace
I've had some fun making magnets or necklaces using Diamond Glaze and scrapbook paper (or photos)--so why not combine the two? A co-worker had some earrings that had the same premise (although fancier than a bottle cap) that I used as inspiration. Now I can switch out my necklace depending on my mood or outfit :)
You'll need:
Bottlecap necklace blank (Hobby Lobby)
Round magnets
Diamond Glaze
Patterned paper or photo
This was a super fast, super easy project (and very inexpensive--the magnets were 1.99 for 6, but I had a 40% off coupon and the bottlecap necklace was on sale for 4/$1). I looked at some other necklace blanks that were flat, but I was concerned that the magnet could get knocked off.
First, find the scrapbook paper that you like and roughly cut out a circle a bit larger than the magnet. Flip the piece of scrapbook paper upside down and spread a thin layer of the Diamond Glaze (you could use any glue here, but to keep things simple, I just use the glaze). Press the magnet into the glue. Let it set for about a minute, then use scissors to trim around the edges.
Make sure you don't have any excess glue dripping down and flip the magnet over so that the paper side is now up. Puddle some Diamond Glaze on top of the patterned paper and smooth out (I use a bit of cardstock, or in this case packaging from the bottle caps) as a spreader. Go slow and make sure that you don't have any air bubbles. Careful, if you are doing more than one pendant at a time, keep them apart--if two magnets with wet Diamond Glaze get close together...not so good (not that I learned that the hard way or anything). Let dry for a couple hours (or overnight).
Thread a chain through the bottlecap and decide which magnet to pop in! That's it :) Try it out for different holidays (or make an advent necklace!) or to switch up between favorite sports teams or your school mascot.
Washstand Repaint
I ran across this sturdy table at a thrift store and decided I could probably put it to use. After scrubbing, I debated whether or not to leave it stained or painted. It was pretty rough, so I tried some wood restorer that did wonders on another project...but it didn't look right on this project. So, paint it is. That $3.00 sampler of Martha Stewart teal paint sure has gone a long way (this is project #3).
Before:
A couple coats of paint. Then some sanding (all the paint covered up some of its "character"). Then I used some chocolate brown glaze to tone down the color and emphasize some of the dings and dents. Really, it turned out great.
I haven't found a permanent place for it yet. I've got some ideas, like as a storage station for a basket of socks, or as a stand for drinks at a party, but right now its a charging station for my iPad.
Friday, September 2, 2011
Metal cabinet repaint
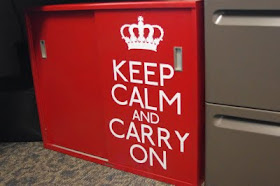
I work in a cubicle. A gray cubicle. I do have a window, which is great, but my view is of the wall of the other building. Oh well. So, in my gray cubicle is a metal cabinet that I thought could use some sprucing up! So, I hauled it home and went to work on it.
First, I used my sander to scuff up the surface then I washed it really well and dried it. I took the doors off and the hardware and used painter's tape to cover the brand name label (Steelcage) on the bottom. I used Krylon Fusion paint in Hot Pepper. It took about 1 1/2 cans. I did not paint the inside, so I used some newspaper to cover up the door track and block overspray from getting inside.
After I let it dry (had to go grab it out in the yard in the middle of the night when the thunder storms were threatening-ha ha, me in my PJ's dragging it back into the garage) for a couple days I got to getting the vinyl ready. I had a hard time deciding what to do on the doors. I thought about quatrefoil, or intersecting circles or maybe some typography or even scientific formulas (since I am a science nerd for work)--but things are always a bit crazy around my office with huge projects, tight deadlines and low funding, so this one seemed most appropriate. I measured the space on the door (decided that I'd just do one door, 2 seemed like overkill) and left space at the top, bottom and sides for the tracks. I planned it out in my Silhouette software and let it cut while I waited for the cable man to show up (yup, 15 minutes before his 2 hour window was up, he came. Typical). I used a yardstick and chalk to mark my lines.
So it adds a nice pop of color to my office (I should probably work on getting the piles of papers taken care of, but oh well). I love the transformative power of spray paint!